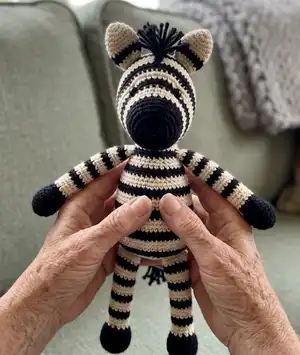
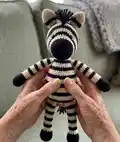
Make Xander the Zebra, a striped amigurumi friend that is perfect for gifting or keeping. You will enjoy the clean, photo-assisted instructions and clear shaping notes that guide you round by round. This pattern focuses on color changes, shaping and simple assembly so you can create a cuddly, poseable zebra with charming details.
Progress Tracker
0% Complete
— Head :
Round 3 :
(sc, inc) x 6 (18)
Round 4 :
(inc, sc 2) x 6 (24)
Round 5 :
(sc 7, inc) x 3 (27)
Round 6 :
sc in each st (27)
Round 7 :
sc 3, inc, (sc 8, inc) x 2, sc 5 (30)
Round 8 :
sc in each st (30)
Round 9 :
With white yarn: (sc 9, inc) x 3 (33)
Round 10 :
sc in each st (33)
Round 11 :
With black yarn: sc 4, inc, (sc 10, inc) x 2, sc 6 (36)
Round 12 :
sc 2, inc, (sc 5, inc) x 5, sc 3 (42)
Info :
On round 13 place a stitch marker in the 24th stitch to mark the center of the face. Use it as guide when placing the eyes.
Round 13 :
With white yarn: (sc 6, inc) x 6 (48)
Round 14 :
sc 18, inc, sc 8, inc, sc 20 (50)
Round 15 :
sc 21, inc, sc 5, inc, sc 22 (52)
Round 16 :
With black yarn: (sc 25, inc) x 2 (54)
Round 17 :
sc 23, inc, sc 4, inc, sc 25 (56)
Info :
Attach safety eyes between rows 13 and 14, leaving 16 stitches (count 15 holes) between them (see page 9).
Round 18-20 :
With white yarn: sc in each st (56)
Round 21-22 :
With black yarn: sc in each st (56)
Round 23-24 :
With white yarn: sc in each st (56)
Round 25 :
sc 5, dec, (sc 12, dec) x 3, sc 7 (52)
Round 26 :
With black yarn: (sc 11, dec) x 4 (48)
Round 27 :
sc 4, dec, (sc 10, dec) x 3, sc 6 (44)
Info :
Sc in next stitch, count it as the end of the round from now on.
Info :
Start stuffing the head. Keep adding a bit of fiberfill after every few rounds, stuffing the head firmly.
Round 28 :
With white yarn: (sc 9, dec) x 4 (40)
Round 29 :
sc 3, dec, (sc 8, dec) x 3, sc 5 (36)
Round 30 :
(sc 7, dec) x 4 (32)
Round 31 :
With black yarn: sc 2, dec, (sc 6, dec) x 3, sc 4 (28)
Round 32 :
(sc 5, dec) x 4 (24)
Info :
Sc in next stitch, count it as the end of the round from now on.
Round 33 :
With white yarn: (dec, sc 2) x 6 (18)
Round 34 :
(sc, dec) x 6 (12)
Info :
Finish stuffing the head. Cut the yarn, leaving a long yarn tail, and fasten off. Pick up all the remaining stitches and close the opening (see page 9).
— Ears (make 2) :
Round 1 :
With white yarn: mr, sc 6 (6)
Round 2 :
(inc, sc) x 3 (9)
Round 3 :
(sc 2, inc) x 3 (12)
Round 4 :
sc, inc, (sc 3, inc) x 2, sc 2 (15)
Round 5 :
(sc 4, inc) x 3 (18)
Round 6 :
sc 2, inc, (sc 5, inc) x 2, sc 3 (21)
Round 7-11 :
sc in each st (21)
Round 12 :
sc 5, dec, sc 14 (20)
Round 13 :
sc in each st (20)
Info :
Sl st in next stitch. Cut the yarn, leaving a long yarn tail for sewing, and fasten off. Do not stuff the ears.
— Left Arm :
Round 1 :
With black yarn: mr, sc 7 (7)
Round 3 :
(sc, inc) x 7 (21)
Round 4 :
bpsc in each st (21)
Round 5 :
sc 9, dec, sc 4, dec, sc 4 (19)
Round 6 :
sc 11, dec, sc 6 (18)
Round 7 :
sc 6, dec, sc 7, dec, sc (16)
Info :
Start stuffing the arm. Keep adding a bit of fiberfill after every few rounds, stuffing the arms firmly.
Round 8 :
With white yarn: sc 8, dec, sc, dec, sc 3 (14)
Round 9 :
sc in each st (14)
Round 10 :
sc 9, dec, sc 3 (13)
Round 11 :
With black yarn: sc in each st (13)
Round 12 :
sc 9, dec, sc 2 (12)
Info :
Sc in next stitch, count it as the end of the round from now on.
Round 13-15 :
With white yarn: sc in each st (12)
Round 16-17 :
With black yarn: sc in each st (12)
Round 18-20 :
With white yarn: sc in each st (13)
Round 21-22 :
With black yarn: sc in each st (13)
Round 23-25 :
With white yarn: sc in each st (12)
Round 26-27 :
With black yarn: sc in each st (12)
Round 28-30 :
With white yarn: sc in each st (12)
Info :
Attach the joint between rows 28 and 29, placing it so the stem is facing straight towards the body (see page 11).
Round 31 :
sc 2, dec x 5 (7)
Info :
Finish stuffing the arm. Cut the yarn, leaving a long yarn tail, and fasten off. Pick up all the remaining stitches and close the opening (see page 9).
— Right Arm :
Round 1 :
With black yarn: mr, sc 7 (7)
Round 3 :
(sc, inc) x 7 (21)
Round 4 :
bpsc in each st (21)
Round 5 :
sc 3, dec, sc 4, dec, sc 10 (19)
Round 6 :
sc 5, dec, sc 12 (18)
Round 7 :
(dec, sc 7) x 2 (16)
Info :
Start stuffing the arm. Keep adding a bit of fiberfill after every few rounds, stuffing the arms firmly.
Round 8 :
With white yarn: sc 2, dec, sc, dec, sc 9 (14)
Round 9 :
sc in each st (14)
Round 10 :
sc 3, dec, sc 9 (13)
Round 11 :
With black yarn: sc in each st (13)
Round 12 :
sc 3, dec, sc 8 (12)
Info :
Sc in next stitch, count it as the end of the round from now on.
Round 13-15 :
With white yarn: sc in each st (12)
Round 16-17 :
With black yarn: sc in each st (12)
Round 18-20 :
With white yarn: sc in each st (13)
Round 21-22 :
With black yarn: sc in each st (13)
Round 23-25 :
With white yarn: sc in each st (14)
Round 28-29 :
With black yarn: sc in each st (14)
Info :
Attach the joint between rows 28 and 29, placing it so the stem is facing straight towards the body (see page 11).
Round 31 :
sc 2, dec x 5 (7)
Info :
Finish stuffing the arm. Cut the yarn, leaving a long yarn tail, and fasten off. Pick up all the remaining stitches and close the opening (see page 9).
— Left Leg :
Round 1 :
With black yarn: mr, sc 7 (7)
Round 3 :
(sc, inc) x 7 (21)
Round 4 :
(inc, sc 2) x 7 (28)
Round 5 :
bpsc in each st (28)
Round 6 :
sc 15, dec, sc 4, dec, sc 5 (26)
Round 7 :
sc 12, dec, (sc 3, dec) x 2, sc 2 (23)
Round 8 :
dec, sc 6, dec, sc 13 (21)
Round 9 :
sc 11, dec, sc 4, dec, sc 2 (19)
Info :
Start stuffing the leg. Keep adding a bit of fiberfill after every few rounds, stuffing the legs firmly.
Round 10 :
With white yarn: sc, (dec, sc 4) x 3 (16)
Round 11 :
sc in each st (16)
Round 12 :
sc 4, dec, sc 10 (15)
Round 13 :
With black yarn: sc in each st (15)
Round 14 :
sc 4, dec, sc 9 (14)
Info :
Sc in next stitch, count it as the end of the round from now on.
Round 15-17 :
With white yarn: sc in each st (14)
Round 18-19 :
With black yarn: sc in each st (14)
Info :
Sc in next stitch, count it as the end of the round from now on.
Round 20-22 :
With white yarn: sc in each st (14)
Round 23-24 :
With black yarn: sc in each st (14)
Round 25-27 :
With white yarn: sc in each st (14)
Round 28-29 :
With black yarn: sc in each st (14)
Info :
Attach the joint between rows 31 and 32, placing it so the stem is facing straight towards the body (see page 11).
Round 33 :
sc 2, dec, sc 5, dec, sc 3 (12)
Round 34 :
sc 2, dec x 5 (7)
Info :
Finish stuffing the leg. Cut the yarn, leaving a long yarn tail, and fasten off. Pick up all the remaining stitches and close the opening (see page 9).
— Right Leg :
Round 1 :
With black yarn: mr, sc 7 (7)
Round 3 :
(sc, inc) x 7 (21)
Round 4 :
(inc, sc 2) x 7 (28)
Round 5 :
bpsc in each st (28)
Round 6 :
sc 5, dec, sc 4, dec, sc 15 (26)
Round 7 :
sc 2, dec, (sc 3, dec) x 2, sc 12 (23)
Round 8 :
sc 13, dec, sc 6, dec (21)
Round 9 :
sc 3, dec, sc 4, dec, sc 10 (19)
Info :
Start stuffing the leg. Keep adding a bit of fiberfill after every few rounds, stuffing the legs firmly.
Round 10 :
With white yarn: (sc 4, dec) x 3, sc (16)
Round 11 :
sc in each st (16)
Round 12 :
sc 4, dec, sc 10 (15)
Round 13 :
With black yarn: sc in each st (15)
Round 14 :
sc 4, dec, sc 9 (14)
Info :
Sc in next stitch, count it as the end of the round from now on.
Round 15-17 :
With white yarn: sc in each st (14)
Round 18-19 :
With black yarn: sc in each st (14)
Round 20-22 :
With white yarn: sc in each st (14)
Round 23-24 :
With black yarn: sc in each st (14)
Round 25-27 :
With white yarn: sc in each st (14)
Round 28-29 :
With black yarn: sc in each st (14)
Round 30-32 :
With white yarn: sc in each st (14)
Round 33 :
sc 2, dec, sc 5, dec, sc 3 (12)
Round 34 :
sc 2, dec x 5 (7)
Info :
Finish stuffing the leg. Cut the yarn, leaving a long yarn tail, and fasten off. Pick up all the remaining stitches and close the opening (see page 9).
— Body :
Round 1 :
With white yarn: mr, sc 6 (6)
Round 3 :
(sc, inc) x 6 (18)
Round 4 :
inc, sc, with black yarn: sc, (inc, sc 2) x 5 (24)
Round 5 :
(sc 3, inc) x 6 (30)
Round 6 :
sc, inc, sc 3, with white yarn: sc, inc, (sc 4, inc) x 4, sc 3 (36)
Round 7 :
sc 3, inc, (sc 8, inc) x 3, sc 5 (40)
Round 8 :
(sc 9, inc) x 4 (44)
Info :
Sc in next 8 stitches. Count the last sc as the end of the round from now on.
Round 9-10 :
With black yarn: sc in each st (44)
Round 11-13 :
With white yarn: sc in each st (44)
Round 14-15 :
With black yarn: sc in each st (44)
Info :
Turn the body so the end of the round is at your zebra's left hand side. Attach the legs to the sides of the body, between rounds 9 and 10 (see page 12).
Round 16 :
With white yarn: (sc 10, dec) x 2, (sc 8, dec) x 2 (40)
Round 17 :
sc 4, dec, (sc 8, dec) x 3, sc 4 (36)
Round 18 :
(dec, sc 7) x 4 (32)
Round 19 :
With black yarn: sc in each st (32)
Round 20 :
sc 8, dec, sc 22 (31)
Info :
Sc in next stitch, count it as the end of the round from now on.
Info :
Start stuffing the body. Keep adding a bit of fiberfill after every few rounds, stuffing the body firmly.
Round 21 :
With white yarn: sc 22, dec, sc 7 (30)
Round 22 :
(sc 4, dec) x 2, sc 18 (28)
Round 23 :
sc 14, dec, sc 10, dec (26)
Round 24 :
With black yarn: sc 6, dec, sc 11, dec, sc 5 (24)
Round 25 :
sc in each st (24)
Round 26 :
With white yarn: (sc 3, dec) x 2, sc 14 (22)
Round 27 :
sc in each st (22)
Round 28 :
dec, sc 7, dec, sc 11 (20)
Info :
Start stuffing the body. Keep adding a bit of fiberfill after every few rounds, stuffing the body firmly.
Round 29 :
With white yarn: sc in each st (20)
Round 30-32 :
With white yarn: sc in each st (20)
Info :
Attach the arms to the sides of the body, between rounds 28 and 29 (see page 12).
Round 31-32 :
With white yarn: sc in each st (20)
Info :
Sl st in next stitch. Cut the yarn, leaving a long yarn tail for sewing, and fasten off.
Info :
Attach the arms to the sides of the body, between rounds 28 and 29 (see page 12). Finish stuffing the body.
— Tail :
Round 1 :
With white yarn: mr, sc 5 (5)
Round 2-4 :
sc in each st (5)
Info :
Start stuffing the tail. Keep adding a bit of fiberfill after every few rounds, stuffing the tail lightly.
Round 5 :
With black yarn: sc 2, inc, sc 2 (6)
Info :
Sc in next stitch, count it as the end of the round from now on.
Round 6-7 :
With white yarn: sc in each st (6)
Round 8 :
With black yarn: sc in each st (6)
Round 9 :
With black yarn: sc 2, inc, sc 3 (7)
Info :
Sl st in next stitch. Cut the yarn, leaving a long yarn tail for sewing, and fasten off. Finish stuffing the tail.
— Mane & Tail (attachment) :
Info :
Attach pieces of yarn to the head and back to form the mane and to the tip of the tail. Cut pieces about 2.5 times longer than you want the mane to be. Insert the hook under a stitch, fold a piece of yarn in half, grab the center and draw up a loop and pull tails through, knot and trim as desired.
— Assembly & Finishing :
Info :
Sew the ears to the head just behind round 19 leaving 11-12 stitches between them. Flatten the ears and sew them in a V-shape. Sew head to body placing the front edge just behind round 14 of the head. Sew tail to the body over round 9 and attach mane pieces around the head and down the back following the stripes. Use mattress or whip stitch to sew open pieces closed and hide yarn tails inside pieces.
Bring Xander the Zebra to life with careful striping, shaping and a fluffy mane — a handmade friend full of charm and personality. This pattern has clear step-by-step photos and helpful technique pages to guide you through each stage. Make one for yourself or as a heartfelt gift and enjoy the smile it brings. 🧶🧸