About This Octopus Surprise Amigurumi Pattern
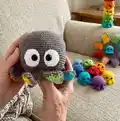
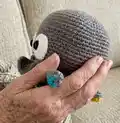
This pattern creates a delightful big octopus with eight tiny mini octopuses hidden on its arms for a colorful surprise. The design combines simple amigurumi construction with small row-work arm pieces to add playful texture and color. You will make the inside lining, join colored arm pieces, and assemble eyes and details for a finished cuddly companion.

Detailed round-by-round and row-by-row instructions are included for all pieces. The pattern uses fingering weight cotton and a 2.5 mm hook for a neat finish and clear shaping.
Why You'll Love This Octopus Surprise Amigurumi Pattern
I absolutely love this pattern because it brings together a surprised reveal and cute faces in one project, which always delights both makers and recipients. I enjoy the mix of simple spherical shaping with small row-based arm pieces — it keeps the work interesting without being overwhelming. The color play is one of my favorite parts; each tiny octopus can be a different bright hue to create a rainbow effect. Sewing everything together and seeing the little octopuses peeking out is wonderfully satisfying and makes me smile every time.
Switch Things Up
I love customizing this pattern by changing color palettes — try pastel shades for a soft nursery set or bright primaries for a playful kids collection.
To make a larger version, I change to a DK or worsted weight yarn and increase my hook size accordingly; this gives a chunkier, cuddlier octopus.
I sometimes add tiny embroidered mouths or blush using a small dab of fabric paint to give each mini octopus more personality.
For a whimsical version, I use variegated yarn for the arm pieces so each arm tip has a subtle color shift and unique look.
If you want posable arms, I add thin craft wire inside the arm pieces before joining and secure ends to prevent poking through.
I also experiment with eye types — felt appliques, embroidered eyes, or safety eyes of different sizes change the final expression dramatically.
Turn the mini octopuses into keychains by attaching a small jump ring and keyring before finishing off the top round.
Try using cotton blend yarn for a softer feel or anti-pilling acrylic for toys that need to withstand heavier play.
I sometimes make a set in monochrome tones for a modern home display, then accent one arm in a bold color to create a focal point.
When gifting, I like to stitch a tiny loop to the top of the big octopus and hang a mini on a ribbon so they can be displayed as a mobile or nursery decoration.
Common Mistakes & How to Fix Them
✗ Skipping stitch markers when marking the inside and arm positions can cause misaligned arms; place markers in the 8 indicated stitches with 5 stitches between each as instructed.
✗ Not attaching the colored arm piece with RW1 aligned to RW1 of the octopus arm can make the join look uneven; position the colored piece on top so the first row lines up exactly before crocheting them together.
✗ Pulling yarn tails through too early may leave bulky lumps between layers; tug and weave colored ends in carefully between the octopus and the inside after assembly and tidy them with a hook if necessary.
✗ Forgetting to use the front loop/back loop instructions for the arm rows can change the arm shape; follow the instructions to work in FLO or BLO as stated to get the correct texture and placement.