🧢 Beautiful ✨ Detailed πŸ’ Adorable

The Boho Bag Saver Pattern

The Boho Bag Saver Pattern
4.2β˜… Rating
2-4 Hours Time Needed
2.3K Made This
βœ‚οΈ

Intermediate Level

Ideal for those with basic crochet experience, featuring slightly more advanced stitches and techniques to expand your skills.

⏱️

Bite-Sized Project

Finishes in 2-4 hoursβ€”perfect for an afternoon of creative relaxation.

✨

Stylish Touch

An elegant detail to elevate any look, combining traditional techniques with contemporary design sensibilities.

About This The Boho Bag Saver Pattern

This pattern creates a decorative and functional boho bag saver designed to hold grocery or plastic bags neatly. It features a round base that fits a hair elastic and an openwork V-stitch body for a light, airy look. The finished design measures approximately 4.5" wide by 24" long and includes instructions for a beaded tassel finish.

The Boho Bag Saver Pattern crochet pattern - detailed view of completed project

Worked in rounds from a covered hair elastic, the body alternates V-stitch rounds and shaping rounds for a balanced open pattern. The pattern supports DK or worsted weight yarn and includes gauge notes and finishing instructions.

Why You'll Love This The Boho Bag Saver Pattern

I absolutely love this pattern because it marries function with style β€” it stores bags neatly while looking like a boutique accessory. I enjoy the rhythmic change between textured rounds and airy V-stitch rounds; it keeps the making process interesting without being complicated. The pattern is versatile so I can quickly make different colorways and finishes for gifts or market items. Seeing the finished tassel and bead detail always makes me smile because it feels like a little ceremony to finish the piece.

The Boho Bag Saver Pattern step 1 - construction progress The Boho Bag Saver Pattern step 2 - assembly progress The Boho Bag Saver Pattern step 3 - details and accessories The Boho Bag Saver Pattern step 4 - final assembly and finishing

Switch Things Up

I love how easy it is to customize this pattern by changing yarn weight; try bulky yarn and a larger hook for a chunkier, more rustic look.

I sometimes make a mini version using fingering yarn and a smaller hook to create a tiny bag-saver keychain for gifts.

I often swap the wooden bead for a colorful glass or ceramic bead to give each piece a unique accent and personality.

I like to experiment with ombre or variegated yarns so the V-stitch mesh shows subtle color transitions through the bag saver.

I also create a lined version by stitching a simple fabric tube to the inside for added durability and to protect delicate bags.

I recommend trying metallic or sparkly yarn for a festive holiday version that doubles as decorative storage for gift wrap scraps.

I sometimes replace the hair elastic with a fabric-covered elastic or ribbon loop if I want a softer top edge and different hanging look.

I enjoy adding small crocheted flowers or appliques to the front panel for a personalized touch, stitching them on after finishing.

I occasionally add a loop and button closure near the ch-12 loop so the top can be closed for a neater appearance when not in use.

I like to make sets in coordinating colors β€” one for the pantry, one for the laundry room β€” so they act as both storage and decor in different spaces.

I sometimes adapt the length by adding or removing V-stitch repeats (rounds 6-7) to make a longer or shorter saver depending on how many bags I want to store.

I love using up leftover yarn by making tassels in contrasting hues to give each bag saver a playful finishing detail.

Common Mistakes & How to Fix Them

βœ— Not covering the hair elastic completely can cause gaps and uneven shape; ensure your hdc round completely covers the elastic without ruffling and restart if necessary. βœ— Forgetting that the beginning ch-2 does not count as a stitch can throw off stitch counts; always count actual stitches and remember the note after Round 2. βœ— Working with inconsistent tension causes the open V-stitch section to look uneven; keep a steady, slightly firm tension on the V-stitch rounds for consistent mesh. βœ— Skipping the gauge check after Round 2 can result in an incorrect base diameter; measure the base and adjust hook size before continuing if it does not match. βœ— Attaching the tassel asymmetrically can look off-center; count rounds and place the Larks knot centered to the ch-12 loop (st 25) as instructed.

The Boho Bag Saver Pattern

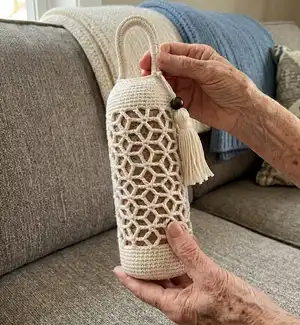
Make a modern, functional boho-style grocery bag holder that looks beautiful on display. This design uses simple V-stitches and rounds built around a hair elastic to create an airy, decorative holder that keeps plastic bags neat. The pattern includes full round-by-round instructions plus a beaded tassel finish to personalize your project.

Intermediate 2-4 Hours

Materials Needed for The Boho Bag Saver Pattern

β€” Main Fabric

  • 01
    150-175 yards of DK weight yarn (size 3), recommended for the lighter, airy version (approx. 150-175 yd).
  • 02
    150-175 yards of worsted weight yarn (size 4) as an alternative (author used Lion Brand Comfy Cotton Blend).
  • 03
    Color example: Whipped Cream (Lion Brand Comfy Cotton Blend) shown in photos.
  • 04
    Alternate worsted weight colors used in samples: Sleight Gray and Black (Hobby Lobby ILTY).
  • 05
    Optional: small amounts of contrasting color for tassel or trim

β€” Tools Required

  • 01
    Crochet hook size 5.0 mm (H)
  • 02
    Regular sized hair elastic (preferably a new one), the thicker kind (do not use a stretched elastic)
  • 03
    15-20 mm wooden bead (optional)
  • 04
    4" piece of cardboard (optional, for making tassels)
  • 05
    Scissors
  • 06
    Tape measure
  • 07
    Yarn needle for weaving ends and sewing tassel
  • 08
    Stitch marker (optional but helpful)

Progress Tracker

0% Complete

β€” Supplies :

Infos :

-5 mm size H hook -Regular sized hair elastic (preferably a new one), the thicker kind. You don’t want it to be stretched out. -150-175 yards of DK weight (size 3) or worsted weight (size 4) yarn (I used Lion Brand Comfy Cotton Blend) -15-20 mm wooden bead (optional) -4"piece of cardboard (optional) -Scissors, tape measure, yarn needle

β€” Terminology and Abbreviations Used :

Info :

Pattern is written in US terminology. Beginning - beg. Chain(s) - ch(s). Double Crochet - dc. Fasten Off - FO. Half Double Crochet - hdc. Single Crochet - sc. Skip - sk. Slip Stitch - sl st. Space(es) - sp(s). Stitch(es) - st(s). Treble Crochet - Tr. V-Stitch - Vst.

β€” Special Stitches :

Info :

V-Stitch- Make {1 Tr, ch 5, 1 Tr} into indicated st.

β€” Gauge :

Info :

Gauge is not essential for this project, but I do give my diameter measurement after round 2 to give you a baseline measurement.

β€” Finished Measurements :

Info :

Finished bag saver will measure approximately 4.5" (11.5 cm) wide x 24" (61 cm) long.

β€” Instructions :

Info :

Begin by making a sl st into the hair elastic.

Round 1 :

Ch 1, 40 hdc inside hair elastic. Join with a sl st in top of first hdc. [40 hdc] NOTE: Your hdc should be completely covering the hair elastic but should not be ruffling up. See photo.

Round 2 :

Ch 2 (beg ch 2 does not count as a st from here on out), dc in same st as join and in next 2 sts, 2 dc in next st, * dc in next 3 sts, 2 dc in next st; rep from * to end. Join with a sl st in first dc. [50 dc]

Info :

The diameter of my base is approximately 4" (10 cm). If yours does not measure the same, adjust hook size accordingly and start over.

Rounds 3-4 :

Ch 2, dc in each st to end. Join with a sl st in first dc. [50 dc]

Round 5 :

Ch 9 (counts as 1 Tr + ch 5), Tr in same st (Vst made), ch 3, sk 4 sts, sc in next st, ch 3, sk 4 sts, * Vst in next st, ch 3, sk 4 sts, sc in next st, ch 3, sk 4 sts; rep from * end. Join with a sl st in 4th ch of beg ch 9, sl st into next 2 chs of beg ch 9. [5 Vsts, 5 sc, 10 ch-3 sps] (see photo below)

Round 6 :

Ch 1, sc in same ch sp, ch 3, Vst in next sc, ch 3, * sc in ch sp of next Vst, ch 3, Vst in next sc, ch 3; rep from * to end. Join with a sl st in first sc. [5 Vsts, 5 sc, 10 ch 3-sps] (see photo below)

Round 7 :

Ch 9 (counts as 1 Tr + ch 5), Tr in same st (Vst made), ch 3, sc in ch sp of next Vst, ch 3, * Vst in next sc, ch 3, sc in ch sp of next Vst, ch 3; rep from * to end. Join with a sl st in 4th ch of beg ch 9, sl st in next 2 chs of beg ch 9. [5 Vsts, 5 sc, 10 ch 3-sps] (see photo below)

Rounds 8-24 :

Rep rounds 6-7, ending on a round 6 rep.

Round 25 :

Ch 1, * sc in next sc, 2 sc in next ch sp, sc in next Tr, 3 sc in ch-5 sp, sc in next Tr, 2 sc in next ch sp; rep from * to end. Join with a sl st in first sc. [50 sc]

Rounds 26-27 :

Ch 1, hdc in each st to end. Join with a sl st in first hdc. [50 hdc]

Round 28 :

Ch 1, hdc in each st to end, ch 12, sl st in top of last hdc made to create a loop. Join with a sl st in first hdc. [50 hdc, 1 ch-12 sp]

Round 29 :

Ch 1, sc in each st until ch-12 sp, 12 sc in ch sp. Join with a sl st in first sc. FO, leaving a long 6"-8" tail. [62 sc]

Info :

Take long tail and wrap around the base of the ch 12 loop to further secure. Weave in tail and cut off excess. Weave in beginning tail.
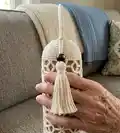
β€” Add beaded tassel :

Add beaded tassel :

1) Using your 4" piece of cardboard, wrap your yarn approx. 15-20 times and cut bottoms to create tassel tails. Set aside. 2) Cut another piece of yarn approx. 12" long. Count from ch 12 loop to the 25th st of round 26. Using the Larks knot, attach 12" strand to st 25. (You want it to be centered to the front. The ch-12 loop is the back of the project.) 3) Grab a tiny hook small enough to put your 20 mm bead on and draw those ends through the bead. Push the bead upwards to the top. 4) Open the ends below the bead. Grab your tassel tails and place them in the middle of those strands to tie around the tassel tails to secure. 5) Cut another length of yarn approx. 6" in length and use the Gathering knot to secure tassel tails in place, approx. 1" below the bead. Cut the bottom of the tassel tails so that the ends are even.

Info :

Pictured are worsted weight versions in Hobby Lobby's ILTY in the colors Sleight Gray and Black. They turned out to be the exact same size for me as the DK weight version, but I did intentionally crochet a bit tighter since I knew the yarn was technically bulkier.

Info :

Your Boho Bag Saver is complete!

Assembly Instructions

  • Wrap your long ending tail around the base of the ch-12 loop to secure the loop, then weave in the tail and trim any excess.
  • Center the 12" Larks knot attachment to stitch 25 (front) so the ch-12 loop remains at the back, then attach the tassel by threading the yarn strands through the bead and pulling the bead up against the top.
  • Place the tassel tails inside the opened strands below the bead and tie them with the gathering knot approximately 1" below the bead; trim tassel ends evenly.
  • When adding the 20 mm bead, use a very small hook to feed the tassel attaching strands through the bead and push the bead up tight to the top to achieve a clean finish.
  • Before final sewing, pin and center the tassel and bead assembly to ensure it is aligned with the ch-12 loop and sits centered on the front of the bag saver.

Important Notes

  • πŸ’‘Use stitch markers if you need to mark the beginning of rounds, especially when doing joins with slip stitches and beginning chains.
  • πŸ’‘Stuffing is not required; maintain even tension and keep stitches consistent for a smooth finished shape.
  • πŸ’‘If your base diameter after round 2 does not match approximately 4" (10 cm), change hook size and rework the base to ensure the correct finishing dimensions.
  • πŸ’‘Cover the hair elastic completely with the round 1 hdc to avoid gaps; the hdc should lie flat and not ruffle.
  • πŸ’‘When making tassels, use a cardboard template for consistent length and trim tassel ends evenly for a professional finish.

This Boho Bag Saver pattern makes a beautiful and useful handmade accessory you can be proud to display. It is perfect for gifting, market stalls, or adding a touch of handmade style to your pantry. Finish it with a wooden bead and tassel for a charming boho accent. 🧢✨😊

You ask,

we answer.

FAQs

What size will the finished piece be?

The finished bag saver measures approximately 4.5" (11.5 cm) wide by 24" (61 cm) long when made with the recommended yarn and hook size.

Can I use different yarn weights for this pattern?

Yes, you can use DK or worsted weight yarn; the designer used DK and also made worsted versions that turned out the same size when crocheted a bit tighter. Changing yarn weight will affect drape and texture.

Do I need prior crochet experience for this pattern?

This pattern is rated intermediate; basic knowledge of stitches like dc, hdc, tr, sc and experience working in rounds is recommended for best results.

How long does this project typically take to complete?

This is a bite-sized project that typically finishes in 2-4 hours, depending on your speed and whether you make the tassel and bead detail.