🧶 Beautiful ✨ Detailed 💝 Adorable

Plant Car Amigurumi Pattern

Plant Car Amigurumi Pattern
4.4★ Rating
2-3 Hours Time Needed
2.6K Made This
✂️

Intermediate Level

Ideal for those with basic crochet experience, featuring slightly more advanced stitches and techniques to expand your skills.

⏱️

Bite-Sized Project

Finishes in 2-4 hours—perfect for an afternoon of creative relaxation.

🏡

Cozy Accent

A warm touch for your space that transforms ordinary corners into inviting nooks filled with handmade charm.

About This Plant Car Amigurumi Pattern

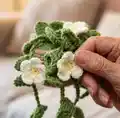
This pattern creates a small hanging plant pot—perfect for decorating shelves or giving as a tiny handmade gift. You will crochet the pot, a circular insert, vines, leaves and small flowers and sew them together for a finished hanging planter. Techniques used include magic ring, single crochet, half double crochet, double crochet and simple shaping.

Plant Car Amigurumi Pattern crochet pattern - detailed view of completed project

Clear step-by-step rows are provided for every piece, with photos showing assembly and finishing. The finished piece is compact and decorative, ideal for practicing small amigurumi-style crochet work.

Why You'll Love This Plant Car Amigurumi Pattern

I absolutely love this pattern because it combines small, meditative stitches with a beautiful finished piece you can hang anywhere. I enjoy making the tiny leaves and flowers—they are quick to crochet and very satisfying to assemble. The pattern is versatile so you can change colors to suit your decor or gift recipient. I also appreciate that this project is compact and portable, perfect for crafting on the go.

Plant Car Amigurumi Pattern step 1 - construction progress Plant Car Amigurumi Pattern step 2 - assembly progress Plant Car Amigurumi Pattern step 3 - details and accessories Plant Car Amigurumi Pattern step 4 - final assembly and finishing

Switch Things Up

I love experimenting with color combinations for this pattern; try soft pastels for a whimsical look or earthy tones for a natural hanging planter.

I sometimes change yarn weight and hook size to make a miniature keychain or a larger statement planter—just adjust stitch counts as needed.

I will often embroider tiny veins on the leaves with a darker green yarn to add texture and realism to each leaf.

I like to add small beads or seed beads to the flower centers instead of yellow yarn for a sparkly effect; they give a sweet accent.

I also enjoy making a set of several pots in matching colors and hanging them at different heights for a tiered display.

I sometimes replace the hanging chain with a short leather cord or decorative macrame hanger to match my home decor style.

I will alternate leaf shapes—some larger, some smaller—by adjusting the chain and stitch counts while keeping the same construction method.

I recommend trying variegated yarn for the vines to give a lively, multicolored trailing effect that looks very organic.

I occasionally add wire inside a vine to make it poseable and hold a particular curve or spiral as it hangs from the pot.

I love turning the tiny flowers into seasonal versions by using autumn or spring color palettes and arranging them differently on each vine for variety.

I also enjoy combining different yarn textures, like a slightly fuzzy yarn for leaves, to create a soft, lush planter effect.

Common Mistakes & How to Fix Them

✗ Skipping stitch counts during increases will change the pot shape and size; always count your stitches at the end of each round to ensure the correct stitch total. ✗ Cutting the yarn too early after Row 11 will prevent you from making the hanging chain; leave the yarn as instructed and chain 60 before fastening off. ✗ Not making enough vines or making vine chains with inconsistent length will lead to an unbalanced look; make the recommended 30ch, 25ch and 20ch vines and keep lengths consistent. ✗ Understuffing or overstuffing the pot base will distort the final shape; stuff evenly and gradually to achieve a smooth, natural dome inside the pot.

Plant Car Amigurumi Pattern

Make a charming hanging plant car with delicate leaves and tiny flowers. This pattern guides you step-by-step so you can create a decorative mini hanging planter for your home or to give as a handmade gift. You will crochet the pot, a circle base, vines, leaves and flowers and assemble them into a finished hanging piece you will love to display.

Intermediate 2-3 Hours

Materials Needed for Plant Car Amigurumi Pattern

— Main Fabric

  • 01
    Super fine weight yarn, 1.8 oz (50 g) per skein
  • 02
    Color A: Beige - small amount for pot (approx. one 50 g skein recommended)
  • 03
    Color B: Light green - small amount for circle base, vines and leaves (approx. one 50 g skein recommended)
  • 04
    Color C: White - small amount for flower petals
  • 05
    Color D: Yellow - small amount for flower centers

— Tools Required

  • 01
    Crochet hook size 2.5-3.0 mm
  • 02
    Stitch maker (stitch marker)
  • 03
    Sewing needle
  • 04
    Scissors
  • 05
    Cotton filling (polyester stuffing) for pot interior
  • 06
    Yarn needle for sewing vines, leaves and flowers to pot

Progress Tracker

0% Complete

— Pots :

Row 1 :

Magic ring, chain 1, 10 single crochet, slip stitch end row 1. (10 stitches)

Row 2 :

chain 1, (1 single crochet, 1 increase) 5 times, slip stitch end row 2. (15 stitches)

Row 3 :

chain 1, (2 single crochet, 1 increase) 5 times, slip stitch end row 3 (20 stitches)

Row 4 :

chain 1, (3 single crochet, 1 increase) 5 times (25 stitches)

Row 5 :

chain 1, (4 single crochet, 1 increase) 5 times (30 stitches)

Row 6 :

chain 1, (5 single crochet, 1 increase) 5 times (35 stitches)

Row 7 :

chain 1, (6 single crochet, 1 increase) 5 times (40 stitches)

Row 8-11 :

40 single crochet (40 stitches)

Info :

*do not cut yarn*

Row :

sl st end row 11 and chain 60 make a hanging

— CIRCLE BASE :

Row 1 :

Magic ring, chain 1, 10 half double crochet. (10 stitches)

Row 2 :

10 half double crochet increase. (20 stitches)

Row 3 :

(1 half double crochet, 1 increase) 10 times. (30 stitches)

Row 4 :

(2 single crochet, 1 increase)*10 (40 stitches)

— LEAF (PART 1) :

Info :

Before make leaf, make the vines by 30ch, 25ch and 20ch. (make 5-6)

Info :

- start crochet the Leaf - *every vines crochet 1 - 5 leaf*

Step :

Slip knot and yarn over in chain stitch(vines), chain 7, 1 single crochet in 3rd stitches

Step :

2 half double crochet, 1 double crochet, chain 3 and slip stitch in next stitches

— LEAF (PART 2) :

Step :

1 slip stitch into the opposite row, chain 3, 1 double crochet in next sts, 1 double crochet, 2 half double crochet, 1 single crochet

Step :

slip stitch in the first sts and cut yarn to finish the leaf.

— FLOWER (MAKE 5-8) :

Step (yellow) :

hook in the vines a magic ring • 5 single crochet (5stitches) • Cut yarn.

Step (white) :

chain 2, 2 double crochet in same sts, chain 2 and hook in same stitches (all in one stitches)

Step :

Slip titch in next stitch and do the same do

Step :

After 5 petals have been completed, slip stitch in first sts to end row and cut yarn.

— ASSEMBLY & FINISHING :

Step :

Use needle : sewing the circle inside the pot and stuffing inside the pot to finish

Step :

next step : sew every vines on the green circle

Info :

Attach leaves and flowers to vines as desired. Arrange vines to hang naturally from pot edge.

Assembly Instructions

  • Sew the green circle base inside the pot using a yarn needle, aligning the edge to the pot opening and stitching securely around the rim.
  • Stuff the pot interior with cotton filling through the opening in the circle base until you achieve a rounded, planted look, then finish sewing the circle closed.
  • Sew each vine to the green circle base at spaced intervals so vines hang over the pot edge naturally; use pins to position before sewing for symmetry.
  • Attach leaves and flowers to the vines by sewing at the vine attachment points; place 1-2 leaves per vine and 1 small flower cluster where desired for balance.
  • Securely weave in all ends and trim excess yarn, ensuring the hanging chain is firmly attached and all pieces are fastened for display.

Important Notes

  • 💡Use a stitch marker to mark the beginning of each round to avoid losing your place while working in the round.
  • 💡Do not cut the yarn after row 11 of the pot; slip stitch and chain 60 to make the hanging before fastening off.
  • 💡Stuff the pot gradually and evenly so the circle base maintains a smooth dome shape inside the pot.
  • 💡Pin vines and decorative elements in place before sewing to ensure balanced placement around the pot.
  • 💡Weave in ends neatly with a yarn needle to secure pieces and avoid unraveling during handling.

This sweet hanging plant car is a delightful small project you can finish in an afternoon. The combination of tiny leaves, delicate flowers and a cozy pot makes a beautiful gift or decor piece. Enjoy personalizing colors and arrangements to match your home. 🧶🌿✨

You ask,

we answer.

FAQs

What size will the finished piece be?

The finished hanging plant measures approximately 7-10 cm wide depending on yarn tension and whether you used the recommended super fine yarn and 2.5-3.0 mm hook.

Can I use different yarn weights for this pattern?

Yes, but changing yarn weight will affect the final size; use a smaller or larger hook appropriate for your yarn and expect the finished pot to be proportionally smaller or larger.

Do I need prior crochet experience for this pattern?

This pattern is rated intermediate and assumes you know magic ring, sc, hdc, dc, increases and slip stitch; basic crochet experience is recommended.

How long does this project typically take to complete?

Most crocheters complete this project in 2-3 hours, though time may vary based on experience level and how many decorative vines and flowers you make.

How many vines, leaves and flowers should I make?

Make 5-6 vines (lengths 30ch, 25ch and 20ch) and 5-8 flowers as suggested; you can adjust counts to create a fuller or simpler look.