🧶 Beautiful ✨ Detailed 💝 Adorable

Doll in a Baby-Carriage Amigurumi Pattern

Doll in a Baby-Carriage Amigurumi Pattern
4.3★ Rating
12-15 Hours Time Needed
1.2K Made This
✂️

Intermediate Level

Ideal for those with basic crochet experience, featuring slightly more advanced stitches and techniques to expand your skills.

⏱️

Multi-Day Project

A rewarding 12+ hour journey—perfect for dedicated crafters who love detailed work.

🧸

Cute Companion

An adorable friend to cherish, handcrafted with love to bring comfort and joy for years to come.

About This Doll in a Baby-Carriage Amigurumi Pattern

This pattern creates a tiny doll tucked into a matching baby carriage, complete with a wired frame and removable cradle. You will crochet the cradle, roof, base, frame parts and wheels, then assemble the pieces over a plastic insert for stability. The doll is made separately and finished with embroidered features and tiny ears and arms for character.

Doll in a Baby-Carriage Amigurumi Pattern crochet pattern - detailed view of completed project

Detailed step-by-step rounds are provided for every piece so you can follow along easily. Photos and assembly guidance help with positioning and finishing touches.

Why You'll Love This Doll in a Baby-Carriage Amigurumi Pattern

I absolutely love this pattern because it brings together miniature amigurumi charm with clever structural techniques like wired frame pieces for realism. I enjoy how the carriage and doll pair perfectly as a set and make a thoughtful handmade gift. The process of inserting plastic and sewing the pieces together feels rewarding and produces a sturdy finished toy. I love seeing the tiny details like the roof scallop and embroidered hair come to life at the end.

Doll in a Baby-Carriage Amigurumi Pattern step 1 - construction progress Doll in a Baby-Carriage Amigurumi Pattern step 2 - assembly progress Doll in a Baby-Carriage Amigurumi Pattern step 3 - details and accessories Doll in a Baby-Carriage Amigurumi Pattern step 4 - final assembly and finishing

Switch Things Up

I love how versatile this pattern is for customization! You can change the carriage and doll colors to suit a nursery theme or make holiday versions by swapping palette colors.

For a chunkier version, use a bulkier yarn and a larger hook—this will also increase the amount of wire and plastic base needed but gives a cuddly, larger toy.

To make a keychain or tiny ornament, use thinner yarn and a smaller hook; reduce round counts proportionally and skip wiring for a lightweight result.

I often add tiny crocheted accessories like a little blanket, miniature teddy or a hanging charm to the carriage for extra charm and personalization.

Experiment with embroidery styles for facial features: a simple smile or more detailed stitching changes the doll's expression entirely.

You can replace safety eyes with embroidered eyes for a child-safe toy—use French knots or stitched circles for an adorable look.

If you want a poseable doll, mount thin wire into the arms and legs before stuffing so you can bend and position the toy.

Try adding beads or tiny buttons on the carriage sides for a vintage look, or use metallic yarn for accents to make it glimmer.

Use felt for the carriage lining instead of plastic for a soft interior, though the plastic insert gives a firmer base and shape.

I also recommend trying gradient or variegated yarn for the carriage roof to achieve an ombre effect—it's a simple switch that looks designer-made.

Common Mistakes & How to Fix Them

✗ Skipping the plastic insert step can make the cradle collapse; cut and insert the plastic base to maintain shape before joining pieces. ✗ Not wrapping wire ends with tape will cause poking and yarn damage; always wrap wire ends carefully with adhesive tape before inserting into crocheted tubes. ✗ Forgetting to place markers when working long round counts leads to counting errors; place a row marker at the start of long tubes and count often. ✗ Overstuffing the doll will distort the shape and make sewing difficult; stuff gradually, especially in the head and neck area, to maintain the correct proportions.

Doll in a Baby-Carriage Amigurumi Pattern

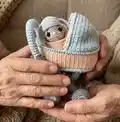
Make a charming miniature doll and matching baby carriage using sport-weight yarn and simple amigurumi techniques. This pattern walks you through crocheting each carriage part, frame, wheels and a tiny doll with clear row-by-row instructions. You will assemble the plastic base, add wire for structure, and finish with embroidery for the sweetest facial details.

Intermediate 12-15 Hours

Materials Needed for Doll in a Baby-Carriage Amigurumi Pattern

— Main Fabric

  • 01
    Sport weight 4ply yarn Yarn Art Jeans (50g /160m) - N01 White (main doll body) - quantity as needed
  • 02
    Sport weight 4ply yarn Yarn Art Jeans (50g /160m) - N05 Cream (doll details, ears, arms) - quantity as needed
  • 03
    Sport weight 4ply yarn Yarn Art Jeans (50g /160m) - N40 Brown (hair embroidery) - small amount
  • 04
    Sport weight 4ply yarn Yarn Art Jeans (50g /160m) - N73 Peach (carriage accent color) - quantity as needed
  • 05
    Sport weight 4ply yarn Yarn Art Jeans (50g /160m) - N49 Gray (frame, wheels) - quantity as needed
  • 06
    Sport weight 4ply yarn Yarn Art Jeans (50g /160m) - N75 Blue (carriage main color) - quantity as needed
  • 07
    Some black thread for embroidery - small amount
  • 08
    Pink pastel for toning - small amount

— Tools Required

  • 01
    Crochet hook size 1.5 mm
  • 02
    Safety Eyes 8 mm (2 for the doll)
  • 03
    Wire ~ 90-100 cm (35-40 inches) for frame parts
  • 04
    11 Buttons (for decoration if desired)
  • 05
    Scissors
  • 06
    Sewing pins
  • 07
    Polyester stuffing (fiberfill)
  • 08
    Needle for sewing pieces and embroidery
  • 09
    Plastic (use plastic from a stationery folder) for base insert
  • 10
    Stitch markers

Progress Tracker

0% Complete

— Baby-Carriage :

Infos :

Recommendations: Depending on choosen yarn and crochet density, the size of the piece may differ. Cut the base of plastic to the size of the resulting pieces. All pieces are attached along the outer border.

— Cradle :

Side part :

Crochet 1 pieces in Blue and 1 pieces in Peach color. Work in rows. 1. ch10. Start from the second chain on the hook: 9sc, turn (9) 2.-90. ch1, 9sc, turn (89 rows) (9) Fold in half and make 9sl st through both sides. Cut the yarn. Cut a piece of plastic the width of the resulting part and a little longer than the length of the resulting part.

Info :

Place one Blue side piece inside the other peach side piece. Connect the two pieces together by using blue yarn and single crochet, 90sc. Cut the yarn.

— Base :

Base :

Crochet 1 pieces in Blue and 1 pieces in Peach color. Work in rows. 1. 11ch. Start from the second chain on the hook: inc, 8sc, inc, turn (12) 2. ch1, inc, 10sc, inc, turn (14) 3. ch1, inc, 12sc, inc, turn (16) 4. ch1, inc, 14sc, inc, turn (18) 5. ch1, inc, 18sc, inc, turn (20)

Round 6-29 :

ch1, 20sc, turn (24 rows) (20)

Round 30 :

ch1, dec, 16sc, dec, turn (18)

Round 31 :

ch1, dec, 14sc, dec, turn (16)

Round 32 :

ch1, dec, 12sc, dec, turn (14)

Round 33 :

ch1, dec, 10sc, dec, turn (12)

Round 34 :

ch1, dec, 8sc, dec, turn (10) Cut the Peach yarn part. Continue crocheting from the second blue piece.

Info :

Cut a oval from the plastic and put it between the two pieces. Connect the pieces Crochet both pieces together: 90sc, Do not cut the yarn.

Info :

Place the plastic between the two halves and crochet both pieces around the plastic, joining them.

Connect the base to the side part :

Attach the Side part to the base with blue yarn by crocheting reverse 90sc. Cut the yarn.

Info :

Repeat process on other side on the side part using Blue yarn and reverse single crochet (90 reverse sc). Cut the yarn.

— Carriage roof :

Carriage roof R1 :

With Blue yarn. Work in rows 1. 4sc in MR, turn (4)

Carriage roof R2 :

2. ch1, 4inc, turn (8)

Carriage roof R3 :

3. ch1, (1sc, inc) *4, turn (12)

Carriage roof R4 :

4. ch1, (2sc, inc) *4, turn (16)

Carriage roof R5 :

5. ch1, 16sc, turn (16)

Carriage roof R6 :

6. ch1, (3sc, inc) *4, turn (20)

Carriage roof R7 :

7. ch1, (4sc, inc) *4, turn (24)

Carriage roof R8 :

8. ch1, 24sc, turn (24)

Carriage roof R9 :

9. ch1, (5sc, inc) *4, turn (28)

Carriage roof R10 :

10. ch1, (6sc, inc) *4, turn (32)

Carriage roof R11 :

11. ch1, 32sc, turn (32)

Carriage roof R12 :

12. ch1, (7sc, inc) *4, turn (36)

Carriage roof R13 :

13. ch1, (8sc, inc) *4, turn (40)

Carriage roof R14 :

14. ch1, (9sc, inc) *4, turn (44)

Carriage roof R15-25 :

15.-25. ch1, 44sc, turn (11 rows) (44)

Carriage roof R26 :

26. ch1, BLO reverse 44sc. Leave a long tail for sewing.

Carriage roof Info :

Return to round 26 of the carriage roof and work crocheting in a circle with Peach yarn through back loops: (ch1, hdc, ch1, sl st) *22. Cut the yarn.

Attach roof :

Place the carriage roof evenly on one side of the cradle, sew the roof to the cradle.

— Carriage design / Frame parts :

Carriage design Infos :

The length of the wire is adjusted depending on the length of the resulting parts; Wrap the ends of the wire carefully with adhesive tape; The bends of the parts are corrected during the assembly process.

Back Part :

With Gray yarn. 1. 10sc in MR Place row marker here. 2.-70. 10sc (69 rounds) (10) Cut a piece of wire the length of the resulting part, wrap the ends with adhesive tape and insert the wire inside the part. Fasten off, cut the yarn, weave in the ends.

Bend the part :

Bend the part as shown in the picture. Make the 1st bend in approximately rnd 21-22, the 2nd bend in approximately rnd 47-48.

Lower part :

With Gray yarn. 1. 8sc in MR Place row marker here. 2.-23. 8sc (22 rounds) (8) Cut a piece of wire the length of the resulting part, wrap the ends with adhesive tape and insert the wire inside the part. Fasten off, cut the yarn, weave in the ends.

Lower part Fix :

Fix the lower part to the back part at the level of rnd 14-15 and rnd 55-56. Sew the lower part to the back part of the frame.

Front Part :

With Gray yarn. 1. 10sc in MR Place row marker here. 2.-40. 10sc (39 rounds) (10) 41.-80. BLO 10sc (40 rounds) (10) 81. -120. 10sc (40 rounds) (10) Cut a piece of wire the length of the resulting part, wrap the ends with adhesive tape and insert the wire inside the part. Fasten off, cut the yarn, weave in the ends.

Front Part Bend :

Return to round 41 of the front part and work crocheting in a circle with Blue yarn through back loops rnd 41-80: 400sc. Cut the yarn. Bend the front part as shown in the picture (Make the 1st bend approximately in rnd 48-49, the 2nd bend approximately in rnd 71-72). The part should be in the shape of a horseshoe.

Connect frame :

Connect the back part of the frame to the front. Attach the back part with the front "cross". Sew up the fixation points.

Attach the cradle to the frame :

Sew the cradle to the back and front parts (see photo). Fix the cradle to the frame with pins before sewing to check position.

Sew the cradle :

Sew the cradle to the back part of the frame. Sew the cradle from 2 sides to the front part of the frame.

— Wheels (make 4) :

Wheels R1 :

With Blue yarn. 1. 6sc in MR Place row marker here.

Wheels R2 :

2. 6inc (12)

Wheels R3 :

3. (1sc, inc) *6 (18)

Wheels R4 :

4. Change color to Gray. Cut the Blue yarn. BLO (2sc, inc) *6 (24)

Wheels R5 :

5. (3sc, inc) *6 (30)

Wheels R6 :

6. (4sc, inc) *6 (36)

Wheels R7-8 :

7.-8. 36sc (2 rounds) (36) Stuff with fiberfill.

Wheels R9 :

9. (4sc, dec) *6 (30)

Wheels R10 :

10. (3sc, dec) *6 (24)

Wheels R11 :

11. (2sc, dec) *6 (18)

Wheels R12 :

12. (1sc, dec) *6 (12)

Wheels R13 :

13. 6dec. Fasten off, cut the yarn, weave in the ends. Sew the wheels to the carriage frame.

— DOLL Body - Head :

Body R1 :

With White yarn. 1. 6sc in MR Place row marker here.

Body R2 :

2. 6inc (12)

Body R3 :

3. (1sc, inc) *6 (18)

Body R4 :

4. (2sc, inc) *6 (24)

Body R5 :

5. (3sc, inc) *6 (30)

Body R6-8 :

6.-8. 30sc (3 rounds) (30)

Body R9 :

9. Change color to Cream BLO 30sc (30)

Body R10 :

10. (3sc, dec) *6 (24)

Body R11-12 :

11.-12. 24sc (2 rounds) (24)

Body R13 :

13. (2sc, dec) *6 (18)

Body R14 :

14. (1sc, dec) *6 (12) Stuff with fiberfill in the process.

Head R15 :

15. 12inc (24)

Head R16 :

16. (1sc, inc) *12 (36)

Head R17-21 :

17.-21. 36sc (5 rounds) (36)

Head R22 :

22. 6sc, (2sc, dec) *6, 6sc (30)

Head R23-27 :

23.-27. 30sc (5 rounds) (30)

Info :

Insert the eyes between rounds 22-23 at a distance of 8-10 sc.

Head R28 :

28. (4sc, dec) *6 (30)

Head R29 :

29. (3sc, dec) *6 (24) Stuff the head with fiberfill.

Head R30 :

30. (2sc, dec) *6 (18)

Head R31 :

31. (1sc, dec) *6 (12)

Head R32 :

32. 6dec (6) Fasten off, cut the yarn, weave in the ends.

Face Embroidery :

Embroider the nose with cream yarn. Embroider the upper eyelids with black thread. Embroider the mouth with black thread.

Hair :

Embroider the hair with brown yarn (see photo for method) by creating radial stitches from crown to edge and knotting/tying to secure.

Ears (make 2) :

With Cream yarn. 6sc in MR, leave a long tail for sewing. Sew the ears to the head.

Arms (make 2) :

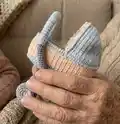
With Cream yarn. 1. 6sc in MR Place row marker here. 2.-6. 6sc (5 rounds) (6) Stuff with fiberfill in the process. Fasten off, cut the yarn, weave in the ends. Fasten the arms with a thread mount. Attach the arms using a long needle and thread as shown in pictures.

Finish :

Sew doll into cradle if desired or place loosely. Add any buttons or decorations to carriage. Weave in all ends and secure wires inside frame parts. Adjust bends and secure with tape as needed.

Assembly Instructions

  • Place the plastic oval inside the two base halves before crocheting them together and crochet 90sc around to join them securely.
  • Insert taped wire into each long frame part (front, back, lower) before fastening off, then bend at the indicated rounds and sew the back and front parts together in a cross to form the frame.
  • Sew the cradle to the frame by aligning the cradle opening with the frame cross and stitching through the outer border, securing with pins before final sewing.
  • Attach the carriage roof to one side of the cradle by sewing through the roof tail and cradle edge, then embroider the roof edge with peach scallops as shown.
  • Sew wheels to the carriage frame at the indicated positions after finishing and stuffing the wheels; make sure they are evenly spaced for balance.
  • Attach the doll arms and ears by sewing with long thread mounts and secure the doll inside the cradle; embroider facial features before final assembly.

Important Notes

  • 💡Wrap wire ends securely with adhesive tape before inserting into crocheted tubes to avoid damage and pokes.
  • 💡Use a plastic insert cut to the size of the base to stabilize the cradle; position it before joining both halves.
  • 💡Place stitch markers at the start of long round sequences and on tube parts to track placement for bends and assembly.
  • 💡Weave in ends and fasten off securely after inserting wires; check bends and adjust before final sewing to the frame.
  • 💡Stuff parts gradually—especially the doll head and wheels—to maintain shape without overstuffing which can distort proportions.

This delightful Doll in a Baby-Carriage set is a small celebration of handmade charm and careful construction. It combines amigurumi doll-making with simple frame engineering for a sturdier, more realistic finish. Perfect as a keepsake, gift, or display piece—each stitch makes a memory. 🧶✨🧸

You ask,

we answer.

FAQs

What size will the finished piece be?

The baby carriage measures approximately 14-16 cm in height and 10-12 cm in width using the recommended sport-weight yarn and hook; the doll is approximately 9-10 cm tall.

Can I use a different yarn weight?

Yes, you can use a different yarn weight but this will change the final size and required wire length; choose an appropriate hook size to match the yarn and expect size differences.

Do I need to use wire inside the frame parts?

Yes, wire is recommended to give the carriage frame structure and allow bending; wrap the wire ends with adhesive tape before inserting to prevent sharp points.

How long will this project take?

This is a multi-piece project and typically takes 12-15 hours depending on experience and assembly time; allow extra time for wiring and sewing pieces together.