🧢 Beautiful ✨ Detailed πŸ’ Adorable

Succulent Potted Plant Pattern

Succulent Potted Plant Pattern
4.3β˜… Rating
2-4 Hours Time Needed
3.8K Made This
βœ‚οΈ

Intermediate Level

Ideal for those with basic crochet experience, featuring slightly more advanced stitches and techniques to expand your skills.

⏱️

Bite-Sized Project

Finishes in 2-4 hoursβ€”perfect for an afternoon of creative relaxation.

🏑

Cozy Accent

A warm touch for your space that transforms ordinary corners into inviting nooks filled with handmade charm.

About This Succulent Potted Plant Pattern

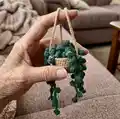
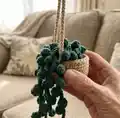
This pattern creates a small hanging succulent pot with a crocheted pot, a green circle base, and multiple puff-stitch succulent ropes. It uses superfine yarn and small hooks to achieve a delicate, realistic look. The design is compact and ideal for gifts, key decorations, or shelf styling.

Succulent Potted Plant Pattern crochet pattern - detailed view of completed project

You will crochet the pot in beige brown, the succulent ropes in pine green, then sew everything together and add a hanging rope. The pattern includes clear row-by-row instructions and assembly guidance for easy finishing.

Why You'll Love This Succulent Potted Plant Pattern

I absolutely love this pattern because it turns simple stitches into a charming, lifelike hanging plant. I enjoy how the puff stitch creates tiny succulent β€œbuds” that cascade naturally. The project is small enough to finish in an afternoon but satisfying to assemble and customize. Making multiple succulent ropes gives you creative control over the density and length, making each planter unique.

Succulent Potted Plant Pattern step 1 - construction progress Succulent Potted Plant Pattern step 2 - assembly progress Succulent Potted Plant Pattern step 3 - details and accessories Succulent Potted Plant Pattern step 4 - final assembly and finishing

Switch Things Up

I love customizing the color palette for different decor styles; I often use soft pastels for a gentle, trendy look.

I sometimes make the succulents longer or shorter by changing the number of 8-chain repeats to vary the cascade intensity.

I like to swap the beige pot color for terracotta shades to mimic a real clay pot feel in my home.

I often try different yarn weights and a larger hook to create a chunky, statement hanging planter version.

I add tiny embroidered details or beads to the succulent blooms for a unique, decorative touch.

I sometimes glue a small bit of craft moss around the base inside the pot for extra texture and to hide stitches.

I recommend experimenting with three or more succulents per pot for a fuller, lush appearance when gifting.

I occasionally braid three hanging ropes together to make a sturdier hanger or add a macrame-inspired twist for boho decor.

I also try alternating puff stitch sizes by changing puff stitch loops to create varied succulent shapes and movement.

I find blocking the circle base lightly helps it sit flat inside the pot before sewing for a neat finish.

Common Mistakes & How to Fix Them

βœ— Skipping the chain-1 at the start of rounds causes uneven edges and stitch misalignment; always begin each round with chain-1 where indicated to stabilize the row. βœ— Not slip stitching at the end of rounds will leave gaps and uneven joins; perform the slip stitch at the end of every row as instructed to close the round neatly. βœ— Overstuffing or under-stuffing the pot can distort its shape; stuff gradually and evenly until the pot holds its form without bulging. βœ— Forgetting to count increases during the pot base will result in incorrect stitch counts; count stitches after each increase round to stay accurate and adjust if necessary.

Succulent Potted Plant Pattern

Make a delightful mini hanging succulent pot to brighten any space. This pattern guides you through crocheting the pot, green circle base, and multiple puff-stitch succulents, then assembling them into a hanging planter. You will enjoy a compact project that makes a lovely gift or cute decor. Clear step-by-step rounds and simple assembly make this pattern satisfying to complete.

Intermediate 2-4 Hours

Materials Needed for Succulent Potted Plant Pattern

β€” Main Fabric

  • 01
    Super fine yarn, approximately 1.8 oz (50 g) per skein
  • 02
    Color A: Beige brown - approx 50 g for the pot and hanging rope
  • 03
    Color B: Pine green - approx 50 g for succulents and circle base
  • 04
    Small amounts of additional green for extra succulents if desired

β€” Tools Required

  • 01
    Crochet hook size 2.5-3.0 mm
  • 02
    Stitch marker
  • 03
    Sewing needle (tapestry needle)
  • 04
    Scissors
  • 05
    Cotton filling (polyester stuffing)
  • 06
    Tapestry/yarn needle for sewing pieces together

Progress Tracker

0% Complete

β€” Pots :

Info :

*chain-1 at beginning of row, slip stitch in every time the end of the row*

Round 1 :

Magic ring, chain 1, 10 Single Crochet. (10)

Round 2 :

chain 1, (1 Single Crochet, 1 increase ) 5 times (15 stitches)

Round 3 :

chain 1 (2 Single Crochet, 1 increase) 5 times. (20 stitches)

Round 4 :

chain 1 (3 Single Crochet, 1 increase) 5 times. (25 stitches)

Round 5 :

chain 1 (4 Single Crochet, 1 increase) 5 times. (30 stitches)

Round 6 :

chain 1 (5 Single Crochet, 1 increase) 5 times. (35 stitches)

Round 7-10 :

chain 1, 35 Single Crochet (35 stitches)

β€” Circle Base (green) :

Round 1 :

Magic Ring, chain 1, 10 half double crochet (10 stitch)

Round 2 :

10 half double crochet increase (20 stitch)

Round 3 :

chain 1, (1 half double Crochet, 1 increase ) 10 times (30 stitch)

Round 4 :

chain 1 (5 Single Crochet, 1 increase) 5 times. (35 stitches)

β€” Succulent :

Item Succulent (make 7 -9) :

Chain 4, 1 Puff stitch in 3rd sts, 1 slip stitch in next sts

Item Succulent (long) :

Chain 8, 1 Puff stitch in 3rd sts, 1 slip stitch in next sts *this step crochet (8ch, 1PS in 3rd,1 SL ST) until the length you want*

β€” Assembly :

Info :

Sew the circle inside the pot and dont forget stuffing ^_^

Step 1 :

Next step is sew every succulent rope on the middle of pots

Hanging Rope :

chain 60 in the sides of the pots

Assembly Instructions

  • Sew the green circle base inside the pot and stuff the pot before closing to keep shape.
  • Arrange and sew each succulent rope around the center/top edge of the pot, spacing them evenly for a cascading look.
  • Attach the hanging rope by chaining 60 and securing each end to opposite sides of the pot, weaving and knotting ends inside for security.
  • Weave in all loose ends with a tapestry needle and trim excess yarn close to the work for a neat finish.

Important Notes

  • πŸ’‘Use the chain-1 at the start of rounds and finish each row with a slip stitch to keep edges tidy.
  • πŸ’‘Stuff the pot gently and evenly; overstuffing will distort the pot and under-stuffing will cause it to collapse.
  • πŸ’‘Pin succulent ropes in place before sewing to check spacing and length for an even cascading appearance.
  • πŸ’‘Work with consistent tension and count stitches after increase rounds to maintain correct stitch counts.

This pattern was made to bring a little handmade greenery into your home and brighten a shelf or window sill. Make multiple succulents for a fuller look or gift one to a friend who loves plants. Thank you for making something with care β€” happy crocheting! 🧢🌿

You ask,

we answer.

FAQs

What size will the finished piece be?

The finished hanging succulent pot measures approximately 6-8 cm in diameter depending on your tension and yarn, with succulent ropes varying in length to taste.

Can I use different yarn weights for this pattern?

Yes, you can use different yarn weights but this will change the finished size; adjust your hook size accordingly and make a gauge swatch to predict final dimensions.

Do I need prior crochet experience for this pattern?

This pattern is rated intermediate because it uses puff stitches and requires assembly; basic knowledge of MR, sc, hdc, increases, and slip stitches is recommended.

How long does this project typically take to complete?

Most crocheters complete this small project in about 2-4 hours, depending on how many succulent ropes you make and how much time you allow for assembly.