🧶 Beautiful ✨ Detailed 💝 Adorable

By Your Side Basket Bag Pattern

By Your Side Basket Bag Pattern
4.3★ Rating
5-7 Hours Time Needed
1.9K Made This
✂️

Intermediate Level

Ideal for those with basic crochet experience, featuring slightly more advanced stitches and techniques to expand your skills.

⏱️

Weekend Treat

Takes 5-7 hours, making it an enjoyable project to finish over a couple of days.

Stylish Touch

An elegant detail to elevate any look, combining traditional techniques with contemporary design sensibilities.

About This By Your Side Basket Bag Pattern

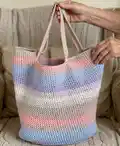
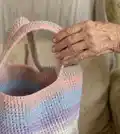
This pattern creates a roomy, soft-sided basket tote crocheted in the round using Paintbox Yarns Recycled Crafty Pots. The bag features an oval base, vertical sides, worked handle openings and a neat finished seam. It uses simple single (double) crochet stitches and marker placement to shape the base and body.

By Your Side Basket Bag Pattern crochet pattern - detailed view of completed project

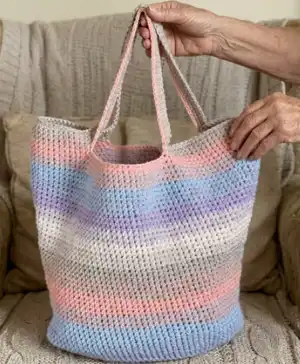
Perfect for gifting or everyday use, the bag showcases soft stripe variations from the recycled yarn. The pattern includes full round-by-round instructions and materials list for accurate results.

Why You'll Love This By Your Side Basket Bag Pattern

I absolutely love this pattern because it turns recycled yarn into a beautiful, functional tote that feels modern and relaxed. I enjoy the way the base increases shape the bag so it sits nicely when filled. The handle opening technique is clever and secure, making it easy to carry heavier items with confidence. I also love that the stripe variations appear naturally from the yarn, giving each finished piece a unique personality.

By Your Side Basket Bag Pattern step 1 - construction progress By Your Side Basket Bag Pattern step 2 - assembly progress By Your Side Basket Bag Pattern step 3 - details and accessories By Your Side Basket Bag Pattern step 4 - final assembly and finishing

Switch Things Up

I love swapping yarn colors to create entirely new looks; try tonal shades for a subtle ombre effect or bold contrasting colors for a statement bag.

I often change the handle length to make a shorter shoulder strap or a long crossbody strap—just adjust the chain length in the handle instructions.

If you want a sturdier base, I sometimes work a round or two of single crochet in a tighter tension or use a slightly smaller hook for the first few rounds.

I sometimes line the bag with fabric for extra structure and to protect delicate contents; sew the lining to match the handle openings for a clean finish.

For an even more durable handle, try making a double-thick handle by folding a longer strap and working both layers together when joining to the bag.

I like to add pockets inside the lined version for phone and keys; measure and sew the pocket into the lining before attaching it to the bag.

To scale the bag up or down, change your yarn weight and hook size; bulky yarn with a larger hook makes a chunky, roomy tote while finer yarn creates a dainty shopper.

Try decorative edge finishes—such as a round of reverse single crochet or a picot edge—to add a polished border around the opening.

I sometimes replace the chain handle section with a crocheted rope or wrapped leather strap for a mixed-material look that’s easy to carry.

Want to personalize the bag? Add embroidered initials, a crocheted flower, or sew on buttons for decorative detail—these little touches make each bag unique.

Common Mistakes & How to Fix Them

✗ Forgetting to place or move stitch markers during increases; place a lockable marker at each specified point and move them up every round to keep the shaping accurate. ✗ Not counting stitches after rounds with increases or repeats; count your stitches at the end of each increase round to ensure you have the correct total before proceeding. ✗ Working with inconsistent tension while making the base and sides; maintain even tension throughout to keep the bag base flat and the sides uniform in height. ✗ Skipping the instruction to remove markers during the handle join step; remove markers as you go exactly where directed to ensure the handle opening forms correctly. ✗ Failing to secure and weave in ends after breaking yarn; fasten off neatly and weave in all loose ends with a darning needle to avoid unravelling and for a tidy finish.

By Your Side Basket Bag Pattern

Make a stylish, roomy tote with this By Your Side Basket Bag Pattern using Paintbox Recycled Crafty Pots yarn. Youll enjoy working in the round to create a sturdy base and easy handle openings, perfect for everyday use. The gentle stripe effect and soft drape make it a fashionable companion for market runs or beach days.

Intermediate 5-7 Hours

Materials Needed for By Your Side Basket Bag Pattern

— Main Fabric

  • 01
    8¾oz/250g balls of Paintbox Yarns Recycled Crafty Pots - 2 balls (Neapolitan)

— Tools Required

  • 01
    H-8 (5mm) crochet hook
  • 02
    Darning needle
  • 03
    2 lockable stitch markers
  • 04
    3 buttons size ½in/1.5cm

Progress Tracker

0% Complete

— Sizes :

Info :

Height 12½in/32cm. Width at widest point 17¾in/45cm

— You Will Need :

Infos :

Paintbox Yarns is exclusively available at lovecrafts.com. 8¾oz/250g balls of Paintbox Yarns Recycled Crafty Pots: 2 balls in Neapolitan. 3 buttons size ½in/1.5cm. H-8 (5mm) crochet hook. Darning needle. 2 lockable stitch markers.

— Gauge (Tension) :

Info :

14 sts and 15 rows to 4in/10cm in single (double) crochet stitch using H-8 (5mm) crochet hook.

— Good To Know :

Infos :

Paintbox Yarns cannot accept responsibility for the finished item if any yarn other than the recommended yarn is used. Yarn quantities are based on average requirements and are therefore approximate. Instructions are written using US terminology with UK terminology given in italics in round brackets () afterwards. Where the figure 0 appears, no stitches, times or rows are worked for this size. Stripes may vary from those shown.

— Abbreviations :

Infos :

cm centimetres. ch chain. flo front loop only. g grams. in inches. mm millimetres. oz ounces. PM place marker. rep repeat. sc(dc) single (double) crochet. sl st slip stitch. st/s stitche/s.

— Base :

Round 1st :

Using H-8 (5mm) hook ch 13. 1st round 1 sc(dc) in second ch from hook, and in each ch to last ch, 3 sc(dc) in last ch (PM in second of these 3 sts), turn, work back along other side of foundation chain, working 11 sc(dc), 3 sc(dc) in last ch (PM in second of these 3 sts), sl st to join. | 26 sts.

Round 2nd :

2nd round Ch 1 (does not count as a st), *1 sc(dc) in every st to 1 st before marker, 2 sc(dc) in next st, 3 sc(dc) in marked st, 2 sc(dc) in next st, PM in centre st of three-st increase; rep from * to complete the increases, 1 sc(dc) in each st to end of round seam, sl st to join. | 34 sts.

Round 3rd - 9th :

Rep 2nd round a further 7 times, increasing 8 sts per round. | 90 sts.

Round 10th :

10th round Ch 1, 1 sc(dc) flo in each st around, keeping markers in place, sl st to join.

Round 11th - 18th :

11th - 18th rounds Ch 1, sc(dc) around, move markers up in place each round, sl st to join.

Round 19th :

19th round Ch 1, *sc(dc) to 1 st before marker, 2 sc(dc) in this st, 1 sc(dc) in marked st, PM in new st, 2 sc(dc) in st after marker; rep from * once more, sc(dc) to end of round seam, sl st to join. | 94 sts.

Round 20th - 22nd :

20th - 22nd rounds Ch 1, sc(dc) around, move markers up in place each round, sl st to join.

Round 23rd - 30th :

Rep 19th - 22nd rounds 7 more times, increasing 4 sts in every repeat. | 122 sts.

Round Next :

Next round Ch 1, *sc(dc) to 1 st before marker, 2 sc(dc) in this st, 1 sc(dc) in marked st, PM in this new st, 2 sc(dc) in st after marker; rep from * once more, sc(dc) to end of round seam, sl st to join. | 126 sts.

Round Next :

Next round Ch 1, sc(dc) around, move markers up in place each round, sl st to join.

Info :

'Seam' should now be 26 sts away from closest marker.

Round Next :

Next round Turn, sl st in next 10 sts, turn, ch 50, skip next 29 sts, 1 sc(dc) in following st and all sts to marker, remove marker, 18 sc(dc), ch 50, skip next 29 sts, 1 sc(dc) in following st and next 34 sts, removing markers as you go, sl st at bottom of original handle to join. | 168 sts.

Round Next :

Next 4 rounds Ch 1, sc(dc) around, sl st to join at seam. Break yarn and secure.

— To Finish :

Info :

Weave in all loose ends and block bag to shape to finish.

Assembly Instructions

  • When creating the handle openings follow the instructions to turn, sl st in next 10 sts, turn, ch 50 and skip the indicated sts; join by slipping stitch at bottom of original handle to form a secure opening.
  • Remove stitch markers as instructed during the handle join step so that the handles align correctly and the seam forms as shown in the pattern.
  • After finishing the final rounds break yarn and secure the last stitch, then weave in all loose ends using a darning needle for a neat finish.
  • Block the bag to shape after weaving in ends to help the sides relax and the base sit flat; shape the handles and body while damp and allow to dry.
  • When adding optional buttons, position and sew them securely by hand using a darning needle and matching yarn or thread, spacing evenly for balance.

Important Notes

  • 💡Use lockable stitch markers to mark increases and handle placement, moving them up each round to keep shaping correct.
  • 💡Gauge is important: 14 sts and 15 rows = 4in/10cm in single (double) crochet with H-8 (5mm); adjust hook size to match gauge.
  • 💡Yarn quantities are approximate; using a different yarn or color changes the final look and may alter the amount required.
  • 💡Instructions use US terminology with UK terminology in round brackets where given; check abbreviations before starting.

This pretty tote is made from recycled Paintbox Crafty Pots yarn for a soft, summery finish. Create a unique striped look without changing color by simply working the yarn as it comes. Perfect for market runs, beach days, or gifting — crochet one today! 🧶✨

You ask,

we answer.

FAQs

What size will the finished piece be?

The finished bag measures approximately 12½in/32cm high and 17¾in/45cm wide at the widest point when worked to the stated gauge.

Can I use different yarn weights for this pattern?

Yes, but using a different yarn weight will change the finished size and drape; adjust your hook size and check gauge before continuing.

Do I need prior crochet experience for this pattern?

This pattern is rated intermediate, so basic knowledge of single (double) crochet, increases, and working in the round is recommended.

How long does this project typically take to complete?

Most crocheters complete this project in about 5-7 hours, depending on pace and familiarity with the techniques.