🧢 Beautiful ✨ Detailed πŸ’ Adorable

Butterfly Amigurumi Pattern

Butterfly Amigurumi Pattern
4.4β˜… Rating
12-15 Hours Time Needed
3.6K Made This
βœ‚οΈ

Advanced Level

Designed for experienced crocheters, these patterns involve intricate designs and complex techniques to challenge and inspire.

⏱️

Multi-Day Project

A rewarding 12+ hour journeyβ€”perfect for dedicated crafters who love detailed work.

🏑

Cozy Accent

A warm touch for your space that transforms ordinary corners into inviting nooks filled with handmade charm.

About This Butterfly Amigurumi Pattern

This pattern creates a delicate lace butterfly composed of small circular motifs and larger sculpted wings using fine cotton thread. The design uses a cord technique to shape wing structure and produce crisp edges and arches. You will follow step-by-step photo rows and instructions for both the small wing motif and the large right wing assembly. The finished butterfly is decorative and perfect for framing, hanging, or gifting.

Butterfly Amigurumi Pattern crochet pattern - detailed view of completed project

Detailed photos and row-by-row descriptions help you reproduce the lace textures accurately. Advanced stitch combinations and cord-attaching techniques give the wings shape and stability.

Why You'll Love This Butterfly Amigurumi Pattern

I absolutely love this pattern because it combines classic Irish-lace inspiration with modern shaping techniques to create a timeless decorative piece. The cord-attaching method gives the wings a sculpted look that photographs beautifully and holds its shape. I enjoy how the small round motif evolves into a complex wing through careful stitch choices and arches. Making each wing is meditative and rewarding, and sewing the motifs together brings the entire butterfly to life.

Butterfly Amigurumi Pattern step 1 - construction progress Butterfly Amigurumi Pattern step 2 - assembly progress Butterfly Amigurumi Pattern step 3 - details and accessories Butterfly Amigurumi Pattern step 4 - final assembly and finishing

Switch Things Up

I love customizing this lace butterfly by changing thread color to create vintage or modern looks; try soft neutrals or bright jewel tones for different effects.

To make a smaller butterfly, use thinner thread and a smaller hook, or for a bolder display use thicker thread and a slightly larger hook to create a chunkier lace version.

I often add beads or tiny seed-bead picots to the final edging for a subtle sparkle that catches light on the wings.

Try substituting metallic cord for the shaping cord to add stiffness and a decorative outline to the wing edges.

You can shorten or lengthen the cord sections and adjust arch counts slightly to change the wing curvature and create a variety of poses.

Consider making a matching set of butterflies in graduated sizes to hang as a mobile or in a decorative cluster on a gallery wall.

If you want a wearable piece, attach a loop or small pin at the wing center to turn the finished motif into a brooch or hair accessory.

For a softer look, lightly starch or spray-stiffen the wings before blocking to keep arches smooth without excessive rigidity.

I sometimes embroider subtle veins along the wing surface with contrasting thread to emphasize the lace texture and add visual depth.

Don’t be afraid to mix thread brands or weights for the body and wings; the contrast can highlight the wing details and make the centerpiece stand out.

Common Mistakes & How to Fix Them

βœ— Skipping the cord attachment steps will result in floppy wings that do not hold their shape; always attach the cord where directed and pull it straight to align the wing. βœ— Working into the wrong loop (front versus back loop) can distort counts and shape; mark rows and follow 'front loops' or 'back loops' instructions precisely. βœ— Not measuring the cord length before starting may interrupt the row flow mid-construction; prepare a 4-thread cord at least 65 cm long before beginning the big wing. βœ— Ignoring the photo references for arch placement can create uneven spacing; use the photos to space arches every 3rd loop and check counts after each arch.

Butterfly Amigurumi Pattern

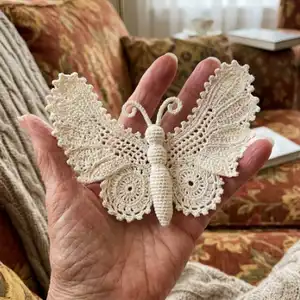
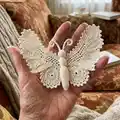
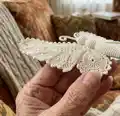
Create an elegant lace butterfly using fine cotton thread and delicate crochet techniques. This pattern guides you through small motif construction and building the large ornate wings, perfect for decor or special gifts. You will work with a fine hook and follow clear step-by-step photographic instructions and row descriptions. Ideal for crocheters who enjoy detailed, lacy projects and shaping with cords.

Advanced 12-15 Hours

Materials Needed for Butterfly Amigurumi Pattern

β€” Main Fabric

  • 01
    DMC Babylo 20 (Size 20 cotton thread) - use fine crochet cotton suitable for 0.6mm hook; quantity: as needed for two wings and body motifs

β€” Tools Required

  • 01
    Crochet hook 0.6 mm
  • 02
    Scissors
  • 03
    Yarn/tapestry needle for sewing and hiding tails
  • 04
    4-thread cord (minimum 65 cm) for wing shaping
  • 05
    Stitch markers (optional)
  • 06
    Blocking pins and surface for blocking shaped wings
  • 07
    Measuring tape

Progress Tracker

0% Complete

β€” Small wing :

Row 1 :

10 ch, join into the ring.

Row 2 :

Work 21 sc, 1 slst into the 1st sc to join

Row 3 :

Then work around different crochets, and always make 1 ch between: 2 ch, 1 hdc, 3 dc, 4 tc, 3 dc, 4 tc, 3 dc, 1 hdc, 1 sc

Row 4 :

Work another round: *make 2 sc into the arch, 1 sc into the loop of PR* - rep till the end. Total 56 sc

Row 5 :

1 ch, turn And work 56 sc in back loops

Row 6 :

1 ch, turn And work 56 sc in back loops

Row 7 :

Turn. 3 ch, 3 dc in the same loop, then work: *1 ch, skip 2 loops, 4 dc in the next same loop* - rep till the end. 1 slst in the 3rd ch Total 19 rapport

Row 8 :

Then make arches: *1 sc in the 1ch of the PR, 5 ch* - rep till the end. 1 slst in the 1st arch

Row 9 :

Work 6 sc in each arch

Row 10 :

Work: *1 sc, 3 ch, 2 sc, 3 ch* - rep till the end

Row 11 :

Small wing is ready Cut the yarn, hide the 1st tail into the middle of motif, and leave the 2nd one to sew to the butterfly body.

β€” Big right wing :

Row 1 :

Work over the 4thread cord 43 sc (Cord has to be minimum 65 cm or longer)

Row 2 :

Turn and work without the cord in back loops only: 1 sc 1 hdc 1 dc 15 tc 5 dc 1 hdc 4 sc

Row 3 :

Turn and work: 1 ch 3 sc 2 hdc 17 dc 2 hdc 3 sc 1 sc over the cord

Row 4 :

Turn, attach the cord, and work together in back loop 21 sc (attaching the cord to the row) 1 sc over the cord only Pull the cord, straight the cord, make the wing align.

Row 5 :

(Later the waviness can NOT be correct) Turn and work 12 sc with the cord (attaching the cord to wing) on front loops Then work 8 sc over the cord only

Row 6 :

Turn and work without the cord in back loops only: 1 ch 1 sc 1 hdc 1 dc 10 tc 5 dc 1 hdc 1 sc

Row 7 :

Turn and work: 1 ch 2 sc 3 hdc 4 dc 7 tc 1 dc 1 hdc 2 sc 1 sc over the cord only

Row 8 :

Turn and work 16 sc on back loops attaching the cord to the wing. Then leave the cord and make arches on the side of the wing. Try to measure even spaces between arches in every 3rd loop: 1 sc, 2 ch, 1 hdc, 2 ch *1sc, 2 ch* - rep 2 times 1 hdc, 2 ch 1 sc into the 3rd loop of the lower cord. Has to be 6 arches in total

Row 9 :

Turn and work 3 sc in each arch. Then 1 sc into the 1st loop of the wing Then grab the cord and work 11 sc on front loops and over the cord together (attaching the cord to the wing); and then work 13 sc over the cord together

Row 10 :

Turn and work without the cord on back loops only: 1 ch 1 sc 1 hdc 1 dc 13 tc 4 dc 1 hdc 1 sc

Row 11 :

Turn: 1 ch 2 sc 1 hdc 4 dc 10 tc 1 dc 1 hdc 3 sc 1 sc over the cord only

Row 12 :

Turn and work 14 sc on back loops attaching the cord to the wing. Then leave the cord and work without it: 1 sc, 2 ch *1 hdc, 2 ch* - rep 1 time *1 dc, 2 ch* - rep 7 times 1 hdc, 2 ch 1 sc into the 3rd loop of the lower cord (Make crochet on even distance from each other. Total 11 arches)

Row 13 :

Turn and work 3 sc in each arch. Then 1 sc into the 1st loop of the wing Then grab the cord and work 8 sc on front loops and over the cord together (attaching the cord to the wing); and then work 15 sc over the cord only

Row 14 :

Turn and work without the cord on back loops only: 1 ch 1 sc 1 hdc 1 dc 17 tc 7 dc 2 hdc 2 sc

Row 15 :

Turn: 1 ch 4 sc 3 hdc 4 dc 15 tc 2 dc 1 hdc 2 sc 1 sc over the cord only

Row 16 :

Turn and work 21 sc on back loops attaching the cord to the wing. Then leave the cord and work without it. Make arches: 1 sc, 2 ch *1 hdc, 2 ch* - rep 2 times *1 dc, 2 ch* - rep 9 times *1 hdc, 2 ch* - rep 1 time 1 sc into the last loop of the lower cord (Make crochet on even distance from each other. Total 15 arches)

Row 17 :

Turn and work 3 sc in each arch. Then 1 sc into the 1st loop of the wing Then grab the cord and work 16 sc on front loops and over the cord together (attaching the cord to the wing); and then work 11 sc over the cord only

Row 18 :

Turn and work without the cord on back loops only: 1 ch 1 sc 1 hdc 1 dc 16 tc 3 dc 4 hdc 1 sc

Row 19 :

Turn: 1 ch 2 sc 3 hdc 5 dc 13 tc 1 dc 1 hdc 2 sc 1 sc over the cord only

Row 20 :

Turn and work 26 sc on back loops attaching the cord to the wing. Then leave the cord and work without it. Make arches: 1 sc, 2 ch *1 dc, 2 ch* - rep 11 times In the end make 1 dc and 1 sc. (Total 13 arches)

Row 21 :

Turn and work 3 sc in each arch. Then 1 sc into the 1st loop of the wing Then grab the cord and work 24 sc on front loops and over the cord together (attaching the cord to the wing); and then work 1 sc over the cord only

Row 22 :

Turn and work sc till the end on back loops attaching the cord to the wing. Leave the cord and make 1 sc into the last loop The cord is NOT needed anymore

Row 23 :

Turn and work 1 slst into the 2nd loop, then work sc till the lower end of the wing on front loops. Note. On wing tops make additional 2 or 3 sc (on top edges we have made 1 sc over the cord only) On lower edges of the wing insert the hook between the vertical threads of cord loops

Row 24 :

Turn *3 ch, 1 dc into the 2nd loop, 3ch-picot, 3 ch, 1 dc into the 2nd loop* - rep all around the wing. Note. You can correct some waviness by skipping the more loops or working in each loop. Finish last arch approximately 0.5 cm till the end and work slst.

Assembly Instructions

  • Hide the first tail of each small wing inside the middle of the motif and leave the second tail to sew the small wing to the butterfly body.
  • Align the small wings symmetrically on the butterfly body and sew using the reserved tail, securing with small invisible stitches.
  • When attaching the big wings, use the cord-attached row tails: insert the hook between vertical thread loops at the lower edge and sew the wing securely to the body.
  • Pull and straighten the cord when instructed (Row 4 on the big wing) to align and shape each wing before final joining and blocking.
  • Block both wings flat after sewing to the body, pinning edges and arches to achieve even spacing and crisp lace definition.

Important Notes

  • πŸ’‘Prepare a 4-thread cord at least 65 cm long before starting the big wing so attachment is continuous and uninterrupted.
  • πŸ’‘Follow front loop and back loop instructions exactly; many shaping rows attach cord or work only in one set of loops to create shape.
  • πŸ’‘Block and shape wings after finishing to correct waviness and set arches; use pins and a damp-blocking surface for best results.

This delicate lace butterfly is an elegant addition to your handmade decor collection, combining fine threadwork and sculpted wing shaping. The pattern uses DMC Babylo 20 and a 0.6 mm hook to create crisp arches and beautiful textures you will be proud to display. Whether you frame it, hang it, or gift it, this butterfly brings a touch of timeless handmade charm to any space. πŸ¦‹πŸ§Ά

You ask,

we answer.

FAQs

What size will the finished piece be?

Finished size depends on your tension and thread, but using DMC Babylo 20 and 0.6 mm hook the wings will be large and suitable for wall or frame display; exact dimensions are variable by gauge.

Can I use different yarn weights for this pattern?

Yes, but changing thread weight will change the final size and look; use an appropriately sized hook and expect to adjust cord length and arch counts for balance.

Do I need prior crochet experience for this pattern?

This pattern is rated advanced because it requires precise stitch counts, working in front/back loops, and cord-attaching techniques; experience with lace motifs and shaping is recommended.

How long does this project typically take to complete?

Most crocheters take 12-15 hours to complete both wings and assembly, though time will vary with experience and blocking time.