🧶 Beautiful ✨ Detailed 💝 Adorable

Farrah Amigurumi Pattern

Farrah Amigurumi Pattern
3.9★ Rating
12-15 Hours Time Needed
2.9K Made This
✂️

Advanced Level

Designed for experienced crocheters, these patterns involve intricate designs and complex techniques to challenge and inspire.

⏱️

Multi-Day Project

A rewarding 12+ hour journey—perfect for dedicated crafters who love detailed work.

🧸

Cute Companion

An adorable friend to cherish, handcrafted with love to bring comfort and joy for years to come.

About This Farrah Amigurumi Pattern

This pattern creates Farrah, a detailed bride amigurumi with a layered wedding dress and sculpted wig. You will crochet arms, legs, body, head, ears and a multi-layer wig, then assemble and embellish the doll. Photo references and notes are provided throughout to guide placement and finishing.

Farrah Amigurumi Pattern crochet pattern - detailed view of completed project

Techniques include spiral rounds, working in FLO/BLO, joining limbs to the body, and detailed hair construction. Suitable for crocheters comfortable with shaping and assembly.

Why You'll Love This Farrah Amigurumi Pattern

I absolutely love this pattern because it transforms simple stitches into a charming bridal character full of personality. I enjoy the layered wig technique — it creates beautiful, flowing hair that really brings Farrah to life. The ruffled wedding dress is one of my favorite parts; the texture is dramatic but surprisingly achievable with the step-by-step rounds. I also love how customizable this design is: you can change yarn colors, adjust hair length, or add accessories to make the doll uniquely yours.

Farrah Amigurumi Pattern step 1 - construction progress Farrah Amigurumi Pattern step 2 - assembly progress Farrah Amigurumi Pattern step 3 - details and accessories Farrah Amigurumi Pattern step 4 - final assembly and finishing

Switch Things Up

I love how versatile this pattern is for customization — change the gown color, add lace or beads, or make a colored veil for a different look.

You can alter the size by changing yarn weight and hook size: bulky yarn with a larger hook gives a chunky version, while thin yarn and a smaller hook create a mini keepsake.

I often personalize the face and expression by slight adjustments to eye placement and eyebrow stitches to create different personalities for each doll.

Try alternate hairstyles: fewer hair strands or longer curls can significantly change the finished silhouette, or attach braids and small bows for variety.

Swap materials for washable versions: use machine-washable yarns and plastic insoles to make the doll easier to care for if it will be handled frequently.

For posability, insert thin wires inside the limbs or use thicker internal wire for a poseable neck and arms so the doll can hold accessories.

I sometimes add tiny crocheted accessories like gloves, a bouquet, or a removable veil to create an outfit set that can be mixed and matched.

Feel free to embroider different eyelash styles, add freckles or blush intensity to create unique facial expressions.

Want a simpler version? Skip the layered wig and embroider hair or use a simpler cap to reduce time without losing character.

Have fun experimenting with pearl beads, sequins, or metallic threads for a more glamorous wedding look — just secure small embellishments carefully for safety.

Common Mistakes & How to Fix Them

✗ Skipping stitch markers during rounds with shaping can make tracking increases or decreases confusing; place markers at the start of important rounds and at key stitch points to stay accurate. ✗ Stuffing too much at once often causes lumps or an uneven shape; stuff gradually and shape as you go, adding small amounts to get a smooth finish. ✗ Changing yarn colors without securing ends may cause bulky joins that show through; weave in tails neatly and change yarn inside stitches when possible to hide joins. ✗ Not preparing the sole inserts leads to sagging feet when the doll is handled; cut and glue plastic or cardboard soles into the feet before finishing to flatten and stabilize them. ✗ Sewing parts without pinning first can cause misaligned limbs or features; always pin the head, arms and wig in place and check symmetry before sewing permanently.

Farrah Amigurumi Pattern

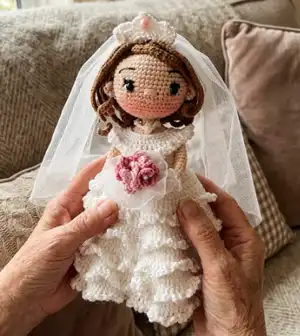
Create a beautiful bridal amigurumi named Farrah, complete with a ruffled wedding gown, delicate wig, and floral bouquet. This detailed pattern walks you through each piece — arms, legs, body, head, wig and dress — with clear rounds and photo references. Perfect for crafters who enjoy assembling intricate dolls and adding personalized finishing touches to a handmade bride.

Advanced 12-15 Hours

Materials Needed for Farrah Amigurumi Pattern

— Main Fabric

  • 01
    Jeans - Yarn Art Skin (code 73): 30g
  • 02
    Jeans - Yarn Art White (code 62): 160g
  • 03
    Jeans - Yarn Art Pink (code 36): 5g
  • 04
    Jeans - Yarn Art Light pink (code 18): 5g
  • 05
    Etrofil Jeans Yellow (code 59) : 30g for wig/hair

— Tools Required

  • 01
    Crochet hook size 2.3 mm (or the size you prefer)
  • 02
    Wire (for internal arm/leg or body support)
  • 03
    Sewing needle
  • 04
    Stitch marker
  • 05
    Scissors
  • 06
    Pink blush makeup powder
  • 07
    Pins for assembly
  • 08
    Optional: wooden spoon/chopstick and clamping scissor to simplify filling
  • 09
    Silicon glue
  • 10
    3 buttons
  • 11
    Fiberfill (polyester stuffing)
  • 12
    2 black safety eyes, size 10 mm
  • 13
    Embroidery thread: black and white
  • 14
    Tulle (50cm x 60cm) for veil
  • 15
    Gauge jewelry wire and green washi tape, pearl beads
  • 16
    Cardboard or plastic sheet for shoe/sole insert

Progress Tracker

0% Complete

— ARMS (make two) :

Round 1 :

6sc in the magic ring (6)

Round 2 :

6inc (12)

Round 3 :

*3sc, 1inc* crochet 3 times (15)

Round 4 - Round 5 :

15sc (15)

Round 6 :

1sc, 2dec, 10sc (13)

Round 7 :

1sc, 1N, 11sc (Crochet "N": photo 1, 2, 3) (13)

Round 8 :

1sc, 1dec, 3sc, 2dec, 3sc (10)

Round 9 :

1dec, 8sc (9)

Info :

Cut the white yarn (62). Change to the skin yarn (73)

Round 10 :

BLO: 9sc (Photo 05) (9)

Round 11 - Round 24 :

9sc (9)

Round 25 :

9sc, 1slst, Fasten off (9)

— Border round (Arms) :

Info :

Working in the FLO of round 09, attach the white yarn (62) (Photo 06)

Round 1 :

9sc (9)

Round 2 :

*[1slst, 3ch]* crochet 9 times (Photo 07), Fasten off (9)

— LEGS (make two) :

Round 1 :

Begin with 5 ch, start in 2nd chain from the hook: 1inc, 2sc, [4sc], bottom side of chain: 2sc, 1inc (photo 10, 11) (12)

Round 2 :

1sc, 1inc, 2sc, 4inc, 2sc, 1inc, 1sc (18)

Round 3 :

1inc, 4sc, *1sc, 1inc* crochet 4 times, 4sc, 1inc (24)

Round 4 - Round 6 :

24sc (24)

Round 7 :

6sc, 6dec, 6sc (18)

Round 8 :

5sc, 4dec, 5sc (14)

Round 9 :

6sc, 1dec, 6sc (13)

Round 10 - Round 11 :

13sc (13)

Info :

Change to the skin Yarn (73), with the last st of Rd 11

Round 12 :

BLO: 6sc, 1dec, 5sc (Photo 14) (12)

Round 13 - Round 19 :

12sc (12)

Round 20 :

1inc, 11sc (13)

Round 21 - Round 22 :

13sc (13)

Round 23 :

1inc, 12sc (14)

Round 24 - Round 29 :

14sc (14)

Round 30 :

1inc, 13sc (15)

Round 31 - Round 34 :

15sc (15)

Round 35 :

15sc, 1slst, Fasten off (15)

— Border round (Legs) :

Info :

Working in the FLO of round 11, attach the white yarn (62) (Photo 15)

Round 1 :

13sc (13)

Round 2 :

*[1slst, 3ch]* crochet 13 times, Fasten off (13)

— BODY :

Round 36 :

15sc (around the 1st leg), 4sc (along the chain), 15sc (around the 2rd leg), 4sc (along the chain) (Photo 23) (38)

Round 37 :

*2sc, 1inc* crochet 2 times, 1inc, 22sc, *1inc, 2sc* crochet 3 times (44)

Round 38 :

*4sc, 1inc* crochet 2 times, 24sc, *1inc, 4sc* crochet 2 times (48)

Round 39 - Round 44 :

48sc (48)

Round 45 :

*6sc, 1dec* crochet 6 times (42)

Round 46 :

*1dec, 5sc* crochet 6 times (36)

Info :

Cut the white yarn (62). Change to the skin yarn (73)

Round 47 :

36sc (36)

Round 48 - Round 55 :

36sc (36)

Round 56 :

start to join arms: 9sc on the body, from body and arm together 3sc, 15sc, from body and arm together 3sc, 6sc (Photo 25,26) (36)

Round 57 :

9sc, 6sc from outer sts of arm, 15sc, 6sc from outer sts of arm, 6sc (Photo 27) (42)

Round 58 :

*5sc, 1dec* crochet 6 times (36)

Round 59 :

*2sc, 1dec, 2sc* crochet 6 times (30)

Round 60 :

*3sc, 1dec* crochet 6 times (24)

Round 61 :

*1sc, 1dec, 1sc* crochet 6 times (18)

Round 62 :

*1sc, 1dec* crochet 6 times (12)

— NECK AND HEAD :

Info :

If you choose the 2nd option, insert a stick (or wire) to the doll's neck (Photo 30)

Round 63 - Round 66 :

12sc (12)

Round 67 :

12inc (24)

Round 68 :

*1sc, 1inc* crochet 12 times (36)

Round 69 :

*5sc, 1inc* crochet 6 times (42)

Round 70 :

3sc, 1inc, *6sc, 1inc* crochet 5 times, 3sc (48)

Round 71 :

*7sc, 1inc* crochet 6 times (54)

Round 72 - Round 83 :

54sc (54)

Round 84 :

*7sc, 1dec* crochet 6 times (48)

Round 85 :

3sc, 1dec, *6sc, 1dec* crochet 5 times, 3sc (42)

Round 86 :

*5sc, 1dec* crochet 6 times (36)

Round 87 :

2sc, 1dec, *4sc, 1dec* crochet 5 times, 2sc (30)

Round 88 :

*3sc, 1dec* crochet 6 times (24)

Round 89 :

1sc, 1dec, *2sc, 1dec* crochet 5 times, 1sc (18)

Round 90 :

*1sc, 1dec* crochet 6 times (12)

Round 91 :

6dec, 1slst, Fasten off (6)

Info :

Put the eyes between round 76 and 77. The distance between two eyes is 9 stitches (photo 35). Use the skin yarn (73) to attach and secure the eyes for deeper look.

— EARS (make two) :

Info :

With skin (73) color: Begin with 2ch, start in 2nd chain from the hook: [6dc], 1slst, leave a long tail to sew the ears on the head, Fasten off (Photo 45)

Info :

Sew the ears between Rd 77 and Rd 79. The space between eye and ear is 5 stitches (photo 46)

— WIG :

Round 1 :

8sc in the magic ring (8)

Round 2 :

BLO: 8inc (16)

Round 3 :

BLO: *1sc, 1inc* crochet 8 times (24)

Round 4 :

BLO: *1sc, 1inc, 1sc* crochet 8 times, DO NOT cut the yarn (32)

— HAIR STRANDS :

Layer 1 (Work in the Rd 4) :

Total 16 strands (photo 48, 49, 50). Row 1 =>13: 23ch, start in 2nd chain from the hook: 22hdc, then crochet in this Rd 4: 1sk, 1sc

Layer 1 (continued) :

Row 14 =>16: 28ch, start in 2nd chain from the hook: 27hdc, then crochet in this Rd 4: 1sk, 1sc

Layer 2 (Work in the FLO of Rd 3) :

Total 12 strands (photo 51, 52). Row 17 =>28: 39ch, start in 2nd chain from the hook: 38hdc, then crochet in this FLO of Rd 3: 1sk, 1sc

Layer 3 (Work in the FLO of Rd 2) :

Total 8 strands (photo 53, 54). Row 29 =>36: 39ch, start in 2nd chain from the hook: 38hdc, then crochet in this FLO of Rd 2: 1sk, 1sc

Layer 4 (Work in the FLO of Rd 1) :

Total 4 strands (photo 55, 56). Row 37 =>40: 36ch, start in 2nd chain from the hook: 35hdc, then crochet in this FLO of Rd 1: 1sk, 1sc, Fasten off and weave in the ends.

— ASSEMBLY :

Info :

For correct placement of the wig insert a pin both through the magic ring of the cap and the magic ring of the head (photo 57). Align the wig so it covers the sides of the head evenly and pin the edge of the cap to the head (photo 58, 59).

Info :

Use matching colored sewing thread to sew (or use Silicon glue) the wig to the head (photo 60). Blush your doll's cheeks (Photo 62).

— WEDDING DRESS - UPPER BODY :

Round 1 :

Begin with 41, start in 2nd chain from the hook: 40sc, turn (40)

Round 2 :

40sc, turn (40)

Round 3 :

BLO: *9sc, 1inc* crochet 4 times, turn (44)

Round 4 :

1ch, 7sc, 7ch, 8sk, 14sc, 7ch, 8sk, 7sc, turn (Photo 64, 65) (42)

Round 5 :

1ch, 1inc, 5sc, 1inc, 7sc (into 7ch), 1inc, 12sc, 1inc, 7sc (into 7ch), 1inc, 5sc, 1inc, turn (48)

Round 6 - Round 9 :

1ch, 48sc, turn (48)

Round 10 :

1ch, 48sc, (do not turn), 1slst onto the first stitch to form a circle (48) (Photo 67)

Layer 1 - Round 11 :

BLO: 2ch, *1dc, 1dc-inc* crochet 24 times, 1slst (72)

Layer 1 - Round 12 - Round 14 :

2ch, 72dc, 1slst (72)

Layer 1 - Round 15 :

BLO: *2dc, 1dc-inc* crochet 24 times, 1slst (96)

Layer 1 - Round 16 - Round 18 :

2ch, 96dc, 1slst (96)

Layer 1 - Round 19 :

BLO: 2ch: *3dc, 1dc-inc* crochet 24 times, 1slst (120)

Layer 1 - Round 20 - Round 22 :

2ch, 120dc, 1slst (120)

Layer 1 - Round 23 :

BLO: 2ch: *4dc, 1dc-inc* crochet 24 times, 1slst (144)

Layer 1 - Round 24 - Round 27 :

2ch, 144dc, 1slst (144)

Layer 1 - Round 28 :

2ch, *1dc, 1ch* crochet 144 times, 1slst (144)

Layer 1 - Round 29 :

*[1sc,5ch,1slst] - at 1ch of Rd28* crochet 144 times, Fasten off and weave in the ends. (photo 71) (144)

Assembly Instructions

  • For correct placement of the wig insert a pin both through the magic ring of the cap and the magic ring of the head, then align and pin the wig edges to the head before sewing.
  • Sew the wig to the head using matching thread or attach with silicone glue, securing the edges first and then stitching through the cap and head for durability.
  • Connect the two legs together from the back by aligning the connection point to the middle, then crochet 4 ch with white yarn (62) and join to the first leg as shown in photos, before continuing body rounds.
  • Attach arms by joining them during the body rounds (Round 56 onward): place 9sc on the body, then crochet body-and-arm together stitches as indicated and sew any remaining seams securely.

Important Notes

  • 💡Use stitch markers to keep track of the start of rounds and key shaping points, especially when joining limbs and placing eyes.
  • 💡Prepare shoe insoles from plastic or cardboard and glue them inside the foot to flatten and stabilize the sole for durability.
  • 💡Stuff firmly but not overly tight; stuff gradually and shape while stuffing to avoid lumps and to preserve the doll's proportions.
  • 💡Pin all parts in place before sewing permanently to ensure correct positioning and symmetry; refer to the photo callouts for exact placement.
  • 💡When changing yarn colors, weave in ends neatly and hide color joins inside stitches for a clean finish.

This Farrah bride amigurumi pattern is a labor of love with a full gown, wig, and tiny bouquet to finish. The layered hair and ruffled skirt give the doll an elegant, handmade presence. Whether for display or as a special gift, Farrah brings charm and personality to your crochet collection. 🧶👰✨

You ask,

we answer.

FAQs

What size will the finished piece be?

The finished amigurumi measures approximately 32 cm tall when using the recommended yarn and hook size as shown in the photos.

Can I use different yarn weights for this pattern?

Yes, you can use different yarn weights, but this will affect the final size and texture; choose an appropriate hook for your yarn and expect size changes.

Do I need prior crochet experience for this pattern?

This pattern is rated advanced due to detailed shaping, multiple sections and assembly techniques, so prior experience with amigurumi and sewing is recommended.

How long does this project typically take to complete?

Most crocheters complete this project in 12-15 hours, though time may vary based on experience level, customization and finishing details.