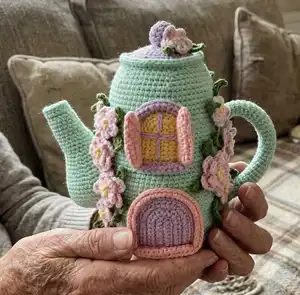
Make a charming spring teapot house amigurumi with delicate windows, shutters, flowers and a sturdy handle. This pattern walks you through every round and assembly step so you can create a decorative toy or tabletop accent. Designed with clear photos and finishing tips, it is perfect for makers who enjoy shaping and small-detail work.
Progress Tracker
0% Complete
— Teapot Bottom / Base :
Info :
Start crocheting from the teapot bottom with mint yarn. Use a piece of yarn of contrasting color as a marker for easy rounds counting.
Round 2 :
inc*6=12 sc (12)
Round 3 :
(1 sc, inc)*6=18 sc (18)
Round 4 :
1 sc, inc, (2 sc, inc)*5, 1 sc=24 sc (24)
Round 5 :
(3 sc, inc)*6=30 sc (30)
Round 6 :
2 sc, inc, (4 sc, inc)*5, 2 sc=36 sc (36)
Round 7 :
(5 sc, inc)*6=42 sc (42)
Round 8 :
3 sc, inc, (6 sc, inc)*5, 3 sc=48 sc (48)
Round 9 :
(7 sc, inc)*6=54 sc (54)
Round 10 :
4 sc, inc, (8 sc, inc)*5, 4 sc=60 sc (60)
Round 11 :
(9 sc, inc)*6=66 sc (66)
Round 12 :
5 sc, inc, (10 sc, inc)*5, 5 sc=72 sc (72)
Round 13 :
(11 sc, inc)*6=78 sc (78)
Round 14 :
6 sc, inc, (12 sc, inc)*5, 6 sc=84 sc (84). Finish with a sl st, do not cut the yarn.
Info :
Cut out from plastic a circle according to the size of crocheted detail and glue it on the wrong side. I used a leftover of hard plastic canvas for it.
Round 15 :
84 sc through the back loops (84)
Round 16-24 :
9 rounds of 84 sc (84)
— Body :
Round 25 :
(12 sc, dec)*6=78 sc (78)
Round 26-34 :
9 rounds of 78 sc (78)
Round 35 :
(11 sc, dec)*6=72 sc (72)
Round 36-43 :
8 rounds of 72 sc (72)
Round 44 :
(10 sc, dec)*6=66 sc (66)
Round 45-50 :
6 rounds of 66 sc (66)
Round 51 :
(9 sc, dec)*6=60 sc (60)
Round 53 :
(8 sc, dec)*6=54 sc (54)
Round 54 :
(7 sc, dec)*6=48 sc (48)
Round 55 :
Change yarn to lilac, sc 48 through the back loops (48)
Round 56 :
48 sc through both loops (48)
Round 57 :
(6 sc, dec)*6=42 sc (42)
Round 58 :
(5 sc, dec)*6=36 sc (36)
Round 59 :
(4 sc, dec)*6=30 sc (30)
Round 60 :
(3 sc, dec)*6=24 sc (24)
Round 61 :
(2 sc, dec)*6=18 sc (18)
Round 62 :
(1 sc, dec)*6=12 sc (12)
Round 63 :
Dec every st until the opening closes (add fiberfill if necessary). Cut the yarn and fix the end.
Info :
Join the mint yarn to the 54th round and crochet through the front loops: 3 sc, inc, (7 sc, inc)*5, 4 sc = 54 sc
Round 64 :
Crochet 2 rounds more of 54 sc each. Finish with a sl st, leave a long end.
Info :
Thread the end of the yarn into the needle. Fold the edge inward and stitch around.
Info :
Join lilac yarn to the bottom line and sl st through the front loops.
Round 65 :
Sc 1 round through the back loops of sl st (54)
Round 66 :
Sl st one more round. Cut the yarn and fix the end.
— Spout :
Round 2 :
inc*6=12 sc (12)
Round 3 :
(1 sc, inc)*6=18 sc (18). Crochet one more sc after the last inc and finish with a sl st. Do not cut the yarn.
Round 4 :
18 sc through the back loops (18)
Round 8 :
inc, 17 sc = 19 sc (19)
Round 9 :
2 sc, inc, 16 sc = 20 sc (20)
Round 10 :
2 sc, inc, 17 sc = 21 sc (21)
Round 11 :
2 sc, inc, 18 sc = 22 sc (22)
Round 12 :
2 sc, inc, 19 sc = 23 sc (23)
Round 13 :
2 sc, inc, 20 sc = 24 sc (24)
Round 15 :
(3 sc, inc)*6=30 sc (30)
Round 18 :
(4 sc, inc)*6=36 sc (36)
Round 21 :
(5 sc, inc)*6=42 sc (42)
Round 24 :
(6 sc, inc)*6=48 sc (48)
Round 28 :
(6 sc, dec)*6=42 sc (42)
Round 29 :
(5 sc, dec)*6=36 sc (36). Stuff the narrow part tightly and the wide part looser.
Round 30 :
(4 sc, dec)*6=30 sc (30)
Round 31 :
(3 sc, dec)*6=24 sc (24)
Round 32 :
(2 sc, dec)*6=18 sc (18)
Round 33 :
(1 sc, dec)*6=12 sc (12)
Round 34 :
dec*6. Cut the yarn and fix the end.
Info :
Join yarn to the 3rd round and sc 18 through the front loops.
Round 35 :
Crochet one more round of 18 sc and the last one 18 sl st. Cut the yarn and fix the end.
Info :
The spout needs to be attached to the teapot so that the marker on the first rows looks at the teapot.
Info :
Slightly flatten the lower wide part of the spout and attach to the teapot with pins.
Info :
Start sewing from the lower center point, gradually removing the pins. Neatly sew around.
— Handle :
Info :
For handle sc 6 in AR, inc*6 in the second round.
Info :
Then crochet spiral rounds up without inc.
Info :
Put 4 chenille wires together, fold in half and twist them together. Crochet the handle to the fitting length.
Info :
Put the wire inside and sew the opened end with the end of the yarn.
Info :
Bend the flat end of the handle and sew to the teapot. Sew the second end close to the bottom.
— Lid and Lid Edge :
Round L1 :
After body top shaping and filling: Change yarn to lilac and continue the lid detail as follows (join to previous indicated round).
Round L2 :
sc 48 through the back loops (48)
Round L3 :
48 sc through both loops (48)
Round L4 :
(6 sc, dec)*6=42 sc (42)
Round L5 :
(5 sc, dec)*6=36 sc (36)
Round L6 :
(4 sc, dec)*6=30 sc (30)
Round L7 :
(3 sc, dec)*6=24 sc (24)
Round L8 :
(2 sc, dec)*6=18 sc (18)
Round L9 :
(1 sc, dec)*6=12 sc (12)
Round L10 :
Dec every st until the opening closes (add fiberfill if necessary). Cut the yarn and fix the end.
Info :
Join the mint yarn to the 54th round and crochet through the front loops: 3 sc, inc, (7 sc, inc)*5, 4 sc = 54 sc. Crochet 2 rounds more of 54 sc each. Finish with a sl st, leave a long end.
Info :
Thread the end of the yarn into the needle. Fold the edge inward and stitch around.
Info :
Join lilac yarn to the bottom line and sl st through the front loops. Sc 1 round through the back loops of sl st. Sl st one more round. Cut the yarn and fix the end.
— Lid Handle :
Round H1 :
Crochet the lid handle with lilac yarn: 1. 6 sc in AR (6)
Round H2 :
2. inc*6=12 sc (12)
Round H3-4 :
3-4. 2 rounds of 12 sc. Stuff.
Round H5 :
5. dec*6, cut the yarn, leave a long end.
Info :
Sew to the lid with the end of the yarn.
— Door :
Info :
Crochet door with lilac yarn. Chain 10, crochet U-shaped rows with a turning ch in the beginning of every row.
Row 1 :
1. 8 sc, 3 inc in the last loop, 8 sc along the bottom side of the chain = 19 sc (19)
Row 2 :
2. 8 sc, inc*3, 8 sc = 22 sc (22)
Row 3 :
3. 8 sc, (1 sc, inc)*3, 8 sc = 25 sc (25)
Row 4 :
4. 8 sc, (2 sc, inc)*3, 8 sc = 28 sc (28)
Row 5 :
5. 8 sc, (3 sc, inc)*3, 8 sc = 31 sc (31)
Row 6 :
6. 8 sc, (4 sc, inc)*3, 8 sc = 34 sc (34)
Row 7 :
7. Change yarn to the pink, crochet through the back loops: 8 sc, (5 sc, inc)*3, 8 sc = 37 sc (37)
Row 8 :
8. Crochet through the back loops 37 sc (37)
Row 9-10 :
9-10. 2 more rows of 37 sc through both loops. Leave a long end.
Info :
Thread the end of the pink yarn into the needle. Fold the pink part in half (outwards) and sew the edge to the front loops of the 7th row.
Info :
Roll the pink part inwards and sew with the end of the yarn. Sew the corners.
Info :
Join the pink yarn to the bottom side of the door and sc 7 rows of 13 sc. Leave a long end. Roll the pink part inwards and sew. Sew corners.
— Window :
Info :
Crochet window with light yellow yarn. Chain 8, crochet like the door U-shaped rows.
Row W1 :
1. 6 sc, 3 sc in the last loop, 6 sc along the bottom side of the chain = 15 sc (15)
Row W2 :
2. 6 sc, inc*3, 6 sc = 18 sc (18)
Row W3 :
3. 6 sc, (1 sc, inc)*3, 6 sc = 21 sc (21)
Row W4 :
4. 6 sc, (2 sc, inc)*3, 6 sc = 24 sc (24)
Row W5 :
5. change yarn to the lilac, crochet through the back loops: 6 sc, (3 sc, inc)*3, 6 sc = 30 sc (30)
Row W6 :
6. 30 sc through the back loops (30)
Row W7-8 :
7-8. 2 rows of 30 sc through both loops. Leave a long end.
Info :
Fold the lilac part outwards and sew. Sc 4 rows of 10 sc with lilac yarn along the bottom side of the window.
Info :
Fold inwards, sew with the end of the yarn. Sew the corners. Stitch a cross-shaped frame on the window.
— Shutters :
Info :
Crochet the shutters in pink: make 2 pcs like light yellow parts of the window. Leave long ends.
Info :
Fold in half and sew all the opened sides over the edge. Sew to the window. Make another window, change the colors of the frame and the shutter in places.
— Flowers & Petals :
Info :
Crochet the flowers with light pink yarn: Chain 5, close into the ring with a sl st.
Petal :
Crochet in the ring (not into every loop) 2 ch, 2 dc, 2 ch, sl st – it should be one petal. Repeat to make petals for a flower.
— Assembly :
Item :
Glue or sew the door and one window above it.
Item :
Attach the second window at the opposite side of the teapot.
Item :
Attach the spout aligning the marker, pin and sew from the lower center point, removing pins as you go.
Item :
Slightly flatten the lower wide part of the spout and sew neatly around to attach securely to the body.
Item :
Insert the twisted chenille wires into the handle, sew the open end closed and bend the flat ends to sew them securely to the teapot body near the top and bottom points.
Item :
Sew lid handle to the lid. Sew flowers, leaves, windows and shutters in place with long ends and secure; use hot glue for small plastic reinforcements if desired.
This Spring Teapot House is a delightful little project that brings a bit of floral magic to your home or gift table. The pattern includes complete round-by-round instructions and clear assembly steps so you can create a neat, sturdy teapot house with windows, shutters and blooming flowers. Enjoy customizing colors and details to make each teapot unique—happy crocheting! 🧶🌸