🧢 Beautiful ✨ Detailed πŸ’ Adorable

Batman Amigurumi Pattern

Batman Amigurumi Pattern
4.2β˜… Rating
5-7 Hours Time Needed
2.1K Made This
βœ‚οΈ

Intermediate Level

Ideal for those with basic crochet experience, featuring slightly more advanced stitches and techniques to expand your skills.

⏱️

Weekend Treat

Takes 5-7 hours, making it an enjoyable project to finish over a couple of days.

🧸

Cute Companion

An adorable friend to cherish, handcrafted with love to bring comfort and joy for years to come.

About This Batman Amigurumi Pattern

This pattern guides you through making a small Batman amigurumi complete with mask, ears, cape and embroidered emblem. It uses YarnArt Jeans in multiple colors and a 2mm hook to achieve a neat, compact finish. The design includes color change tips and clear construction steps to assemble the toy securely. Photos included in the pattern show key steps for shaping and finishing.

Batman Amigurumi Pattern crochet pattern - detailed view of completed project

You will crochet all parts separately and sew them together for a professional look. The pattern covers color changes, embroidery details and how to hide thread tails.

Why You'll Love This Batman Amigurumi Pattern

I absolutely love this pattern because it transforms simple stitches into a character full of personality and charm. I enjoy the clever color changes and the tiny embroidered emblem that bring the superhero costume to life. The design is compact and satisfying to make, perfect for a focused weekend project. I also like that it teaches useful techniques like working through BLO, invisible color joins, and neat assembly.

Batman Amigurumi Pattern step 1 - construction progress Batman Amigurumi Pattern step 2 - assembly progress Batman Amigurumi Pattern step 3 - details and accessories Batman Amigurumi Pattern step 4 - final assembly and finishing

Switch Things Up

I love how easy it is to customize this pattern by changing colors β€” try pastel shades for a softer, whimsical bat-hero.

For a chunkier, cuddlier version use a bulkier yarn and a larger hook; this will create a larger amigurumi ideal for hugs.

To make a keychain or pocket pal, use thinner yarn and a smaller hook to shrink the pattern down to a tiny size.

I often add felt accessories like a tiny utility belt or felt eyes instead of embroidery for a different finish and faster assembly.

Try embroidering different facial expressions or eye shapes to give each character a unique personality.

You can switch the emblem technique: embroider as shown, or cut an emblem from fleece and glue or sew it for a neat alternative.

Add wire inside the arms for posability if you want your figure to hold small props or pose on a shelf.

Mix yarn texturesβ€”use a slightly fuzzy yarn for the cape to make it look more dramatic and tactile.

If making for a child, use securely sewn features or felt rather than small detachable pieces to improve safety.

Experiment with ombre or variegated yarn for the body or cape for an unexpected, modern look that still follows the same construction steps.

Common Mistakes & How to Fix Them

βœ— Skipping stitch markers during rounds can make it hard to find the start of each round; place a marker at the beginning of every round to track your work. βœ— Changing colors incorrectly can leave loose loops and gaps; when switching, finish the last stitch to two loops and pull new color through the two loops to complete the stitch. βœ— Not stuffing gradually causes lumps or flat areas; add stuffing bit by bit and shape as you go, especially in the head and body. βœ— Cutting threads too early before securing can lead to unraveling; always tie or weave in tails securely and hide them inside the piece before trimming.

Batman Amigurumi Pattern

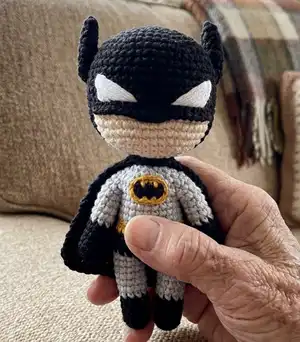
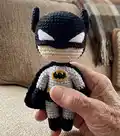
Create an adorable pocket-sized Batman amigurumi with this detailed crochet pattern. You will follow clear step-by-step rounds, color changes, and finishing instructions to make a charming superhero toy. The pattern includes instructions for the head, body, arms, legs, ears, cape, mask, and embroidered emblem to give your figure personality. Perfect for gifting or keeping as a handmade collectible.

Intermediate 5-7 Hours

Materials Needed for Batman Amigurumi Pattern

β€” Main Fabric

  • 01
    YarnArt Jeans black - color 53 (use for mask, cape, gloves, boots and parts of body)
  • 02
    YarnArt Jeans gray - color 80 (use for main body and legs)
  • 03
    YarnArt Jeans white - color 62 (use for eye details)
  • 04
    YarnArt Jeans yellow - color 35 (use for belt and emblem edging)
  • 05
    YarnArt Jeans beige - color 05 (use for face/skin area)
  • 06
    YarnArt Jeans mustard - color 84 (alternative yellow for accents)

β€” Tools Required

  • 01
    Crochet hook size 2mm
  • 02
    Stuffing material (polyester fiberfill)
  • 03
    Scissors
  • 04
    Pins
  • 05
    Needle for sewing and embroidery
  • 06
    Stitch markers (optional)

Progress Tracker

0% Complete

β€” Arms :

Round 1 :

In black: 4 sc into MR

Round 2 :

In black: inc*4 (8)

Round 3-6 :

In black: 8 sc (4 rounds)

Info :

Switch to gray yarn: To change the color, do not work the last stitch of black color till the end (2 loops on the hook). Take the gray yarn and close the stitch with it by working through 2 loops. Tie a knot and hide them inside the legs. Change the color this way every time.

Round 7 :

In gray: 8 sc through BLO

Round 8-12 :

In gray: 8 sc (5 rounds), 1 sl st. Cut the thread leaving a long tail for sewing. Stuff the piece (not firmly).

Info :

Make the second arm.

β€” Legs :

Round 1 :

In black: 5 sc into MR

Round 2 :

In black: inc*5 (10)

Round 3-6 :

In black: 10 sc (4 rounds)

Info :

Switch to gray yarn:

Round 7 :

In gray: Through BLO: 10 sc

Round 8-11 :

In gray: 10 sc (4 rounds)

Info :

Stuff the piece till the middle.

Info :

Cut the thread on the first leg. Make the second one in the same way, but also work 1 sl st at the end of the last round. Don't cut the gray thread. Tie the black and gray tails in a knot and cut them off. Take the second leg and pull the gray loop out from the black one.

β€” Body :

Info :

Go back to the first leg. Take the black yarn and pull it out, working 1 sl st. Chain 1.

Round 1 :

In gray: 10 sc along the leg, In black: 2 sc along the chain, In gray: 10 sc along the leg, In black: 2 sc along the other side of the chain (24)

Round 3-5 :

In black: 24 sc (3 rounds). Stuff the legs.

Round 6 :

In yellow: 24 sc

Round 7 :

In gray: 24 sc through BLO

Info :

Cut the black thread and tie it with the yellow one in a knot. Hide them inside the piece. Don't cut the yellow one for now.

Round 8 :

In gray: (4 sc, dec)*4 (20)

Round 9-10 :

In gray: 20 sc (2 rounds)

Round 11 :

5 sc, 8 sc along the arm (leave the threads from the arms in the armpit area), skip 1 sc on the body, 1 sc along the body, In yellow: 5 sc, In gray: 2 sc, 8 sc along the arm, skip 1 sc on the body, 5 sc (34)

Info :

Sew the armpit area with the remaining threads. Fasten the tails and hide them inside the body.

Round 12 :

In gray: 4 sc, dec, 5 sc, dec, In yellow: 7 sc, In gray: dec, 5 sc, dec, 5 sc (30)

Round 13 :

In gray: 3 sc, dec, 4 sc, dec, 1 sc, In yellow: 1 sc, dec, 2 sc, In gray: 1 sc, dec, 4 sc, dec, 2 sc, dec (24)

Info :

Fix and cut the yellow thread. Stuff the piece.

Round 14 :

(1 sc, dec)*8 (16)

Info :

Stuff the body (don't stuff the arms).

Round 15 :

(2 sc, dec)*4 (12)

Round 16 :

12 sc, 1 sl st. Cut the thread leaving a long tail for sewing. Add some stuffing material to the body.

β€” Head :

Round 1 :

In black: 6 sc into MR

Round 2 :

In black: inc*6 (12)

Round 3 :

In black: (1 sc, inc)*6 (18)

Round 4 :

In black: (2 sc, inc)*6 (24)

Round 5 :

In black: (3 sc, inc)*6 (30)

Round 6 :

In black: (4 sc, inc)*6 (36)

Round 7 :

In black: (5 sc, inc)*6 (42)

Round 8 :

In black: (6 sc, inc)*6 (48)

Round 9-16 :

In black: 48 sc (8 rounds)

Round 17 :

In black: inc, 20 sc, inc (24)

Round 18-19 :

In black: 24 sc (2 rounds)

Round 20 :

In black: inc, 18 sc, inc (22)

Round 21 :

In black: inc, 16 sc, inc (20)

Round 22 :

In black: inc, 14 sc, inc (18)

Round 23 :

In black: (3 sc, dec)*2, 2 sc, In beige: 1 sc, (dec, 3 sc)*2, In black: dec, 3 sc, dec (24). Stuff the piece.

Round 24 :

In black: (2 sc, dec)*2, 2 sc, In beige: (dec, 2 sc)*2, In black: dec, 3 sc, dec (18)

Round 25 :

In black: (1 sc, dec)*3, In beige: 1 sc, dec, 1 sc, In black: dec, 1 sc, dec (12), 1 sl st. Fix and cut the threads. Hide them inside the head. Add some stuffing material.

β€” Ears :

Round 1 :

In black: 6 sc into MR

Round 2 :

In black: inc*6 (12)

Round 3 :

In black: (1 sc, inc)*6 (18)

Round 4 :

In black: (2 sc, inc)*6 (24), 1 sl st. Cut the thread, leaving a long tail for sewing.

Info :

Fold the ear in half and sew, grabbing the back loops of the stitch. Pin both ears to the head and sew them till the middle.

β€” Design (Mask, Eyes, Emblem) :

Info :

MASK: Attach black yarn (leave a long tail for hiding it with a needle) to the first front loop on the head with 1 sl st, keeping the head facing you.

Round 1 :

6 sl st, 1 sc, 2 hdc, 1 sc, 7 sl st

Info :

Cut the thread. Hide the tails inside the head with a needle. Using a needle, embroider two triangles and fill them with stitches. Sew the ears.

Info :

EYES: Cut a long white thread and divide it in half into 2 thin threads. Align and embroider the triangles forming the eyes and fill with stitches. You can also hide extra white spots with gray yarn so everything looks neat.

Info :

EMBLEM: Cut the yellow thread and also divide it in half into 2 thin threads. Align the emblem with the thread, making an oval. Cut the black thread and divide it in half. Embroider the bat, first outlining, and then filling it with stitches.

Info :

To do this, divide the thread in the same way and embroider the imitation of sl st, as shown. Do the same with the belt. If you don't want to embroider, draw or glue a figure cut out of fleece.
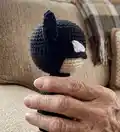
β€” Cape :

Info :

Chain 10 in black, leaving a long thread, and work in turning rows – chain 1 and turn the piece at the end of each row.

Round 1 :

From the second loop from the hook: inc, 3 sc, inc, 3 sc, inc (12)

Round 2 :

12 sc

Round 3 :

inc, 10 sc, inc (14)

Round 4 :

14 sc

Round 5 :

inc, 12, inc (16)

Round 6-7 :

16 sc (2 rounds)

Round 8 :

inc, 14 sc, inc (18)

Round 9-10 :

18 sc (2 rounds)

Round 11 :

inc, 16 sc, inc (20)

Round 12-13 :

20 sc (2 rounds)

Round 14 :

inc, 18 sc, inc (22)

Round 15-16 :

22 sc (2 rounds)

Round 17 :

inc, 20 sc, inc (24)

Round 18-19 :

24 sc (2 rounds)

Info :

Cut the thread. Hide the tail inside the stitches with a needle. Wind the first tail around the neck and sew it to the other corner of the cape with a needle. Fasten the thread and hide it inside the body.

Assembly Instructions

  • Sew the armpit area with the remaining arm threads, fasten the tails and hide them inside the body for a neat finish.
  • Pin both ears to the head and sew them until the middle, then hide the thread tails inside the head and add stuffing.
  • Sew the head to the body, stuffing the neck very firmly and securing with the long tail left from the head to ensure stability.
  • Wind the cape tail around the neck and sew the cape corner to the other corner with a needle; fasten the thread and hide it inside the body.
  • Embroider the emblem on the chest: outline the oval with yellow, then embroider and fill the bat shape with the divided black thread, hiding tails inside the body.

Important Notes

  • πŸ’‘Work color changes by finishing the last stitch of the old color to two loops and pulling the new color through both loops to avoid loose gaps.
  • πŸ’‘Use stitch markers to mark the start of each round and keep track of increases and decreases for symmetrical shaping.
  • πŸ’‘Stuff the head and body gradually and adjust stuffing before final closing to avoid lumps or overstuffed areas.
  • πŸ’‘Hide and secure thread tails inside the piece before cutting to prevent unraveling and ensure a clean finish.

This compact Batman amigurumi is a delightful weekend make with lots of tiny details and charm. The pattern walks you through color changes, embroidery and assembly so your superhero looks polished and ready to display. Perfect as a gift or a small handmade collectible to brighten any shelf. πŸ§ΆπŸ¦‡βœ¨

You ask,

we answer.

FAQs

What size will the finished piece be?

The height of the finished toy is approximately 12 cm when using YarnArt Jeans and a 2mm hook as recommended.

Can I use different yarn weights for this pattern?

Yes, you can use different yarn weights, but this will affect the final size and may require a different hook; always adjust your hook to match gauge and desired size.

Do I need prior crochet experience for this pattern?

This pattern is rated intermediate; it assumes you know basic amigurumi techniques like magic ring, single crochet, increases, decreases, and basic color changes.

How long does this project typically take to complete?

Most crocheters complete this project in 5-7 hours, though time may vary based on experience level and working pace.