🧢 Beautiful ✨ Detailed πŸ’ Adorable

Circus Clown Amigurumi Pattern

Circus Clown Amigurumi Pattern
4.0β˜… Rating
5-7 Hours Time Needed
1.2K Made This
βœ‚οΈ

Intermediate Level

Iideal for those with basic crochet experience, featuring slightly more advanced stitches and techniques to expand your skills.

⏱️

Weekend Treat

Takes 5-7 hours, making it an enjoyable project to finish over a couple of days.

🧸

Cute Companion

An adorable friend to cherish, handcrafted with love to bring comfort and joy for years to come.

About This Circus Clown Amigurumi Pattern

This pattern creates a colorful Circus Clown amigurumi with detailed hair, a tiny hat, striped legs and whimsical curled shoes. Each part is crocheted in the round and assembled for a sturdy finished toy. It uses YarnArt Jeans and Alize Cotton Gold as shown, and includes a spike single crochet special stitch for the overalls.

Circus Clown Amigurumi Pattern crochet pattern - detailed view of completed project

You will work small pieces like ears, cheeks, nose and shoe balls, then sew them together carefully. The pattern includes photo-supported assembly steps and tips for finishing touches.

Why You'll Love This Circus Clown Amigurumi Pattern

I absolutely love this pattern because it captures playful character with simple shapes and bold colors. I enjoy how the spike stitch on the overalls adds texture without complexity. Sewing the hair and hat in place is satisfying and makes the clown come to life. The mix of small components means every step feels like progress toward a charming finish.

Circus Clown Amigurumi Pattern step 1 - construction progress Circus Clown Amigurumi Pattern step 2 - assembly progress Circus Clown Amigurumi Pattern step 3 - details and accessories Circus Clown Amigurumi Pattern step 4 - final assembly and finishing

Switch Things Up

I love how easy it is to customize this clown by changing yarn colors; swap the bright palette for pastels for a softer look or go neon for maximum fun.

I often make a mini version by using sport weight yarn and a 2.0mm hook to create keychain-sized versions that are perfect as gifts.

I sometimes replace the embroidered eyes with small safety eyes if the toy is for an adult display piece, but for children I prefer embroidered eyes for safety.

You can add wire inside the arms or legs to create poseable limbs for display; just add thin craft wire before final stuffing and close carefully.

Try different textures for the hair by switching to a loop or bouclΓ© yarn for a fluffy effectβ€”this changes the personality instantly.

Embellish the hat with tiny pom-poms, sequins, or a stitched stripe to coordinate with the overalls for a cohesive look.

If you want a reversible outfit, crochet a second set of overalls in contrasting colors and attach with buttons so you can swap looks.

I recommend adding blush with a tiny bit of craft pigment or chalk for a sweet finish, but you can also embroider rosy cheeks with satin stitches for durability.

To make a set, change only the hat and shoe colors between dollsβ€”this keeps the pattern fast while providing variety.

I often experiment with different yarn brands and hook sizes; keep notes on gauge and final size so you can reproduce your favorites again and again.

Common Mistakes & How to Fix Them

βœ— Skipping stitch markers when joining legs to the body causes misalignment during the body rounds; place a marker at the join and count stitches carefully to align both legs. βœ— Overstuffing the head and limbs makes shaping difficult and can distort the toy; stuff gradually and check the shape often, adding small amounts at a time to keep curves smooth. βœ— Changing yarn color without securing tails leads to loose ends and messy joins; break yarn with a long tail for sewing and weave in ends after assembly for a neat finish. βœ— Forgetting to work in the back loops (BLO) when instructed removes the intended texture; always check the instruction for BLO or FLO and make a note with a marker if needed. βœ— Skipping the 'third loop' step when instructed for the leg assembly will make it impossible to seam correctly; carefully identify the third loop of the specified stitch and crochet into it before continuing.

Circus Clown Amigurumi Pattern

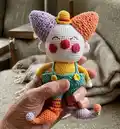
Make a bright, playful Circus Clown amigurumi with this full crochet pattern. You will find complete round-by-round instructions, yarn and tool lists, and clear assembly guidance to finish a charming handmade toy. Perfect for gifting or adding a splash of color to your decor, this pattern uses simple shaping and special spike stitches for personality.

Intermediate 5-7 Hours

Materials Needed for Circus Clown Amigurumi Pattern

β€” Main Fabric

  • 01
    Color A: white YarnArt Jeans 62 (50g, 160m)
  • 02
    Color B: orange YarnArt Jeans 23 (50g, 160m)
  • 03
    Color C: purple YarnArt Jeans 89 (50g, 160m)
  • 04
    Color D: red YarnArt Jeans 26 (50g, 160m)
  • 05
    Color E: hot pink YarnArt Jeans 59 (50g, 160m)
  • 06
    Color F: yellow YarnArt Jeans 35 (50g, 160m)
  • 07
    Color G: turquoise Alize Cotton Gold 610 (100g, 330m)

β€” Tools Required

  • 01
    Crochet hook size 2.5mm
  • 02
    Tapestry needles
  • 03
    Brown thread for embroidery
  • 04
    Pins for assembly
  • 05
    Stitch markers
  • 06
    Scissors
  • 07
    Polyester fiberfill
  • 08
    Yarn needle for sewing

Progress Tracker

0% Complete

β€” Head :

Round 1 :

sc 6 into a magic loop (6)

Round 2 :

inc 6 (12)

Round 3 :

[sc 1, inc 1] 6x (18)

Round 4 :

sc 1, inc 1, [sc 2, inc 1] 5x, sc 1 (24)

Round 5 :

[sc 3, inc 1] 6x (30)

Round 6 :

sc 2, inc 1, [sc 4, inc 1] 5x, sc 2 (36)

Round 7 :

[sc 5, inc 1] 6x (42)

Round 8 :

sc 3, inc 1, [sc 6, inc 1] 5x, sc 3 (48)

Round 9 :

[sc 7, inc 1] 6x (54)

Round 10 :

sc 4, inc 1, [sc 8, inc 1] 5x, sc 4 (60)

Round 11-23 :

sc 60 (13 rnds) (60)

Round 24 :

[sc 8, dec 1] 6x (54)

Round 25 :

[sc 7, dec 1] 6x (48)

Round 26 :

[sc 6, dec 1] 6x (42)

Round 27 :

[sc 5, dec 1] 6x (36)

Round 28 :

[sc 4, dec 1] 6x (30)

Round 29 :

[sc 3, dec 1] 6x (24)

Info :

Break the yarn with a long rest. Stuff firmly.

β€” Hairs :

Round 1 :

sc 6 into a magic loop (6)

Round 2 :

BLO [sc 1, inc] 3x (9)

Round 3 :

BLO [sc 2, inc] 3x (12)

Round 4 :

BLO [sc 3, inc] 3x (15)

Round 5 :

BLO [sc 4, inc] 3x (18)

Round 6 :

BLO [sc 5, inc] 3x (21)

Round 7 :

BLO [sc 6, inc] 3x (24)

Round 8 :

BLO, sc 24 (24)

Round 9 :

BLO [sc 7, inc] 3x (27)

Round 10 :

BLO, sc 27 (27)

Round 11 :

BLO [sc 8, inc] 3x (30)

Round 12 :

BLO, sc 30 (30)

Round 13 :

BLO [sc 9, inc] 3x (33)

Round 14 :

BLO, sc 33 (33)

Info :

Break the yarn with a long rest. Stuff slightly and use tapestry needle to sew edges together where noted.

β€” Ears (yarn A, X2) :

Round 1 :

sc 6 into a magic loop (6)

Round 2 :

inc 6 (12)

Round 3-4 :

sc 12 (2 rnds) (12)

Info :

Break the yarn with a long rest to sew, use the tapestry needle to sew 2 edges together.

β€” Nose (yarn D) :

Round 1-4 :

Repeat rnd 1-4 of the Ear (12)

Round 5 :

[sc 2, dec] 3x (9)

Info :

Break the yarn with a long rest to sew.

β€” Cheeks (yarn E, X2) :

Round 1 :

sc 6 into a magic loop (6)

Round 2 :

inc 6, slst on the 1st st of this rnd (12)

Info :

Break the yarn with a long rest to sew.

β€” Hat (yarn F) :

Round 1-3 :

Repeat rnd 1-3 of the Head (18)

Round 4-6 :

sc 18 (3 rnds), change to yarn D (18)

Round 7-8 :

sc 18 (2 rnds), change to yarn F (18)

Round 9 :

FLO, inc 18 (36)

Info :

Break the yarn with a long rest to sew.

β€” Legs (yarn B X1, yarn C X1) :

Round 1 :

sc 3 into a magic loop (3)

Round 2 :

inc 3 (6)

Round 3 :

sc 2, inc 2, sc 2 (8)

Round 4 :

dec 1, sc 1, inc 2, sc 1, dec 1 (8)

Round 5 :

sc 3, inc 2, sc 3 (10)

Round 6 :

dec 1, sc 2, inc 2, sc 2, dec 1 (10)

Round 7 :

sc 4, inc 2, sc 4 (12)

Round 8 :

sc 5, inc 2, sc 5 (14)

Round 9 :

sc 6, inc 2, sc 6 (16)

Round 10 :

sc 7, inc 2, sc 7 (18)

Round 11 :

sc 8, inc 2, sc 8 (20)

Round 12-13 :

sc 20 (2 rnds) (20)

Round 14 :

sc 9, sc 1 on the 3rd loop (see Assembling part), sc 10 (20)

Round 15 :

dec 1, sc 6, dec 2, sc 6, dec 1 (16)

Round 16 :

dec 1, sc 4, dec 2, sc 4, dec 1, start stuffing firmly (12)

Round 17 :

FLO, dec 1, sc 3, inc 2, sc 3, dec 1 (12)

Round 18-19 :

dec 1, sc 3, inc 2, sc 3, dec 1 (2 rnds) (12)

Round 20 :

dec 1, sc 3, inc 1, slst on the remaining loops of the 10th st of rnd 14 (see Assembling part), inc 1, sc 3, dec 1 (12)

Round 21 :

sc 6, skip the slst st of the previous rnd, sc 6 (12)

Round 22 :

FLO, *ch 3, slst 1 on the next st*, repeat ** to the end, break yarn B/C, change to yarn E (12)

Round 23 :

continue to crochet on the back loops of rnd 22, sc 12, change to yarn F (12)

Round 24-28 :

sc 12 (change to yarn E/F each rnd) (5 rnds) (12)

Round 29 :

[sc 1, inc 1] 6x (18)

Round 30-33 :

sc 18 (4 rnds) (18)

Round 34 :

sc 3, break the yarn (3)

Info :

Make the 2nd leg the same way but do not break the yarn, join with the 1st leg by slst 1 on the last st of the 1st leg, continue to crochet the body.

β€” Body (yarn G) :

Round 35 :

sc 18 (on the 1st leg), sc 18 (on the 2nd leg) (36)

Round 36 :

[sc 5, inc 1] 6x (42)

Round 37 :

BLO, sc 42 (42)

Round 38-41 :

sc 42 (4 rnds), change to yarn F (42)

Round 42-46 :

sc 42 (5 rnds) (42)

Round 47 :

[sc 5, dec 1] 6x (36)

Round 48 :

sc 36 (36)

Round 49 :

[sc 4, inc 1] 6x (30)

Round 50 :

sc 30 (30)

Round 51 :

[sc 3, inc 1] 6x (24)

Round 52 :

sc 24 (24)

Info :

Break the yarn with a long rest to sew later, stuff. Turn to the back side of the body, join yarn G on the 1st of the remaining loop of the 37th rnd (see Assembling Part), continue to crochet the overalls.

Overalls Round 1 :

[sc 1, inc 1] 21x (63)

Overalls Round 2 :

sc 63 (63)

Overalls Round 3 :

[sc 1, spike sc 1] 31x, sc 1 (see Special Stitches for Spike sc) (63)

Overalls Round 4 :

[spike sc 1, sc 1] 31x, spike sc 1 (63)

Overalls Round 5-10 :

repeat rounds 3 & 4 three more times (6 rnds total) (63)

Overalls Round 11 :

ch 30, slst on the 23, slst on all remaining chains, continue to crochet on the overalls, follow pattern notes to form front flap and straps (see assembly photos)

β€” Arms (yarn A, X2) :

Round 1 :

sc 6 in a magic loop (6)

Round 2 :

[sc 1, inc 1] 3x (9)

Round 3 :

sc 4, Bobble 1, sc 4 (9)

Round 4 :

sc 9, change to yarn F (9)

Round 5-18 :

sc 9 (14 rnds) (9)

Info :

Break the yarn with a long rest, stuff slightly the lower part, use the tapestry needle to sew 2 edges together.

β€” Buttons (yarn F, X2) :

Round 1 :

sc 9 in a magic loop (9)

Round 2 :

slst 9 (9)

Info :

Break the yarn with a long rest.

β€” Shoe's Balls (yarn B X1, yarn C X1) :

Round 1-4 :

Repeat rnd 1-4 of the Ear, start stuffing slightly (12)

Round 5 :

dec 6 (6)

Info :

Break the yarn with a long rest, weave in the last 6 sts on the last rnd.

β€” SPECIAL STITCHES :

Info :

Spike Single Crochet (Spike sc): Work 1 normal sc. Insert hook from front to back in the row below, pull yarn over and complete spike sc (will be longer than normal sc). Use pattern instruction: work *sc, spike sc* to the end where indicated.

β€” Assembling :

Info :

Define the 3rd loop of the 10th st of the leg's 14th rnd, sc 1 on the 3rd loop and continue to crochet as normal; mark this st with a marker and slst on the marked st when joining pieces.

Info :

After assembling legs to body and crocheting the overalls, attach shoe's balls on each leg, attach arms to the body between specified rounds, attach cheeks and nose one rnd below the embroidered eyes, and sew hairs between rnd 3 and rnd 15 of the head as shown in photos.

Info :

Embroider eyes with brown thread using 4 sts for each eye at rnd 14; the distance between the two eyes is 4-5 sts. Attach hat between two hairs and sew the head to the body securely.

Assembly Instructions

  • Attach head to body by aligning the head opening with the top of the body and sewing securely through the remaining loops on the 37th round, matching the marked stitches for even placement.
  • Sew each arm to the body between rounds 12-14 of the body, angle slightly forward and use whipstitch to secure firmly, stuffing slightly before closing the seam.
  • Position legs evenly on the bottom of the body. When joining the second leg, slst the last st of the first leg to the first leg and continue crocheting the body, then stuff and shape before closing.
  • Attach hair pieces on each side of the head from the 3rd rnd to the 15th rnd of the head, spacing them about 6 sts apart; sew the hat between two hair pieces and secure with a tapestry needle.
  • Embroider eyes with brown thread on rnd 14 using 4 sts per eye and keeping 4-5 sts between eyes; attach nose one rnd below the eyes and place cheeks on each side.
  • Sew shoe's balls at the tip of each curled shoe and weave in ends; attach buttons to the front side of the overalls and stitch straps across the back as shown in photos.

Important Notes

  • πŸ’‘Use stitch markers to keep track of rounds and special joins, especially when changing colors or joining legs to the body.
  • πŸ’‘Stuff pieces firmly but progressively; under-stuffing gives a floppy toy while over-stuffing distorts shaping.
  • πŸ’‘When a step calls for BLO or FLO, crochet only in the specified loop to achieve the intended texture and seaming points.
  • πŸ’‘Break yarn with a long tail when instructed so you can use that tail for sewing pieces together neatly.

This cheerful Circus Clown pattern is designed to bring color and personality to your handmade toy collection. The pattern includes every small piece and careful assembly steps so you can create a durable, smile-inducing amigurumi. Make it in your favorite color palette, add tiny accessories, and share the joy you made by hand. 🧢πŸŽͺ

You ask,

we answer.

FAQs

What size will the finished piece be?

The finished amigurumi measures approximately 22-25 cm tall when using the recommended yarn and a 2.5mm hook; final size varies with yarn and tension.

Can I use different yarn weights for this pattern?

Yes, you can use different yarn weights but this will change the final size; adjust your hook size accordingly and be mindful of stuffing amounts.

Do I need prior crochet experience for this pattern?

This pattern is rated intermediate, so familiarity with single crochet, increases, decreases, working in BLO/FLO and basic magic ring techniques is recommended.

How long does this project typically take to complete?

Most crocheters finish this project in 5-7 hours, though time may vary depending on experience level and how many small components you make at once.