🧶 Beautiful ✨ Detailed 💝 Adorable

Snail Amigurumi Pattern

Snail Amigurumi Pattern
4.3★ Rating
5-7 Hours Time Needed
2.8K Made This
✂️

Intermediate Level

Ideal for those with basic crochet experience, featuring slightly more advanced stitches and techniques to expand your skills.

⏱️

Weekend Treat

Takes 5-7 hours, making it an enjoyable project to finish over a couple of days.

🧸

Cute Companion

An adorable friend to cherish, handcrafted with love to bring comfort and joy for years to come.

About This Snail Amigurumi Pattern

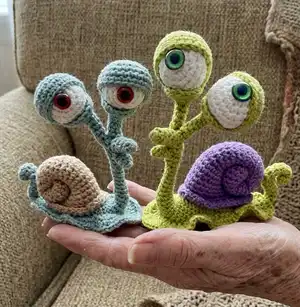
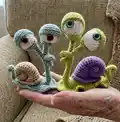
This pattern creates a playful crochet snail amigurumi with large, movable eyes and a textured curled shell. It includes full instructions for the shell, eyes (with eyelids), upper and lower jaws, body and decorative mantle. The design uses wire for eye stems and clear step-by-step assembly guidance for a professional finish.

Snail Amigurumi Pattern crochet pattern - detailed view of completed project

Perfect for gifting or for adding character to your handmade collection. Detailed photos and notes help you complete each stage with confidence.

Why You'll Love This Snail Amigurumi Pattern

I absolutely love this snail pattern because it combines whimsical character with clever construction. The large eyes on wire give the toy so much personality and allow for creative posing. I enjoy the gentle shaping of the shell and how the mantle adds movement and charm. Making this pattern feels like sculpting — each part builds on the last to create a cohesive, hand-crafted friend.

Snail Amigurumi Pattern step 1 - construction progress Snail Amigurumi Pattern step 2 - assembly progress Snail Amigurumi Pattern step 3 - details and accessories Snail Amigurumi Pattern step 4 - final assembly and finishing

Switch Things Up

I love making small changes to give this snail a new personality; try brighter yarn colors for a playful look or muted tones for a vintage vibe.

You can change the yarn weight and hook to alter size: bulky yarn with a larger hook creates a chunky, cuddly snail while thin yarn makes a dainty mini version.

I often swap glass eyes for embroidered pupils or safety eyes for durability — each choice dramatically changes the final expression.

To make the eyes more dramatic, use a contrasting eyelid color or add tiny embroidered eyelashes for a whimsical effect.

Try adding tiny accessories like a miniature scarf, a tiny flower on the shell, or a removable felt mantle to personalize each snail as a gift.

If you prefer no wire, crochet a short, firm stalk and stuff it tightly for a static eye stem; this is safer for small children.

I sometimes stitch a little pocket on the shell to tuck in a small surprise or attach a keyring to make a decorative keychain version.

Experiment with different stuffing amounts: less stuffing yields a softer, floppy snail; more stuffing gives firmer structure and better poseability.

When assembling, I pin parts in place and test balance before final sewing — small placement shifts can change the snail's posture dramatically.

Have fun combining textures like cotton and acrylic blends to highlight the shell or mantle and create subtle visual contrast in your finished piece.

Common Mistakes & How to Fix Them

✗ Crocheting too loosely will create visible holes and an unstable structure; use tighter stitches or a smaller hook to avoid gaps. ✗ Forgetting to leave the long tail for sewing the lower eyelid and frame will make assembly difficult; always leave the required length and check placement before cutting. ✗ Not stuffing gradually can lead to lumps and misshapen parts; stuff small amounts at a time and shape as you go for an even finish. ✗ Skipping the step of wrapping the wire with a textile band-aid can damage the yarn and make the frame slip; wrap and secure wire ends before inserting into the jaw.

Snail Amigurumi Pattern

Crochet a whimsical snail amigurumi with expressive eyeballs and a curled shell. This pattern walks you through each part — shell, eyes, eyelids, jaws, body and mantle — with clear step-by-step rounds and helpful assembly notes. You will use wire for posable eyes and simple finishing techniques to create a charming handmade toy perfect for gifts or display. Enjoy the creative process and make the snail your own with color choices and small custom details.

Intermediate 5-7 Hours

Materials Needed for Snail Amigurumi Pattern

— Main Fabric

  • 01
    YarnArt Jeans 160 m (174 yds) per 50 g (55% cotton, 45% pac): light green (color 29) - 14 g
  • 02
    YarnArt Jeans 160 m (174 yds) per 50 g: purple (color 72) - 7 g
  • 03
    YarnArt Jeans 160 m (174 yds) per 50 g: white (color 62) - 3 g
  • 04
    Additional small amounts of contrasting yarn for shell and body colors as desired (approx 10-20 g)

— Tools Required

  • 01
    steel crochet hook size 1.75 mm (#4 US)
  • 02
    fiberfill for stuffing
  • 03
    a wooden skewer and a toothpick with a broken tips for stuffing
  • 04
    gypsy needle
  • 05
    scissors
  • 06
    2 glass eyes 14 mm (0.55 inch)
  • 07
    glue Moment Crystal
  • 08
    craft wire (aluminum or cooper) thick 0,75-1 mm (0.03-0.039 inch) - 115 cm (45.28 inch)
  • 09
    round pliers and wire cutters
  • 10
    textile band-aid

Progress Tracker

0% Complete

— Shell :

Info :

We knit in a spiral.

Round 1 :

6 sc in MC

Round 2 :

6 inc = 12

Round 3-12 :

12 sc

Round 13 :

inc, 11 sc = 13 (photo 1)

Round 14-23 :

13 sc

Round 24 :

inc, 12 sc = 14

Round 25-29 :

14 sc

Round 30 :

3 sc in 1, 13 sc = 16

Round 31 :

sc, 3 sc in 1, 14 sc = 18

Round 32 :

2 sc, 3 sc in 1, 15 sc = 20

Round 33 :

3 sc, 3 sc in 1, 16 sc = 22

Round 34 :

4 sc, 3 sc in 1, 17 sc = 24 (photo 2)

Round 35 :

5 ps, 3 ps in 1, 18 ps = 26 (photo 3-4), fasten off, hide the tip of the thread. Fill the shell with fiberfill lightly.

Info :

Make a tie from the narrow part of the shell and fix it at the first round (photo 5-6).

— Eye :

Info :

We knit in a spiral with white yarn.

Round 1 :

6 sc in MC

Round 2 :

6 inc = 12

Round 3 :

(sc, inc) * 6 = 18

Round 4 :

(2 sc, inc) * 6 = 24

Round 5-7 :

24 sc

Round 8 :

(2 sc, dec) * 6 = 18

Round 9 :

(sc, dec) * 6 = 12, fill with fiberfill.

Round 10 :

6 dec = 6, pull the hole by the front loops. Hide the tip of the thread inside the ball (photo 4).

— Upper eyelid :

Info :

We knit in a spiral with light green yarn.

Round 1 :

6 sc in MC

Round 2 :

6 inc = 12

Round 3 :

(sc, inc) * 6 = 18

Round 4 :

(2 sc, inc) * 6 = 24

Round 5-8 :

24 sc, fasten off, hide the tip of the thread (photo 1).

— Lower eyelid :

Info :

We knit in a spiral with light green yarn. Immediately leave the tip for sewing 20 cm (8 inch).

Round 1 :

5 sc in MC, we do not tighten the ring tightly - there should be a hole for the frame (photo 2-3).

Round 2-6 :

5 sc

Round 7 :

7 inc = 12 (the marker of the beginning of the row will shift by 2 loops)

Round 8 :

(sc, inc) * 6 = 18, sl st. Cut the yarn leaving a tail for sewing (photo 4).

Info :

Fold the upper and lower eyelid and combine 8 sc in pairs (photo 5).

— Upper jaw :

Info :

We knit in a spiral with light green yarn.

Round 1 :

6 sc in MC

Round 2 :

6 sc

Round 3 :

inc, 5 sc = 7

Round 4 :

7 sc

Round 5 :

inc, 6 sc = 8

Round 6 :

8 sc

Round 7 :

3 sl st, sc, 4 hdc = 8 (photo 1), finish, hide the tip of the thread. Fold the wire with a loop (photo 2), wrap it with a textile band-aid (photo 3). Insert it into the upper jaw. To add volume, fill it slightly (photo 4).

— Lower jaw :

Info :

We knit in a spiral with light green yarn.

Round 1 :

4 sc in MC

Round 2 :

(inc, sc) * 2 = 6

Round 3 :

6 sc, sl st. Do not fill.

Round 4 :

ch, rotate, 3 join sc with upper jaw on sl st (photo 1-2), when knit on upper jaw: sc, 3 hdc, sc, on lower jaw: 3 sl st = 8 (photo 3)

Info :

Insert the eye wires at the base of the first and last half double crochet of the 7th row of the upper jaw (photo 4). Stretch the frame into the neck (photo 5-6). Wrap the wires with a textile band-aid.

— Eye assembly :

Info :

Pick up the eye in the 7th row for 2 columns on a long wire. Align the ends of the wire and twist it under the eye (photo 1-2). Bend the ends of the wire.

Info :

Stretch the ends of the wire through the tube of the lower eyelid, thereby inserting the eye into the socket (photo 3-5). The eye does not need to be sewn in any way. It is remarkably fixed between the eyelids (photo 6).

— Body :

Info :

We continue to knit from the united jaws in a spiral around the frame.

Round 1-2 :

8 sc

Round 3 :

dec, 6 sc = 7

Round 4 :

dec, 5 sc = 6

Round 5-7 :

6 sc

Round 8 :

inc, 5 sc = 7

Round 9 :

7 sc

Round 10 :

inc, 6 sc = 8

Round 11 :

8 sc

Round 12 :

inc, 7 sc = 9 (photo 1)

Round 13 :

inc, 8 sc = 10

Round 14 :

(inc, 4 sc) * 2 = 12

Round 15 :

(3 sc, inc) * 3 = 15

Round 16 :

(4 sc, inc) * 3 = 18

Round 17-19 :

18 sc

Round 20 :

dec, 16 sc = 17

Round 21-23 :

17 sc

Round 24 :

dec, 15 sc = 16

Round 25-27 :

16 sc

Round 28 :

dec, 14 sc = 15

Round 29 :

15 sc

Round 30 :

dec, 13 sc = 14

Round 31 :

dec, 12 sc = 13

Round 32 :

dec, 11 sc = 12 Fill the body with fiberfill lightly.

Round 33 :

dec, 10 sc = 11

Round 34 :

dec, 9 sc = 10

Round 35 :

dec, 8 sc = 9

Round 36 :

dec, 7 sc = 8

Round 37 :

dec, 6 sc = 7

Round 38-51 :

7 sc, cut off the excess tip of the frame (photo 2), complete, pull the hole by the front loops, hide the tip (photo 3-4).

— Assembly (attach shell to body) :

Info :

We bend the body of the snail in the place of thickening with the letter L. We sew the shell to the body with invisible stitches, picking up the border between 34 and 35 rows (photo 1-2). The stitch length is 1 column or 1 row. We bend 35 Row up.

— Mantle :

Info :

Make 47 loops on the body. To do this, it is convenient to mark 3 columns on the chest (photo 3) and count another 22 rows on the sides of them. For each row and for each single crochet, make 1 loop. The mantle line should be in 2 loops below the shell. The line does not have to be flat. The curves of the line will create the illusion of mobility of the mantle (photo 4-5).

Round 1 :

rotate, 10 sc, 7 hdc, 5 dc, 3 inc dc, 5 dc, 7 hdc, 10 sc = 50

Round 2 :

sl st on the body, rotate, skip 1, 10 inc, 7 inc hdc, 16 inc dc, 7 inc hdc, 10 inc, sl st, fasten off, hide the tip of the thread (photo 1).

— Assembly and design of the toy :

Item 1 (P1) :

Press a recess on the abdomen with your finger (photo 2) and sew it around the perimeter so that the snail stands more stable (photo 3).

Item 2 (P2) :

Glue the eyes (photo 4-5).

Info :

Pick up the eye in the 7th row for 2 columns on a long wire. Align the ends of the wire and twist it under the eye (photo 1-2). Bend the ends of the wire. Stretch the ends of the wire through the tube of the lower eyelid, thereby inserting the eye into the socket (photo 3-5). Bend the ends of the wire. The eye does not need to be sewn in any way. It is remarkably fixed between the eyelids (photo 6).

Assembly Instructions

  • Sew the shell to the body using invisible stitches, picking up the border between rows 34 and 35; stitch length should be one column or one row and bend row 35 up to secure the shell.
  • Press a small recess on the abdomen and sew around the perimeter so the snail stands more stably before final finishing.
  • Insert and secure eye wires: pick up the eye at the 7th row, thread wires under the eye, bend and wrap wire ends, then stretch wires through the lower eyelid tube to seat the eye into the socket.
  • Glue the glass eyes into place with Moment Crystal glue as shown in the photos after assembling eyelids and frames.
  • Wrap exposed wire with a textile band-aid before inserting into the jaw and neck to prevent wear and secure the frame.
  • Make the mantle loops by picking up stitches along the body line two loops below the shell and shape the curves to create a mobile-looking mantle.

Important Notes

  • 💡The toy must be crocheted with tight stitches to avoid small holes when stretching crochet fabric.
  • 💡If you see tiny holes, switch to a smaller hook size and stuff the body while crocheting; do not use stuffing too sparingly.
  • 💡If the toy is intended for a toddler under the age of three, use safety eyes and avoid buttons or small glued parts.
  • 💡Leave long tails for sewing eyelids and frames; fold and hide tips inside pieces as you finish to keep a neat appearance.

This cute snail amigurumi brings personality and charm to your handmade collection. Create a pair, mix colors, or gift one to a friend who loves quirky toys. Happy crocheting and may your stitches be even and joyful! 🧶✨
You ask,

we answer.

FAQs

What size will the finished piece be?

The finished snail is approximately 13.5 cm x 11.5 cm (5.31 x 4.53 inch) using the recommended yarn and hook; size may vary with different yarn or hook sizes.

Can I use different yarn weights for this pattern?

Yes, you can use different yarn weights, but this will change the final size and may require a different wire thickness for the eye frames; adjust hook size accordingly.

Do I need prior crochet experience for this pattern?

This pattern is rated intermediate due to wire work, eyelid assembly and shaping; basic experience with amigurumi techniques and reading rounds is recommended.

How long does this project typically take to complete?

Most crocheters complete this project in 5-7 hours depending on experience, assembly complexity and how much time you spend on shaping and finishes.