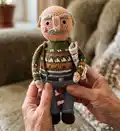
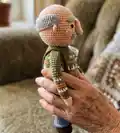
Make a charming handmade grandpa amigurumi with this friendly crochet pattern. You will create a detailed tiny character complete with sweater, moustache, eyebrows and posable wire-framed arms. The pattern includes step-by-step rounds, assembly photos, and tips so your finished toy measures about 22 cm tall. Perfect as a thoughtful gift or a display piece to practice colorwork and shaping.
Progress Tracker
0% Complete
— Head :
Info :
Crochet in beige color.
Round 3 :
(1 sc, inc)*6 (18)
Round 4 :
(2 sc, inc)*6 (24)
Round 5 :
(3 sc, inc)*6 (30)
Round 6 :
(4 sc, inc)*6 (36)
Round 7 :
(5 sc, inc)*6 (42)
Round 8 :
(6 sc, inc)*6 (48)
Round 9-20 :
12 rounds: 48 sc (48)
Info :
At this stage we are going to insert the eyes. Mark two points between the rounds 13 and 14 with pins leaving 9 stitches apart. Insert the eyes and secure them.
Round 21 :
(6 sc, dec)*6 (42)
Info :
Stuff the piece firmly as you go.
Round 22 :
(5 sc, dec)*6 (36)
Round 23 :
(4 sc, dec)*6 (30)
Round 24 :
(3 sc, dec)*6 (24)
Round 25 :
(2 sc, dec)*6 (18)
Round 26 :
(1 sc, dec)*6 (12)
Info :
Cut the thread, fasten off, pull the opening closed through front loops using a needle. Weave in the thread tail inside of the piece.
— Nose :
Info :
Start crocheting in powder color.
Info :
Change to beige color.
Round 3-7 :
5 rounds: 8 sc (8)
Info :
Don't stuff the piece. Fold the piece in half and crochet 4 sc through both layers.
Info :
Fasten off the thread, cut, leaving a long thread tail for sewing.
— Cheeks (2 pieces) :
Info :
Crochet in powder color.
Round 1 :
6 sc in MR, sl st
Info :
Fasten off the thread, cut, leaving a long thread tail for sewing.
— Moustache :
Info :
Crochet in grey melange color.
Row 2 :
From the second ch from the hook crochet 1 sc, 2 hdc, 4 dc, 2 hdc, 1 sc
Info :
Fasten off the thread, cut, leaving a long thread tail for sewing.
— Ears (2 pieces) :
Info :
Crochet in beige color.
Info :
Pull the ring closed, fasten off the thread, cut, leaving a long thread tail for sewing.
— Hair :
Info :
Crochet in grey melange color.
Row 2 :
Work from the second ch from the hook: 31 sc, 3 sc into one ch, continue crocheting across another side of the chain: 30 sc, inc (66)
Row 3 :
inc, 30 sc, 3 inc, 30 sc, 2 inc (72)
Info :
Fasten off the thread, cut, leaving a long thread tail for sewing.
— Assembly and Head Details :
Info :
Make two stitches in beige color above each eye. Then sew the nose. Find the nose location on the head. It should be located between the eyes, 2 stitches higher than the eyes level. We are going to sew the nose across its beige part only, inserting a needle through both nose layers.
Info :
The nose base is also should be sewn.
Info :
The moustache is located under the nose, insert the moustache under the pink part of the nose. Sew the moustache across the upper edge, leave the lower edge without sewing.
Info :
Fix the ears on the head with pins. They should be located between the rounds 13 and 16, skipping 7 stitches to each side of both the eyes. Sew.
Info :
The hair will be located above the ears. Fix the hair on the head with pins. Lower the back part of the hair slightly, forming a slight bending (see the photo). Sew the hair across the perimeter.
Info :
Sew the cheeks (see the photo). I use the thread Alize cotton gold grey melange to embroider the eyebrows. I divide the yarn thread and use one strand folded in half. The eyebrows are located 1 stitch higher from the eyes and 1 stitch to both sides from the nose. The eyebrow length is 5 stitches. Make vertical stitches, the length of these stitches is 2 stitches, work moving from the nose.
Info :
Make the necessary number of stitches until the eyebrow becomes bushy enough. Embroider the stitches closer to each other.
— Arms (2 pieces) :
Info :
Start crocheting in beige color.
Round 2 :
(1 sc, inc)*3 (9)
Round 4 :
4 sc, puff stitch consisting of three dc sts, 4 sc (9)
Info :
This part of the arm can be slightly stuffed, the rest part doesn't need to be stuffed.
Info :
Change to green color.
Round 6 :
9 sc into back loops only (9)
Round 7 :
4 sc, inc, 4 sc (10)
Info :
Change to white color.
Info :
Change to green color.
Info :
Change to mustard color.
Round 11-12 :
2 rounds: 10 sc (10)
Info :
Change to green color.
Round 14 :
(1 sc in green color, 1 sc in white color)*5 (10)
Info :
Then crochet in green color.
Round 15-28 :
14 rounds: 10 sc (10)
Info :
Fasten off the thread, cut, weave in the thread end inside of the piece.
Info :
In the round 6 crochet 9 sc in green color into free front loops.
— Legs and Body :
Info :
Start crocheting in brown color.
Round 1 :
Make ch8, from the second ch from the hook 6 sc, 3 sc into 1 stitch, continue crocheting across another side of the chain 5 sc, inc (16)
Round 2 :
inc, 5 sc, 3 inc, 5 sc, 2 inc (22)
Round 3 :
22 sc into back loops only (22)
Round 4-6 :
3 rounds: 22 sc (22)
Info :
Cut two identical ovals with the sole size from thick cardboard or plastic sheet. Insert it into the shoe.
Round 7 :
5 sc, 6 dec, 5 sc (16)
Info :
Change to blue color.
Round 8 :
16 sc into back loops only (16)
Info :
Stuff the piece firmly. Then stuff as you go.
Round 9-21 :
13 rounds: 16 sc (16)
Info :
Don't work the last stitch in the round 13, so the toes of both the legs will be facing outward. Fasten off the thread, cut, weave in the thread tail inside of the piece.
Info :
The second leg is crocheted in the same way till the round 13. For the 13th round of the second leg crochet: 16 sc + work 5 sc more additionally. Don't cut the thread, continue crocheting the body.
Info :
Make ch8 and join with the first leg.
Body Round 1 :
16 sc across the first leg, 8 sc across the chain, 16 sc across the second leg, 8 sc across the second side of the chain (48)
Round 2 :
(7 sc, inc)*6 (54)
Round 4 :
16 sc, (1 sc, inc)*6, 26 sc (60)
Round 5-9 :
5 rounds: 60 sc (60)
Info :
Change to brown colors.
Round 10 :
60 sc into back loops only (60)
Info :
Change to blue color.
Round 12 :
60 sc into back loops only (60)
Info :
Change to green color.
Round 13 :
60 sc into back loops only (60)
Info :
Change to white color.
Info :
Change to green color.
Info :
In the next six rounds we will crochet the pattern. The color changing will be in the next round. You can use the diagram or continue crocheting according to the pattern.
Round 17 :
2 sc in green color, 1 sc in mustard color, (3 sc in green color, 1 sc in mustard color)*14, 1 sc in green color (60)
Round 18 :
(1 sc in green color, 3 sc in mustard color)*15 (60)
Round 19 :
60 sc in mustard color (60)
Round 20 :
60 sc in green color (60)
Round 21 :
2 sc in white color, 1 sc in green color, (3 sc in white color, 1 sc in green color)*14, 1 sc in white color (60)
Round 22 :
(1 sc in white color, 3 sc in green color)*15 (60)
Round 23 :
60 sc in green color (60)
Round 24 :
Crochet in mustard color: 14 sc, (2 sc, dec)*6, 22 sc (54)
Round 25 :
Crochet in green color 54 sc (54)
Round 26 :
Crochet in green color: 14 sc, (1 sc, dec)*6, 22 (48)
Round 27 :
(2 sc in white color, 2 sc in green color)*12 (48)
Info :
All the next rounds are crocheted in green color.
Round 28 :
(6 sc, dec)*6 (42)
Info :
In the twenty ninth round we are going to join the arms as we crochet.
Round 29 :
6 sc, crochet 5 sc together with the arm (make sure the arm is correctly located), 16 sc, 5 sc together with the second arm, 10 sc (42)
Round 30 :
6 sc, 5 sc across the rest stitches on the arm, continue crocheting across the body 16 sc, then 5 sc across the second arm, continue crocheting across the body 10 sc (42)
Info :
Now we are going to make a wireframe for the arms. Cut two pieces of wire with the length of about 20-22 cm (7.8-8.6 inches). Bend one wire end and wrap it with an adhesive tape or with a scotch tape. Insert the wire with the bent end inside of the arm.
Info :
Twist the wire ends around each other, cut the excess length. Wrap with an adhesive tape, bend and hide inside of the body.
Round 31 :
(5 sc, dec)*6 (36)
Info :
Fasten off the thread, cut, leaving a long thread tail for sewing.
Info :
In the legs' 9th round crochet 16 dc into free front loops of stitches with the blue thread. In the body's 12th round crochet 60 sc into free front loops of stitches with the blue thread.
This Grandpa amigurumi pattern combines tiny details and cozy colorwork to create a character full of charm and personality. Change yarn colors or sweater motifs to personalize your grandpa for gifts or decor. Whether you make one or a whole family, enjoy the process and treasure your handmade friend. 🧶🧵