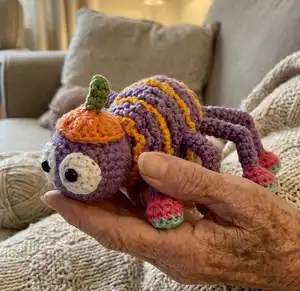
Make a cheerful little spider with bright stripes and a tiny pumpkin hat. This friendly amigurumi is designed to be fun to crochet and playful to display or gift. The pattern uses simple rounds, colour changes, and step-by-step assembly photos to guide you. Perfect for adding a seasonal or whimsical touch to your handmade collection.
Progress Tracker
0% Complete
— Eyes (yarn C, X2) :
Round 1 :
sc 6 into a magic loop (6)
Round 2 :
inc 6, slst (12)
Info :
Break the yarn, leave a long thread to sew later.
— Body (yarn A) :
Info :
Note: Crochet BLO on all the rnds on the Body. And we will change to color each 2 lines, the color will change as the word colors: Yarn A: Black, Yarn B: Red
Round 1 :
sc 6 into a magic loop (6)
Round 2 :
(blo) inc 6 (12)
Round 3 :
(blo) [sc 1, inc] 6x (18)
Round 4 :
(blo) [sc 2, inc] 6x (24)
Round 5 :
(blo) [sc 3, inc] 6x (30)
Round 6 :
(blo) [sc 4, inc] 6x (36)
Round 7-8 :
(blo) sc 36 (2 rnds) (36)
Round 9 :
(blo) sc 36 (36)
Round 10-11 :
(blo) sc 36 (2 rnds) (36)
Round 12 :
(blo) sc 12, dec 6, sc 12 (30)
Round 13 :
(blo) sc 30 (30)
Round 14 :
(blo) sc 9, dec 6, sc 9 (24)
Round 15 :
(blo) sc 24 (24)
Round 16 :
(blo) sc 6, dec 6, sc 6 (18)
Round 17 :
(blo) sc 18, start stuffing (18)
Info :
Do not break the yarn, move to crochet the Head.
— Head (yarn A) :
Round 18 :
[sc 2, inc] 6x (24)
Round 19 :
[sc 3, inc] 6x (30)
Round 20-24 :
sc 30 (5 rnds) (30)
Round 25 :
[sc 3, dec] 6x (24)
Round 26 :
[sc 2, dec] 6x (18)
Round 27 :
[sc 1, dec] 6x (12)
Info :
Place safety eyes between rounds 26-27, separated by 6 SC. Stop to insert the eyes into the Head (see Assembling Part), stuffing. Break the yarn, weave in the last 6 sts, hide the remaining yarn.
— Pumpkin's Hat (yarn D) :
Round 1 :
MR, ch 2 (do not count as a hdc), dc 9, slst on the ch 2 (9)
Round 2 :
ch 2 (do not count as a hdc), (dc 1, FPDC 1 on the same stitch) 9x, slst in the ch 2 (18)
Info :
Break the yarn, leave a long thread to sew later. Continue to crochet the Stem.
— Stem (yarn E) :
Round 1 :
sc 5 into a magic loop (5)
Round 2-4 :
sc 5 (3 rnds) (5)
Info :
Break the yarn, leave a long thread to sew later.
— Legs (yarn F, X8 total; shoes use yarn G and A as noted) :
Leg 1 - Round 1 :
sc 6 into a magic loop (6)
Leg 1 - Round 2 :
inc 6, change to yarn G (12)
Leg 1 - Round 3 :
sc 12 blo (12)
Leg 1 - Round 4 :
sc 12 (12)
Leg 1 - Round 5 :
dec 6, change to yarn A (6)
Leg 1 - Round 6 :
sc 6 blo, stuff slightly (6)
Leg 1 - Round 7-8 :
sc 6 (2 rnds) (6)
Leg 1 - Round 9 :
sc 3 blo, sc 3 (6)
Leg 1 - Round 10 :
sc 6, (stuff the shoes only - pic 2) (6)
Leg 1 - Round 11 :
sc 3 in the flo of the 3 sts on rnd 9, sc 3 on the last 3 sts of rnd 10 (pic 3&4) (6)
Leg 1 - Round 12-13 :
sc 6 (2 rnds) (6)
Info :
Break the yarn, leave a long thread to sew later.
Leg 2 :
1-6 Repeat 1-6 of the Leg 1 (6)
Leg 2 - Round 7-9 :
sc 6 (3 rnds) (6)
Leg 2 - Round 10 :
sc 3 blo, sc 3 (6)
Leg 2 - Round 11 :
sc 6 (6)
Leg 2 - Round 12 :
sc 3 in the flo of the 3sts on rnd 10, sc 3 on the last 3sts of rnd 11 (6)
Leg 2 - Round 13-15 :
sc 6 (3 rnds) (6)
Info :
Break the yarn, leave a long thread to sew later.
Leg 3 :
1-6 Repeat 1-6 of the Leg 1 (6)
Leg 3 - Round 7-10 :
sc 6 (4 rnds) (6)
Info :
Break the yarn, leave a long thread to sew later.
Leg 4 :
1-6 Repeat 1-6 of the Leg 1 (6)
Leg 4 - Round 7-11 :
sc 6 (5 rnds) (6)
Leg 4 - Round 12 :
sc 3 blo, sc 3 (6)
Leg 4 - Round 13 :
sc 6 (6)
Leg 4 - Round 14 :
sc 3 in the flo of the 3sts on rnd 12, sc 3 on the last 3sts of rnd 13 (6)
Leg 4 - Round 15-19 :
sc 6 (5 rnds) (6)
Info :
Break the yarn, leave a long thread to sew later.
— Assembling :
Info :
Crochet the body & head as instructed. Stuff gradually while crocheting. Stop when you finish crochet rnd 27 of the Head.
Info :
Crochet 2 eyes as instructed. Insert black safety eye 6mm into the eye. Put the eye lids on and crochet the last rnd of the head.
Info :
Insert the eyes between rnd 26 & 27 of the head. Use the tapestry needle to weave in the last 6 sts. Hide the remaining yarn. Use the tapestry needle to sew 2 eyes on the head.
Info :
Join yarn A on the 1st of the 2nd rnd of the Body and continue crocheting *ch 3, slst 1 on the next st* in the flo of rnd 2-17 to create the colour stripes for the Spider. Remember to change the color to create the color stripes for the Spider. Crochet the pumpkin's hat as instructed and sew the hat on the head. Sew the stem on the hat.
Info :
Attach the 1st legs as below photo. Attach the other 3 legs as below photo (the distance between each leg is 1 rnd and 1 st higher than the previous leg). Attach all legs evenly around the body as shown in the photos.
Info :
Use pins to position legs and eyes before sewing. Weave in all ends and hide remaining yarn. Finish by shaping the legs and arranging stripes to match photos.
This cheerful Spinderella spider is full of character and color—great as a seasonal gift or a playful shelf friend. The pumpkin hat and striped body make it a delightful little project that finishes quickly. Youll love how the small details bring personality to your crochet collection. 🧶🎃