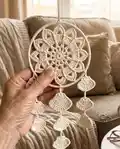
About This Star Dreamcatcher Pattern
This pattern creates a star-shaped double-sided mandala designed to be mounted in a wooden or wire hoop to make a dreamcatcher. It includes a clear chart, written rounds, photo tutorial and joining instructions to finish your piece. You can decorate the finished hoop with shells, beads, ribbons or tassels to suit your personal style.
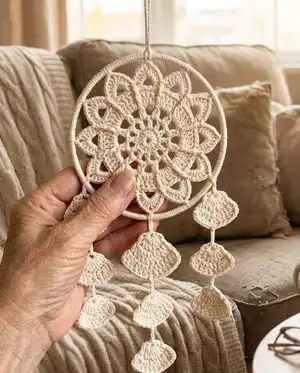
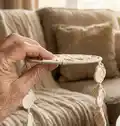
The mandala is worked with eight rounds, alternating between Right Side and Wrong Side to give texture on both faces. Detailed special stitch descriptions and a stitch legend are provided for clarity.
Why You'll Love This Star Dreamcatcher Pattern
I absolutely love this pattern because it transforms simple crochet stitches into a delicate, double-sided mandala that looks beautiful from both sides. I enjoy the way the alternating right-side and wrong-side rounds create a subtle texture that gives the piece depth and interest. I also love that it's quick to make and highly customizable—change the yarn, hoop size or decorations to suit your home. Sharing a finished dreamcatcher always brightens my day and makes a thoughtful handmade gift.
Switch Things Up
I love how changing the yarn color can make a whole new mood for this dreamcatcher; try ombre yarn for a soft transition or bold contrasting colors for a statement piece.
I often use a thicker cotton or jute and a larger hoop to create a rustic, boho-style wall hanging that feels more substantial.
You can make a tiny version using finer thread and a 10 cm embroidery hoop for a delicate ornament or mobile.
Try adding metallic thread or beads into the rounds as you work to introduce sparkle and texture throughout the mandala.
Swap the ribbon tails for macrame fringe or braided yarn strands to create a fuller, more dramatic tail beneath the hoop.
I sometimes stitch shells or small wooden beads into the bottom loops before tying to the hoop for a coastal look that brings a beach feel indoors.
If you want a more sculptural piece, block the mandala on a larger board to open the petals wider before joining to the hoop.
I like to experiment with asymmetric decoration—one side heavier with shells, the other with ribbon—for a playful, artistic balance.
For a festive touch, weave tiny fairy lights around the hoop after joining to make a softly glowing nightlight-style decor item.
If you prefer a modern minimalist look, use neutral colors and skip the tails and beads—let the stitched star be the focal point.
You can also combine two different mandala sizes in one hoop or several hoops in a collage to create a layered wall display I enjoy making for gifts.
Don’t hesitate to try embroidery or tiny surface stitches on the finished mandala to add initials or small motifs for a personalized present.
Common Mistakes & How to Fix Them
✗ Skipping the stitch counts when working rounds can cause misalignments; always check the stitch count at the end of each round to stay on track.
✗ Not keeping consistent tension will produce an uneven mandala shape; maintain even tension and practice the special stitches first if unsure.
✗ Starting with a mandala that is larger than the hoop leads to difficulty joining; ensure your mandala is slightly smaller than the ring so it can be stretched into place.
✗ Forgetting to turn your work for round 7 will reverse the textured side; be sure to turn to the Wrong Side before starting round 7 as instructed.