🧶 Beautiful ✨ Detailed 💝 Adorable

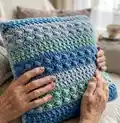
Snowberry cushion cover Pattern

Snowberry cushion cover Pattern
4.4★ Rating
5-7 Hours Time Needed
2.8K Made This
✂️

Intermediate Level

Ideal for those with basic crochet experience, featuring slightly more advanced stitches and techniques to expand your skills.

⏱️

Weekend Treat

Takes 5-7 hours, making it an enjoyable project to finish over a couple of days.

🏡

Cozy Accent

A warm touch for your space that transforms ordinary corners into inviting nooks filled with handmade charm.

About This Snowberry cushion cover Pattern

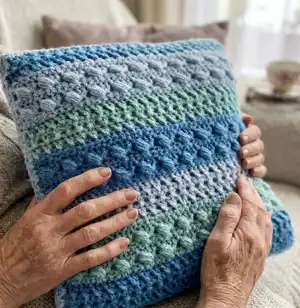
This pattern creates a textured Snowberry cushion cover made from two matching squares joined to fit a 14" x 14" pillow form. It uses a sideways puff stitch for the raised berry texture alternating with rows of double/treble crochet. The pattern includes full row-by-row instructions, special stitch guidance and finishing directions for seaming and edging.

Snowberry cushion cover Pattern crochet pattern - detailed view of completed project

You will make two identical panels then add a simple border and sew them together around a pillow form. The pattern includes UK and US term variants, gauge notes and helpful photographs to guide assembly.

Why You'll Love This Snowberry cushion cover Pattern

I absolutely love this pattern because it combines a textured puff stitch with simple crochet rows to create a sophisticated cushion cover that looks much more involved than it is. I enjoy how the stripes and tones can be changed easily to match your decor. The construction is straightforward: two squares, a neat border and an invisible seam for a professional finish. I also love teaching the sideways puff stitch — it gives such a lovely 3D effect that guests always ask how it was made.

Snowberry cushion cover Pattern step 1 - construction progress Snowberry cushion cover Pattern step 2 - assembly progress Snowberry cushion cover Pattern step 3 - details and accessories Snowberry cushion cover Pattern step 4 - final assembly and finishing

Switch Things Up

I love how easy it is to customise this cushion cover by changing colours; try a monochrome palette for a subtle modern look or bold contrasting stripes for a statement piece.

You can make the cover larger or smaller by adjusting the starting chain and the number of repeats; a thicker yarn and larger hook will produce a chunky, cosy cushion.

I often change the order of the stripes to create more variety — alternating two colours more frequently gives a different rhythm to the pattern.

Try substituting the sideways puff stitch rows with bobble or popcorn stitches for a different textured effect while keeping the same construction.

If you want a removable cushion cover, sew in a zipper along one side after edging instead of sewing the final seam closed.

I sometimes add embroidered initials or a small crocheted appliqu9 for a personalised gift idea.

For a more structured cover use a tight tension and add a layer of interfacing or a lightweight stabiliser when seaming (test first on a swatch).

I like to experiment with border styles too: a picot edge, crab stitch, or an extra round of puff stitches all change the finished look in fun ways.

Consider making a matching set in graded shades from light to dark for a coordinated home collection.

Dont be afraid to swap stitch heights (DC vs TR or HDC vs HTR) when using a different term set; match the stitch height to the original gauge to keep the texture proportionate.

Common Mistakes & How to Fix Them

✗ Skipping stitch count checks between repeats can drift your pattern over time; count your stitches after key rows and after color changes to catch mistakes early. ✗ Starting rows with the wrong chain will change the stitch height and texture; always follow the note about CH1 or CH2 counting and use a standing stitch if preferred. ✗ Forgetting to weave in ends periodically creates many loose strands at the end; weave in ends after every 8-10 rows as recommended to manage loose ends. ✗ Pulling your sideways puff loops too tightly makes the puff flattened and stiff; keep consistent, gentle tension and pull loops to the same height for even puffs. ✗ Not joining new colours with a standing stitch can create a bulky join or gap; join with a standing TR/HTR/HDC as instructed or CH1 and stitch in same ST for a neater edge.

Snowberry cushion cover Pattern

Make a beautiful Snowberry cushion cover featuring soft textured sideways puff stitch rows and a cosy striping sequence. This pattern guides you through two matching squares, an easy border and simple seaming so you can create a polished 14" x 14" cushion cover. The design uses three tonal shades for an elegant, calming finish and is perfect for gifting or home accents.

Intermediate 5-7 Hours

Materials Needed for Snowberry cushion cover Pattern

— Main Fabric

  • 01
    Paintbox Yarns Simply Aran - Dolphin Blue (Color 1) approx. 161 yards / 147 meters (80 grams)
  • 02
    Paintbox Yarns Simply Aran - Washed Teal (Color 2) approx. 100.5 yards / 92 meters (50 grams)
  • 03
    Paintbox Yarns Simply Aran - Duck Egg Blue (Color 3) approx. 161 yards / 147 meters (80 grams)
  • 04
    Extra yarn for seaming and weaving ends
  • 05
    14" x 14" pillow form

— Tools Required

  • 01
    Crochet hook size 5 mm (H)
  • 02
    Yarn needle for weaving in ends and seaming
  • 03
    Scissors
  • 04
    14" x 14" pillow form
  • 05
    Stitch markers (optional) for keeping track of rows

Progress Tracker

0% Complete

— Special Stitches :

Info :

Sideways Puff Stitch (SWPuff ST): Before you make a sideways puff stitch you always have 3 TR STS (Picture 1). Yarn over hook, insert hook in indicated stitch (this is going to be the ST you put the first TR into the base of the first TR, NOT the TR itself!), pull up a long loop through that stitch/space (3 loops on hook) (Picture 2). (Yarn over hook again and insert hook into the same stitch, pull up a loop (same height as the previous one) 3 more times. You should have 9 loops on your hook. (Pictures 3-5). Yarn over and pull through 8 loops, (2 loops on your hook) (Pictures 6-7), yarn over and pull through both loops. (Pictures 8-9)

Info :

Sideways Puff Stitch (SWPuff ST) - US terms: Before you make a sideways puff stitch you always have 3 DC STS (Picture 1). Yarn over hook, insert hook in indicated stitch (this is going to be the ST you put the first DC into the base of the first DC, NOT the DC itself!), pull up a long loop through that stitch/space (3 loops on hook) (Picture 2). (Yarn over hook again and insert hook into the same stitch, pull up a loop (same height as the previous one) 3 more times. You should have 9 loops on your hook. (Pictures 3-5). Yarn over and pull through 8 loops, (2 loops on your hook) (Pictures 6-7), yarn over and pull through both loops. (Pictures 8-9)

— Instructions (UK TERMS) :

Info :

Make 2

Info :

To start: With Color 1 (Dolphin Blue) CH 52

Row 1 :

1 TR into the 4th CH from the hook, 1 TR in each CH to end (50 TR)

Info :

TURN

Row 2 :

CH 2 (counts as TR), {SK 1 ST, 1 TR in next ST, 1 TR in skipped ST} 24 times, 1 TR in top of 3 CH (2 TR, 24 TR „crosses”)

Info :

TURN

Row 3-4 :

same as Row 2

Info :

Fasten off. TURN (2 TR, 24 TR „crosses”)

Row 5 (WS) :

Join Color 2 (Washed Teal) to the last ST of last row with a standing HTR or alternatively, you can CH 1 and HTR in same ST. 1 HTR in next 48 STS, 1 HTR in top of CH 2 (50 HTR)

Info :

TURN

Row 6 (RS) :

CH 2 (counts as TR), {1 TR in next 3 STS, 1 SWPuff ST, SK 1 ST} 12 times, 1 TR in last ST (38 TR, 12 SWPuff ST)

Info :

TURN

Row 7 (WS) :

CH 1, 1 HTR in same ST, 1 HTR in next 48 STS, 1 HTR in top of CH 2 (50 HTR)

Info :

TURN

Row 8-9 :

same as Row 6-7

Info :

Fasten off. TURN (50 HTR)

Row 10 (RS) :

Join Color 3 (Duck Egg Blue) to the last ST of last row with a standing TR or alternatively, you can CH 1 and TR in same ST. {SK 1 ST, 1 TR in next ST, 1 TR in skipped ST} 24 times, 1 TR in last ST (2 TR, 24 TR „crosses”)

Info :

TURN

Row 11-12 :

same as Row 2

Info :

Fasten off. TURN (2 TR, 24 TR „crosses”)

Row 13 (WS) :

Join Color 1 (Dolphin Blue) the last ST of last row with a standing HTR or alternatively, you can CH 1 and HTR in same ST. same as Row 5 (50 HTR)

Info :

TURN

Row 14-17 :

repeat Row 6-7 twice (50 HTR)

Info :

Fasten off. TURN

Row 18-20 :

Join Color 2 (Washed Teal) to the last ST of last row with a standing TR or alternatively, you can CH 1 and TR in same ST. same as Row 10-12 (2 TR, 24 TR „crosses”)

Info :

Fasten off. TURN

Row 21-25 :

Join Color 3 (Duck Egg Blue) to the last ST of last row with a standing HTR or alternatively, you can CH 1 and HTR in same ST. same as Row 13-17 (50 HTR)

Info :

Fasten off. TURN

Row 26-28 :

Join Color 1 (Dolphin Blue) the last ST of last row with a standing TR or alternatively, you can CH 1 and TR in same ST. same as Row 10-12 (2 TR, 24 TR „crosses”)

Info :

Fasten off.

— Edge (UK TERMS) :

Round 1 :

Join Color 3 (Duck Egg Blue) to the first ST of last Row (that’s the top right corner on the right side). CH 1, 2 DC in same ST, 1 DC in next 48 STS, 3 DC in next ST, DC 48 evenly on the side, 3 DC into the base of 3 CH, 1 DC in next 48 CH, 3 DC in last CH, DC 48 evenly on the side, 1 DC into the first ST with the 2 DC in it, join with a SLST to first DC (Corner: 3 DC Sides: 48 DC)

Round 2 :

CH 1, 2 DC in same ST, 1 DC in next 50 STS, 3 DC in next ST, 1 DC in next 50 STS, 3 DC in next ST, 1 DC in next 50 STS, 3 DC in next ST, 1 DC in next 50 STS, 1 DC in first ST with the 2 DC in it, join with a SLST to first DC (Corner: 3 DC Sides: 50 DC)

Info :

Fasten off, weave in all ends.

— Finishing :

Info :

As you have 2 squares (one for each side), line them up, facing with the right side. (Picture 1)

Step 1 (P1) :

Start in one of the corners and start sewing the sides together with the yarn left from the project. (I used the Duck Egg Blue shade) (Picture 2-3)

Step 2 (P2) :

Keep sewing (Picture 4) and when you sew 3 sides together, insert the pillow form.

Step 3 (P3) :

Continue to sew up the last side and then weave in the loose ends.

— Instructions (US TERMS) :

Info :

Make 2

Info :

To start: With Color 1 (Dolphin Blue) CH 52

Row 1 :

1 DC into the 4th CH from the hook, 1 DC in each CH to end (50 DC)

Info :

TURN

Row 2 :

CH 2 (counts as DC), {SK 1 ST, 1 DC in next ST, 1 DC in skipped ST} 24 times, 1 DC in top of 3 CH (2 DC, 24 DC „crosses”)

Info :

TURN

Row 3-4 :

same as Row 2

Info :

Fasten off. TURN (2 DC, 24 DC „crosses”)

Row 5 (WS) :

Join Color 2 (Washed Teal) to the last ST of last row with a standing HDC or alternatively, you can CH 1 and HDC in same ST. 1 HDC in next 48 STS, 1 HDC in top of CH 2 (50 HDC)

Info :

TURN

Row 6 (RS) :

CH 2 (counts as DC), {1 DC in next 3 STS, 1 SWPuff ST, SK 1 ST} 12 times, 1 DC in last ST (38 DC, 12 SWPuff ST)

Info :

TURN

Row 7 (WS) :

CH 1, 1 HDC in same ST, 1 HDC in next 48 STS, 1 HDC in top of CH 2 (50 HDC)

Info :

TURN

Row 8-9 :

same as Row 6-7

Info :

Fasten off. TURN (50 HDC)

Row 10 (RS) :

Join Color 3 (Duck Egg Blue) to the last ST of last row with a standing DC or alternatively, you can CH 1 and DC in same ST. {SK 1 ST, 1 DC in next ST, 1 DC in skipped ST} 24 times, 1 DC in last ST (2 DC, 24 DC „crosses”)

Info :

TURN

Row 11-12 :

same as Row 2

Info :

Fasten off. TURN (2 DC, 24 DC „crosses”)

Row 13 (WS) :

Join Color 1 (Dolphin Blue) the last ST of last row with a standing HDC or alternatively, you can CH 1 and HDC in same ST. same as Row 5 (50 HDC)

Info :

TURN

Row 14-17 :

repeat Row 6-7 twice (50 HDC)

Info :

Fasten off. TURN

Row 18-20 :

Join Color 2 (Washed Teal) to the last ST of last row with a standing DC or alternatively, you can CH 1 and DC in same ST. same as Row 10-12 (2 DC, 24 DC „crosses”)

Info :

Fasten off. TURN

Row 21-25 :

Join Color 3 (Duck Egg Blue) to the last ST of last row with a standing HDC or alternatively, you can CH 1 and HDC in same ST. same as Row 13-17 (50 HDC)

Info :

Fasten off. TURN

Row 26-28 :

Join Color 1 (Dolphin Blue) the last ST of last row with a standing DC or alternatively, you can CH 1 and DC in same ST. same as Row 10-12 (2 DC, 24 DC „crosses”)

Info :

Fasten off.

— Edge (US TERMS) :

Round 1 :

Join Color 3 (Duck Egg Blue) to the first ST of last Row (that’s the top right corner on the right side). CH 1, 2 SC in same ST, 1 SC in next 48 STS, 3 SC in next ST, SC 48 evenly on the side, 3 SC into the base of 3 CH, 1 SC in next 48 CH, 3 SC in last CH, SC 48 evenly on the side, 1 SC into the first ST with the 2 SC in it, join with a SLST to first SC (Corner: 3 SC Sides: 48 SC)

Round 2 :

CH 1, 2 SC in same ST, 1 SC in next 50 STS, 3 SC in next ST, 1 SC in next 50 STS, 3 SC in next ST, 1 SC in next 50 STS, 3 SC in next ST, 1 SC in next 50 STS, 1 SC in first ST with the 2 SC in it, join with a SLST to first SC (Corner: 3 SC Sides: 50 SC)

Info :

Fasten off, weave in all ends.

Assembly Instructions

  • Line up your two completed squares facing with the right sides together so the right sides are touching before you begin to sew.
  • Start sewing at one corner using the leftover yarn from the project (the pattern sample used the Duck Egg Blue shade), and whipstitch or mattress stitch the edges together for a neat seam.
  • Sew three sides together first, then insert the 14" x 14" pillow form before closing the final side to ensure a snug fit.
  • After sewing the last side, weave in all loose ends securely and tidy up the seams so the finished cover looks neat on all sides.
  • Weave in ends after every 8-10 rows during making to reduce loose ends to finish during assembly for a cleaner final finish.

Important Notes

  • 💡If a row/round starts with a Chain 1, it is not counted as a stitch, unless stated otherwise.
  • 💡Slip stitches do not count as stitches when joining or finishing rounds.
  • 💡Chain 2 always counts as treble crochet (UK) or double crochet (US) depending on the term set used in the pattern.
  • 💡Weave in the ends after every 8-10 rows to reduce the amount of ends to weave in at the end.
  • 💡UK and US terms are both included in this pattern; be sure you are following the correct term set for the instructions you are using.

This Snowberry cushion cover pattern is a delightful mix of texture and simple construction that brings handmade charm to any room. It uses three tonal shades with sideways puff stitches to create a soft, dimensional surface that is both elegant and cozy. Whether you make it for yourself or as a thoughtful handmade gift, it’s a lovely project to brighten your home. 🧶 Enjoy crocheting! 🧵
You ask,

we answer.

FAQs

What size will the finished piece be?

The finished cushion cover measures approximately 14.5" x 14.5" / 37 cm x 37 cm when using the recommended yarn and 5 mm hook and seamed around a 14" x 14" pillow form.

Can I use different yarn weights for this pattern?

Yes, you can use a different yarn weight but this will change the finished size and gauge. Match your hook size to the yarn and make a gauge swatch to ensure the final dimensions you want.

Do I need prior crochet experience for this pattern?

This pattern is rated intermediate because it uses the sideways puff stitch and color changes; you should be comfortable with basic stitches and reading row instructions.

How long does this project typically take to complete?

Most crocheters complete this project in 5-7 hours, depending on experience and whether you weave in ends as you go.

Are both UK and US terms included?

Yes, the pattern includes both UK and US term versions of the instructions and the special stitch description is provided in both terminology sets.