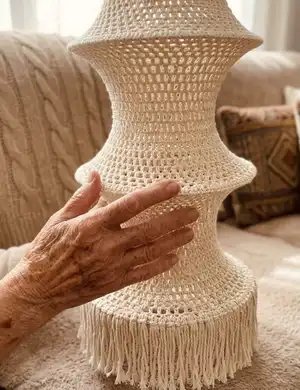
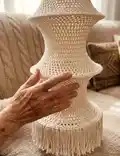
Make a striking SOL&LUNA Boho Lantern for your home or garden with this clear, beginner-friendly crochet pattern. You will learn how to work around rings, shape the lantern between rings, add optional stitch patterns and finish with fringes and a hanger. The design is flexible for any ring size and yarn type so you can create a custom decorative lantern to match your space.
Progress Tracker
0% Complete
— Notes :
Info :
The "SOL&LUNA" lantern gets its characteristic shape from metal or wooden rings and will make a lovely decorative element for your garden or apartment. Equipped with a chain of lights, the lantern looks even more beautiful by night. You can use solar or battery-operated fairy lights with transparent or white cables or fine wires with mini-LEDs, which can be completely hidden inside the lantern.
Info :
The pattern is written in a beginner-friendly way, each step is written out, with no crochet shortcuts. If you know the basic stitches you will be able to crochet your lantern very quickly.
Info :
The patterns design allows any size of rings, any type of yarn and any yarn weight. You can crochet your lantern as long as you like. Therefore, you won´t get exact stitch or round counts - but detailed instructions on how to find the right stitch and round count for your project.
Info :
Apart from the basic pattern, you will also find ideas for additional optional patterns so that you can crochet your lantern just the way you like it. You can also choose the basic pattern: If you do half double (half treble) crochet throughout, your lantern will have a denser structure and you will have to crochet a few more rounds between each ring. If you do double (treble) crochets throughout, the structure of your lantern will be more open and you will finish faster because you will have to crochet fewer rounds. If you are using heavy yarn such as jute or macramé I recommend choosing double crochets (treble crochets), otherwise the lantern will be too stiff and won't fall as nicely. I recommend counting the stitches after each decrease and increase round (i.e. twice per ring) to make sure your lantern gets the right shape.
Info :
The distance between the rings of your lantern is a matter of taste. In my opinion, the distance between the rings is harmonious if it corresponds to about 3/4 of the ring diameter, so I follow this (self-invented) rule: If the rings have a diametre of 20cm, there should be about 15cm space between the rings. If you use rings with a diametre of 26cm, the distance between two rings should be about 19.5cm. You can calculate 3/4 of the ring diametre like this: In case of a 20cm ring: 4 = 5; 5 x 3 = 15cm or in case of a 26cm ring: 4 = 6.5; 6.5 x 3 = 19.5cm.
— Material :
Info :
Any type of yarn: Jute, cotton yarn, macramé yarn - whatever suits you. Heavy weight yarns such as jute or macramé are better for larger lamps with a ring diameter of +25cm.
Info :
Example yarns and quantities: Jute yarn, e.g., Mondial Juta, 100g/65m. You need about 500-600g for a lantern with 5 rings of 26cm diametre (longitude of the lantern: 75cm approx + fringes), including hanger and fringes (= 5-6 balls).
Info :
Cotton yarn, e.g., Lana Grossa Star, 50g/90m. You need about 350-400g for a lantern with 5 rings of 20cm diametre (longitude of the lantern: 60 cm approx + fringes), including hanger and fringes (= 7-8 balls).
Info :
Macramé yarn, e.g., 3mm cotton. For a lantern with 5 rings of 50cm diametre (longitude of the lantern: 1.50m approx + fringes), including hanger and fringes, you will need 3-4 balls, 300m each.
Info :
Wooden or metal rings: minimum 3 rings, but preferably 5, 6 or more rings of any size (all with the same diametre). The larger the diametre of the rings, the more impressive your lantern will be.
Info :
Crochet hook: Crochet with half a size more than indicated on your yarn. If for the jute yarn Mondial Juta a maximum of 6.5 is recommended use a 7.0 hook. For the Lana Grossa Star a maximum of 5.5 is recommended, you should use a 6.0 hook. I crocheted the 3mm macramé yarn with a 9.0 hook.
Info :
Scissors, measuring tape, stitch marker if needed and a darning needle for sewing the hanger.
Info :
Gauge (example yarns): Jute yarn Mondial Juta: 10 stitches / 10 rows = 10cm (double / treble crochet). Cotton yarn Lana Grossa Star: 16 stitches / 24 rows = 10cm (double / treble crochet). Macramé yarn, 3mm: 6 stitches / 4 rows = 10cm (double / treble crochet).
Info :
How to join yarn the invisible way: Avoid weaving in tails with the magic knot. Place the ends next to each other, knot each around the other, pull tight. Pull the long tails until both knots meet in the middle, pull really tight, cut the ends.
— Ring :
Info :
Start the lantern by crocheting around the first ring. The number of stitches depends on the size of your ring. Crochet an even number of single (double) crochet around the ring until you can join the last stitch with the first stitch without stretching. Join with a slip stitch (single crochet). You should not have to pull or stretch, nor should the ring be filled tightly with stitches. The stitch spacing that is automatically created when crocheting is just right. The last two photos below give you an idea of what this looks like.
Info :
How to crochet around the ring: Place the yarn on the outside of the ring and hold the end with your thumb (photo 1). The hook grabs the yarn on the inside of the ring (photo 2), passes the loop under the ring to the front (photo 3), yarn over again on the outside (photo 4) and pull it through the loop on the hook (photo 5). You created a chain stitch to fix the yarn on the ring. Then work single (double) crochets around the ring, while you continue to hold the loose tail with your thumb: the hook dips into the ring from below (photo 6), yarn over, bring the yarn from the inside to the front (photo 7), yarn over again on the outside and pull it through both loops on the hook (photo 8).
Info :
It is important not to crochet too tightly around the ring, as the first round would be a bit laborious if you do. The last single (double) crochet is connected to the first with a slip stitch (single crochet). If you are using a flat wooden ring, as in the photos below, push now all the stitches to the top of the ring (photo 10), then crochet around to the left (if you are left-handed, the other way round). If you use a round wooden or metal ring, you don´t have to push the stitches up. Always crochet around the outside of the ring.
— Rounds between the rings :
1. round :
Mark the starting point with a piece of yarn or stitch marker. The marker is only for counting the rounds and to mark the starting point if you want to crochet one of the optional patterns. Whichever basic pattern you choose (half double/half treble or double/treble crochet), the first two rounds are crocheted with half double (half treble) stitches. In the first round work one half double (half treble) in each stitch. Work around the outside of the ring (photo below left).
2. round (decrease, number of stitches is halved) :
Work in spiral rounds, i.e. just keep on crocheting half double (half treble stitches) over the starting point of the round, but in this second round work always two stitches together. This is how it works: Yarn over, insert the hook into the first stitch, yarn over, insert the hook into the second stitch, yarn over = 4 loops on the needle. Yarn over and pull it through all loops on the hook (photo in the centre).
Info :
All following rounds, until the penultimate round: Continue in spiral rounds in the desired basic pattern: half double (half treble) crochet or double (treble) crochet. When using heavy weight yarn I recommend double (treble) crochets so that the lantern falls nicely (photo below right).
Info :
Number of rounds until the next ring: As mentioned at the beginning, the distance between the rings is a matter of taste. In any case, you should always keep the same number of rounds or, if you are working different patterns, keep always the same distance in cm between the rings. Please, have a look at the (self-invented) rule mentioned on the first page regarding the calculation of the distance between the rings.
Penultimate round before the next ring :
Work half double (half treble) crochets in every stitch.
Last round before the next ring (increase, double the number of stitches) :
Work two half double (half treble) crochets in every stitch.
— Optional patterns :
Info :
After a ring, crochet a few rounds in your basic pattern and start in the 4th or 5th round with one of the following patterns. Important: After the pattern and before the next ring work the same number of rounds in your basic pattern.
Pattern n° 1 :
(particularly suitable if your basic pattern consists of half double (half treble) stitches) 1. round: Alternate one double (treble) crochet with one chain. 2. round: Half double (half treble) crochet in each and every stitch (also into the chain of the previous round). Repeat round 1 and 2 as often as you like (> photos left and centre).
Pattern n° 2 :
(particularly suitable if your basic pattern consists of double (treble) stitches) 1. round: 2 double (treble) crochets into one stitch, skip next - repeat until end of round. 2. round: 2 double (treble) crochets into each gap (either into the stitch above or just into the "hole") between 2 double (treble) crochets of the previous round. Repeat round 1 and 2 as often as you like (> photo right).
2. and all following rings :
Work single (double) crochets around the next ring. Proceed in the same way as you did with the first ring, except that you insert the hook into a stitch before the hook grabs the yarn on the inside of the ring. You now have 2 loops on the hook, yarn over on the outside of the ring and pull it through both loops.
— Optional rounds to finish :
Info :
With the optional rounds you can decrease the top opening (see first photo below). If you want to illuminate your lantern, you can attach the fairy lights to these rounds or place a solar panel on them.
1. round :
half double (half treble) crochet: the number of stitches is reduced by crocheting always two stitches together.
2. round :
half double (half treble) crochet: the number of stitches is reduced by alternating one normal stitch with crocheting two stitches together.
Info :
Repeat rounds 1 and 2 alternately as many times as you like until the opening of the top ring is closed as far as you wish.
— Crochet a cord :
Info :
Crochet as loosely as possible so that inserting the hook into the loops on the side isn't too difficult. Start with 3 chain stitches (photo 1). 1 single (double) crochet into the first chain (photo 2). Turn the cord towards you so that the two side loops are facing you (photo 3). From now on: 1 single (double) crochet into the two loops on the side (photo 3 shows where to insert the hook into the two loops marked by arrows). Photo 4 shows the hook inserted into those two loops. Photo 5 shows the unfinished single (double) crochet before pulling the yarn through both loops on the hook. The arrows show where to insert the hook for the next single (double) crochet.
Info :
Sew the cord to the top ring or to the optional rounds.
— Fringes :
Info :
Fringes on the bottom ring provide a great finishing touch for your lantern. I personally like the fringes to be about half as long as the distance between the rings. The individual strands of yarn need to be cut twice as long as the fringe length.
Info :
My tip for measuring the length of the fringes: Find a book that is either the same height or width as the desired fringe length and wrap the yarn around it, then you only need to cut the wrap at one side to get matching single strands of yarn. If you want a dense fringe, cut about 3 times as many strands as stitches on the lower ring. The fringes are then attached in bundles of three (3 strands) to each stitch. Fold the strands in half, and with your hook pull the loop through the stitch that you´re attaching the fringe to. Then pull the loose ends of the yarn through the loop. Pull the fringe ends gently to tighten the knot.
Info :
After that the fringes should hang for a while before you trim them (scissors should be very sharp). Alternatively, you can also sew on a ready-made fringe border in any colour.
Create your own SOL&LUNA Boho Lantern and bring a warm handmade glow to your home or garden. This flexible pattern works with jute, cotton or macramé yarn and any ring size — perfect for customizing to your space and style. Have fun experimenting with colors, stitch patterns and fringes to make something uniquely yours. 🧶✨