🧢 Beautiful ✨ Detailed πŸ’ Adorable

Dave The Duck Amigurumi Pattern

Dave The Duck Amigurumi Pattern
4.6β˜… Rating
2-3 Hours Time Needed
2.4K Made This
βœ‚οΈ

Beginner Friendly Level

Perfect for those just starting their crochet journey, with clear instructions and simple techniques

⏱️

Bite-Sized Project

Finishes in 2-4 hoursβ€”perfect for an afternoon of creative relaxation.

🧸

Cute Companion

An adorable friend to cherish, handcrafted with love to bring comfort and joy for years to come.

About This Dave The Duck Amigurumi Pattern

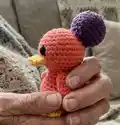
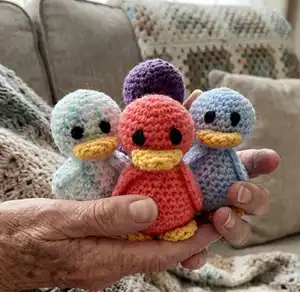
This pattern creates a small, charming duck amigurumi worked mostly in continuous spirals using DK yarn. You will make a head, body, wings, beak and feet, then assemble and embroider the face. The design keeps shaping simple while giving a sweet rounded silhouette.

Dave The Duck Amigurumi Pattern crochet pattern - detailed view of completed project

Clear round-by-round instructions are provided for each piece, plus step-by-step assembly notes. Ideal for practicing simple increases, decreases and small sewn-on parts.

Why You'll Love This Dave The Duck Amigurumi Pattern

I absolutely love this pattern because it turns simple stitches into a delightful little character that's quick to make. I enjoy how compact it is β€” you can finish a duck in an afternoon and gift it the same day. The design uses basic shaping but the wings and beak add personality that I find irresistible. Sewing the pieces together and embroidering the eyes is the satisfying finishing touch I always look forward to.

Dave The Duck Amigurumi Pattern step 1 - construction progress Dave The Duck Amigurumi Pattern step 2 - assembly progress Dave The Duck Amigurumi Pattern step 3 - details and accessories Dave The Duck Amigurumi Pattern step 4 - final assembly and finishing

Switch Things Up

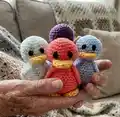
I love to change colours to create a whole flock β€” try pastel shades for a soft nursery set or bright DK tones for playful toys.

I often swap the main DK yarn for a thicker weight and larger hook to make a cuddlier, bigger duck.

I sometimes embroider eyelashes, freckles, or a tiny smile to give each duck a different personality.

For a keyring version, use thinner yarn and a smaller hook and attach a keyring through the top of the head before closing.

I like to make matching mini outfits like a tiny scarf or hat using leftover yarn for seasonal versions.

Try adding felt accents instead of embroidered eyes for a different look, sewing them on securely for safety if given to children.

I sometimes stuff the feet more firmly to help the duck stand better and adapt placement slightly for balance.

For posable wings, consider adding a small piece of wire inside the wing before sewing it closed and positioning.

I also experiment with textured DK yarns like tweed or speckled yarn to add visual interest without changing the pattern stitches.

Finally, I recommend practicing the wing rows once on scrap yarn to understand the stitch sequence before working on the final piece.

Common Mistakes & How to Fix Them

βœ— Skipping the magic ring and starting with a chain loop can leave a visible hole at the top; always use a true magic ring and pull it closed securely. βœ— Not stuffing gradually during shaping causes lumps or flattened areas; stuff a little at a time, shaping as you go to maintain even curves. βœ— Forgetting to follow the continuous spiral note results in visible joins and misaligned stitches; do not join rounds with a slip stitch unless the pattern explicitly instructs you to. βœ— Misplacing the wings or feet by eye can make the toy lopsided; pin parts in position and check symmetry before sewing them on permanently.

Dave The Duck Amigurumi Pattern

Make a sweet pocket-sized duck with this friendly crochet pattern. You will enjoy simple rounds, easy shaping, and a cute finished toy that fits in the palm of your hand. Perfect for quick gifts, stash-busting, and practicing basic crochet techniques.

Beginner Friendly 2-3 Hours

Materials Needed for Dave The Duck Amigurumi Pattern

β€” Main Fabric

  • 01
    DK weight yarn (light), approximately 1 ball main colour (author recommends Robin DK)
  • 02
    Small amount of orange or yellow yarn for beak and feet (approx a few grams)
  • 03
    Small amount of black yarn for embroidering the eyes
  • 04
    Polyester non-toxic toy stuffing, small quantity

β€” Tools Required

  • 01
    3.5mm crochet hook
  • 02
    Sewing needle
  • 03
    Small amount of black yarn for eyes/embroidery
  • 04
    Yarn needle for sewing pieces together
  • 05
    Polyester stuffing

Progress Tracker

0% Complete

β€” Materials :

Infos :

Materials you will need: DK wool of any colour (1 ball) - I like to use Robin DK (my personal preference). Small amount of orange or yellow for the beak and feet. Non-toxic toy stuffing. Sewing needle. 3.5mm crochet hook. Small amount of black for the eyes. Toy is approx. 10cm in height.

Infos :

This design is made using continuous spirals. Do not join rounds with a slip stitch unless specified in the pattern. The pattern is made UK terms. However, the US terms are as follows: UK: US: Dc = Sc. Htr = hdc. Tr = dc.

β€” Head :

Info :

Make a magic ring, 6dc into the ring and pull the ring closed.

Round 1 :

2dc in each stitch

Round 2 :

(dc, 2dc in next stitch) to end

Round 3 :

(2dc, 2dc in next stitch) to end

Round 4 :

(3dc, 2dc in next stitch) to end

Round 5 to 8 :

dc in each stitch

Round 9 :

(3dc, dc2together) to end

Round 10 :

(2dc, dc2together) to end

Round 11 :

(dc, dc2together) to end

Info :

Stuff the head

Round 12 :

dc2together to end

Info :

Fasten off and sew up the gap.

β€” Beak :

Info :

In orange make a magic ring, 6dc into the ring and pull the ring closed.

Round 1 :

2dc in each stitch

Round 2 to 3 :

dc in each stitch

Info :

Fasten off. Leaving a long tail for sewing to head.

β€” Body :

Info :

Make a magic ring, 6dc into the ring and pull the ring closed.

Round 1 :

2dc in each stitch

Round 2 :

(dc, 2dc in next stitch) to end

Round 3 :

(2dc, 2dc in next stitch) to end

Round 4 :

(3dc, 2dc in next stitch) to end

Round 5 to 6 :

dc in each stitch

Round 7 :

(3dc, dc2together) to end

Round 8 to 11 :

dc in each stitch

Round 12 :

(2dc, dc2together) to end

Round 13 to 14 :

dc in each stitch

Round 15 :

(dc, dc2together) to end

Info :

Stuff body

Round 16 :

dc2together to end

Info :

Fasten off leaving a long tail to sew.

β€” Wings (make 2) :

Info :

Make a magic ring, 5dc into the ring and pull the ring closed.

Row 1 :

turn, chain 1, 2dc in next st, 2htr in next st, 2tr in next st, 2htr in next st, 2dc in next st.

Row 2 :

turn, chain 1, dc, 2dc in next st, htr, 2htr in next st, tr, 2tr in next st, htr, 2htr in next st, dc, 2dc in next st.

Row 3 :

turn, chain 1, 2dc, 2dc in next st, 2htr, 2htr in next st, 2tr, 2tr in next st, 2htr, 2htr in next st, 2dc, 2dc in next st.

Info :

Fasten off. Leaving a long tail for sewing to the body.

β€” Feet (make 2) :

Info :

In orange make a magic ring, 6dc into the ring and pull the ring closed.

Round 1 :

2dc in each stitch

Round 2 to 3 :

dc in each stitch

Info :

Fasten off. Leaving a long tail for sewing to the body.

β€” To make up :

Infos :

Sew the head so that it sits level on the top of the body (the fastened off part of the head joining with the fastened off part of the body.). Sew the two wings to either side of the body making sure they sit to the sides and are level in height. (The point of the wings should be facing downwards.) Sew the orange beak to the front of the head making sure it is central and level. The beak should sit in the middle but lower part of the head. Sew the two orange feet to the bottom of the body so that the feet stick out slightly at the front. With black wool embroider the eyes so that they sit central above the beak. Leaving and approx. finger width space between the two eyes.

Assembly Instructions

  • Sew the head so that it sits level on the top of the body (the fastened off part of the head joining with the fastened off part of the body).
  • Sew the two wings to either side of the body making sure they sit to the sides and are level in height, with the wing points facing downwards.
  • Sew the orange beak to the front of the head, ensuring it is central and level and sits in the middle-lower part of the head.
  • Sew the two orange feet to the bottom of the body so the feet stick out slightly at the front for stability.
  • Embroider the eyes using black wool so they sit central above the beak, leaving approximately a finger-width space between the two eyes.

Important Notes

  • πŸ’‘This design is worked in continuous spirals β€” do not join rounds with a slip stitch unless the pattern specifies doing so.
  • πŸ’‘The pattern uses UK crochet terms; refer to the provided UK-to-US conversion if you follow US terminology.
  • πŸ’‘Stuff firmly but gradually for smooth shaping and avoid overstuffing which can distort the toy's shape.

This Dave the Duck pattern is a joyful little project that makes delightful handmade gifts and stash-busting fun. The small size and quick assembly make it perfect for finishing in an afternoon. Try different DK colours to create a whole flock of adorable ducks! πŸ§ΆπŸ¦†

You ask,

we answer.

FAQs

What size will the finished piece be?

The finished amigurumi toy is approximately 10 cm in height when made with DK yarn and a 3.5mm hook as recommended.

Can I use different yarn weights for this pattern?

Yes, you can use different yarn weights but this will change the final size; choose an appropriate hook and expect size and stitch gauge differences.

Do I need to join rounds with slip stitches?

No, this design is made using continuous spirals; do not join rounds with a slip stitch unless the pattern explicitly instructs you to.

How long will this project take to complete?

Most crocheters can complete one duck in about 2-3 hours, depending on experience and assembly speed.