🧢 Beautiful ✨ Detailed πŸ’ Adorable

French Countryside Blanket Pattern

French Countryside Blanket Pattern
4.3β˜… Rating
12-15 Hours Time Needed
3.5K Made This
βœ‚οΈ

Beginner Friendly Level

Perfect for those just starting their crochet journey, with clear instructions and simple techniques

⏱️

Multi-Day Project

A rewarding 12+ hour journeyβ€”perfect for dedicated crafters who love detailed work.

πŸ€—

Soft Hug

Gentle, plush, and full of warmth, creating a sense of comfort and coziness wherever they find a home.

About This French Countryside Blanket Pattern

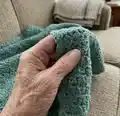
This pattern makes a medium-sized textured blanket worked in the Paris Stitch to create a light, lacy but cosy fabric. It uses DK / Light (3) yarn and a 4.5mm hook and includes full instructions for the body and a two-round border. The design is easy to customise for different widths and lengths using the included tables and suggestions.

French Countryside Blanket Pattern crochet pattern - detailed view of completed project

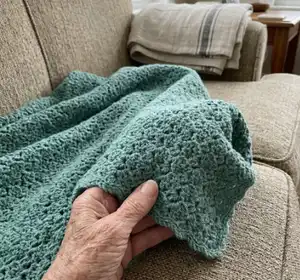
The Paris Stitch (2 dc, ch2, sc) gives a pretty repeating motif that is quick to learn and soothing to crochet. Detailed photo guidance and border instructions are included to help you place stitches and corners correctly.

Why You'll Love This French Countryside Blanket Pattern

I absolutely love this pattern because the Paris Stitch is so addictive and it creates a beautiful texture without complicated stitchwork. I enjoy how the stitch looks intricate but is actually incredibly relaxing to make row after row. The pattern is flexible, so I can change the size easily using the starting chains table or make a matching baby or throw size. I also love that the border instructions are very clear, helping the finished blanket look professional and neat.

French Countryside Blanket Pattern step 1 - construction progress French Countryside Blanket Pattern step 2 - assembly progress French Countryside Blanket Pattern step 3 - details and accessories French Countryside Blanket Pattern step 4 - final assembly and finishing

Switch Things Up

I love how easy it is to customise this pattern by changing yarn colorways β€” you can swap the Seafoam Green for pastel shades, bold stripes, or self-striping yarn to create very different looks.

I often change yarn weight and hook size to make different sizes: use bulky yarn and a larger hook for a chunky cosy throw, or thin yarn and a smaller hook to make a delicate baby blanket.

You can alter the border: try a wider scalloped edge, a picot round, or a contrasting colour for the Paris Stitch round to make the edge pop.

I sometimes add tassels or crochet pom-poms to the corners for a playful finish, which also gives the blanket a handmade boutique feel.

If you prefer a firmer fabric, swap to an acrylic-cotton blend; for extra drape and luxury, choose a soft merino blend instead β€” just make a swatch to check gauge.

Want a striped blanket? Change colours every 10-20 rows for wide stripes, or every 2-3 rows for narrow stripes β€” both look great with the Paris Stitch texture.

I like to make a matching set by crocheting a cushion cover using the same stitch pattern and border, creating a coordinated home dΓ©cor set.

If you want a very portable project, make a mini version with fingering yarn and a small hook for a sweet keyring-sized square using the same stitch repeat.

I sometimes embroider simple motifs onto the finished blanket or tack-on a crochet applique for personalization, especially if making the blanket as a gift.

Don't be afraid to experiment with subtle stitch changes like substituting the sc in the Paris Stitch with a hdc for a slightly different texture β€” always swatch first to check how the change affects gauge and drape.

Common Mistakes & How to Fix Them

βœ— Starting the wrong number of chains can change your blanket width drastically; check the Table 1 multiples (multiple of 4 + 2) and select the closest starting chain number for your desired width. βœ— Skipping the turning chain or miscounting the turning chain can distort the edge stitches; always work the indicated dc around the turning chain as specified so your edges remain even. βœ— Using a different yarn weight without adjusting hook and checking gauge will alter final size; make a swatch first and adjust hook size to match the gauge specified in the pattern. βœ— Placing Paris stitches in the wrong side spaces will make the border uneven; follow the photo guidance and place Paris stitches in the small spaces indicated, counting carefully (it usually works out as 1 Paris stitch for every 2 rows on the left side).

French Countryside Blanket Pattern

Make a cosy French Countryside Blanket using the charming Paris Stitch. This pattern guides you step-by-step to create a textured, lightweight throw in DK / Light (3) yarn. You will love the subtle, lacy texture and the easy-to-follow border instructions designed to give a neat finish. Perfect for gifting or adding a handmade touch to your home.

Beginner Friendly 12-15 Hours

Materials Needed for French Countryside Blanket Pattern

β€” Main Fabric

  • 01
    Ouma Ralie Feels Like Cashmere from Kismet Yarns - Seafoam Green - 9 x 100g
  • 02
    Yarn weight Light (3) / DK - approx 273 yards / 250 meters per 100g
  • 03
    Suggested substitutes: Rico Essentials Acrylic Antipilling DK (100g), King Cole Cherished Baby DK, Stylecraft Bambino DK
  • 04
    Suggested substitutes continued: Lion Brand Jeans, Lion Brand Mandala Ombre, Lion Brand Jamie, Lion Brand Vanna's Style
  • 05
    Suggested substitutes continued: Schachenmayr Original Soft and Easy, Schachenmayr Bravo, Red Heart Baby Hugs Light, Scheepjes Softfun, Scheepjes Colour Crafter, Scheepjes Softfun Denim

β€” Tools Required

  • 01
    Crochet hook size 4.5mm (H)
  • 02
    Optional crochet hook size US G / 4mm for gauge testing
  • 03
    Scissors
  • 04
    Yarn needle (tapestry needle) for weaving in ends
  • 05
    Stitch markers
  • 06
    Measuring tape
  • 07
    Pins for blocking (optional)

Progress Tracker

0% Complete

β€” Information :

Infos :

Degree of difficulty: Easy. Materials: 4.5mm crochet hook. Yarn: Ouma Ralie Feels Like Cashmere from Kismet Yarns: 9 x 100g in Seafoam Green. Finished Size: Approximately 48 inches x 50 inches (123cm x 127cm). Tension: 9 rows and 5 Paris stitches = 4.25 x 4.25 inches / 11 x 11 cm.

β€” Stitches & Abbreviations :

Infos :

ch = chain. sl st = slip stitch. sc = single crochet. dc = double crochet. ch2-sp = chain 2 space. st/sts = stitch/stitches. H = crochet hook. YOH = yarn over hook. rep = repeat. BLO = back loop only. RS = right side.

β€” Yarn Specifications :

Info :

Weight: Light (3). Wraps per inch: 11 wpi. Meterage: 273 yards / 250 meters per 100g. Unit Weight: 3.53 ounces / 100 grams. Gauge / Tension: 22 stitches & 28 rows = 4 x 4 inches. Crochet Hook size: US G or 4mm (suggested for swatch). Fibers: 100% Acrylic.

β€” Special Stitches :

Info :

Paris Stitch: Each (2 dc, ch 2, sc) makes one Paris Stitch. CORNER: For the CORNER, make: (dc, ch 1) x 3, dc, sl st in the indicated st.

β€” Tables :

Info :

Table 1 - Number of starting chains vs Width without border vs Number of Paris stitches per row: 102 β†’ 53 cm / 20.75 inches β†’ 25 Paris stitches; 142 β†’ 74.5 cm / 29.25 inches β†’ 35; 182 β†’ 96 cm / 37.75 inches β†’ 45; 222 β†’ 117 cm / 46 inches β†’ 55; 262 β†’ 138.5 cm / 54.5 inches β†’ 65; 302 β†’ 160 cm / 63 inches β†’ 75; 342 β†’ 181 cm / 71.25 inches β†’ 85. The border will add about 1.5 cm / 1/2 inch per side, thus a total of about 3 cm / 1 inch to the width. Table 2 - Number of rows vs Length without border: 63 β†’ 72.5 cm / 28.5 inches; 73 β†’ 84 cm / 33 inches; 83 β†’ 95.5 cm / 37.5 inches; 93 β†’ 107 cm / 42 inches; 103 β†’ 115 cm / 45.25 inches; 113 β†’ 130 cm / 51 inches; 123 β†’ 141.5 cm / 55.75 inches; 133 β†’ 153 cm / 60.25 inches; 143 β†’ 165 cm / 65 inches; 153 β†’ 176 cm / 69.25 inches.

β€” Instructions :

Info :

Instructions are written for a medium size blanket, consult Table 1 on page 3 for number of starting chains for other blanket sizes.

β€” BLANKET :

Info :

With a 4.5mm H, make 222 ch.

Row 1 :

(RS) 2 dc in 4th ch from H (photo 1-2), ch 2, sc in next ch (photo 2-3), *skip 2 ch, 2 dc in next ch, ch 2, sc in next ch*, rep from * to * until last ch, dc in last ch (photo 4-5), turn [55 Paris Stitches]

Row 2 :

ch 2, *(2 dc, ch 2, sc) in ch2-sp (photo 6-7)*, rep from * to * until end of row, dc around turning ch (photo 8-9)

Row 3 to Row X :

Repeat Row 2 until your desired length (the blanket in the photo has 103 rows). Last Row should be made with RS facing.

Last Row :

(RS) rep Row 2, but don't make the last dc in turning ch

β€” BORDER :

Info :

The border will consist of one round of Paris stitches and one round of slip stitches. The last row made for the body of the blanket will count as the first side (top side) of the border; detailed instructions with photos will help you to place the stitches for the other 3 sides of the blanket.

Round 1 - Left Side :

The first corner will be made in the first dc of the 2 dc indicated by the purple arrow in the photo 10 (the red arrow indicates where you normally would have made the last dc of the row, which is omitted in the last row): for the CORNER, make: (dc, ch 1) x 3, dc, sl st in the indicated st (photo 11), turn so that the left side is now on top (photo 12), locate the space on the left side made by the last dc at the end of each row (it is the smaller (third) space, not the big space, indicated by the white arrows in photo 12), make a Paris st in each of these spaces until the next corner (it works out as 1 Paris st for every 2 rows, photo 13), don't make a Paris st in the last sp, make a CORNER in the last sp (photo 14-15).

Round 1 - Bottom :

Turn so that the bottom is now on top, make a Paris st in the bottom of the same ch where the 2 dc of row 1 was made (photo 16-17) until the next corner, make a CORNER in the ch2-sp at the end of this side (photo 18-19).

Round 1 - Right Side :

Locate the space indicated by the arrows in photo 20-21 (it is the dc at the end of each row, one of the smaller spaces), make a Paris st in each of these spaces (photo 21, it works out as every third space) until the end of this side, make a CORNER in the last space before the ch2-starting-chain of the top row (photo 22-23).

Round 2 :

sl st in the BLO of each st around (insert your H from the top into each st, photo 24-26, the first 2 sl sts will be in the ch2-starting-chain, see arrows in photo 27), fasten off. Weave in yarn ends.

β€” Finishing :

Info :

Weave in ends and block lightly if desired to even out stitches and give a neat edge.

Assembly Instructions

  • Work the blanket body until your desired length, then use the last row of the body as the top side of the border and begin the border as described to work around all four sides.
  • For the border corners, make a CORNER by working (dc, ch 1) x 3, dc, sl st in the indicated stitch, then continue placing Paris Stitches along the side until the next corner.
  • On the left side make a Paris stitch in the smaller (third) space created by the last dc at the end of every two rows; on the right side make a Paris stitch in the dc-end spaces (about every third space) as instructed.
  • After completing one round of Paris stitches around all sides, work one round of slip stitches in the BLO of each stitch around, inserting your hook from the top into each stitch; the first two slip stitches will be worked into the ch2-starting-chain.
  • Fasten off securely and weave in all yarn ends neatly with a yarn needle; block the blanket lightly if desired for an even finish.

Important Notes

  • πŸ’‘This pattern is written in US terminology; consult the special stitches section for Paris Stitch and Corner definitions.
  • πŸ’‘Make a gauge swatch before starting to ensure your stitches per inch match the pattern, especially if using a substitute yarn.
  • πŸ’‘Photos are placed at the end of the document to help you with stitch placement and border corners; refer to them while working the border.

This French Countryside Blanket pattern brings the gentle charm of the French hills to your home with a soft Paris Stitch texture. The pattern is easy to follow with helpful photos and clear border instructions so your finished blanket will look neat and polished. Whether you make it for a gift or your own cosy corner, it is sure to become a favourite. 🧢🧡

You ask,

we answer.

FAQs

What size will the finished piece be?

The sample blanket measures approximately 48 inches x 50 inches (123 cm x 127 cm) when made with the recommended yarn and 4.5mm hook.

Can I use different yarn weights for this pattern?

Yes, you can use different yarn weights, but you must make a swatch and adjust hook size to achieve the correct gauge; final size will change with different yarns.

Do I need prior crochet experience for this pattern?

This pattern is rated beginner friendly and uses basic stitches plus the Paris Stitch; familiarity with dc, sc, chains and working in spaces is helpful.

How long does this project typically take to complete?

Most crocheters complete this medium blanket in about 12-15 hours spread over multiple sessions, depending on size chosen and pace.

How do I adjust the blanket size?

Use Table 1 to choose the number of starting chains (multiples of 4 + 2) for the desired width and Table 2 as a guideline for row count to reach the desired length.