🧢 Beautiful ✨ Detailed πŸ’ Adorable

Snow Globe Amigurumi Pattern

Snow Globe Amigurumi Pattern
4.1β˜… Rating
5-7 Hours Time Needed
1.8K Made This
βœ‚οΈ

Intermediate Level

Ideal for those with basic crochet experience, featuring slightly more advanced stitches and techniques to expand your skills.

⏱️

Weekend Treat

Takes 5-7 hours, making it an enjoyable project to finish over a couple of days.

🧸

Cute Companion

An adorable friend to cherish, handcrafted with love to bring comfort and joy for years to come.

About This Snow Globe Amigurumi Pattern

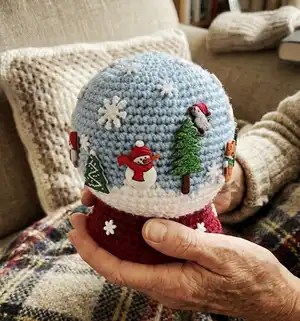
This pattern creates a small crochet snow globe amigurumi worked in continuous rounds with tapestry colorwork for the sky and snow. Youll use three colors to form the globe, white for the snow band, and a burgundy base for a festive look. It includes detailed shaping, invisible decreases, and a sew-on cardboard base for stability.

Snow Globe Amigurumi Pattern crochet pattern - detailed view of completed project

Complete step-by-step rounds are provided for the globe, base, and bottom, plus assembly and embellishment tips. Perfect for seasonal decor or handmade gifts with room to personalize with buttons and trims.

Why You'll Love This Snow Globe Amigurumi Pattern

I absolutely love this pattern because it captures the cozy charm of a snow globe in crochet form. I enjoy the combination of simple single crochet shaping and tapestry colorwork that lets you practice carrying colors neatly. The project is small enough to finish in a weekend but still offers satisfying details like the sewn-in cardboard base and button embellishments. I also love how customizable it is β€” you can change colors, buttons, or add tiny scenes to make each globe unique.

Snow Globe Amigurumi Pattern step 1 - construction progress Snow Globe Amigurumi Pattern step 2 - assembly progress Snow Globe Amigurumi Pattern step 3 - details and accessories Snow Globe Amigurumi Pattern step 4 - final assembly and finishing

Switch Things Up

I love customizing this pattern with different color palettes to match my holiday decor; try pastel shades for a soft winter look or bright colors for a playful globe.

You can change the yarn weight and hook size to make larger or smaller globes; bulky yarn with a larger hook creates a chunky version while fingering weight makes a tiny collectible.

I often swap the burgundy base for a metallic or sparkly yarn for added flair and a more festive finish.

Try embroidering tiny motifs on the sky section instead of gluing buttons for a stitched scene that lasts longer with handling.

Mix and match buttons and tiny charms to tell a story around the globe - trees, reindeer, and tiny snowmen work especially well.

For a weighted display, add beads or poly pellets to the base; I sometimes place a felt disc over the pellets so they dont show through the stuffing.

If you want a flat-backed ornament, flatten the back and sew a loop for hanging before finishing the base.

I also recommend adding a clear fabric or small plastic dome inside for a realistic glass effect if you want a more literal snow globe look.

Try making a set in graduated sizes by changing yarn weight and hook to create an adorable display on a mantel or shelf.

Dont be afraid to experiment with trims like tiny pom-poms or a crocheted garland around the base to make each globe unique and gift-ready.

Common Mistakes & How to Fix Them

βœ— Skipping the stitch marker while working continuous rounds causes misaligned decreases; place a marker at the first stitch of every round and move it as you go. βœ— Carrying unused color loosely will create loops and bumps on the surface; keep the unused yarn snug across the back of the work and crochet over it consistently. βœ— Forgetting to leave a long tail for sewing the bottom makes assembly harder; leave a generous long tail when finishing the bottom to sew it to the base cleanly. βœ— Not adding weighted stuffing can make the globe unstable and tip over easily; include weighted pellets or beads at the base before fully closing to improve stability. βœ— Overstuffing the globe before attaching the base can distort the spherical shape; stuff gradually and shape the globe to a smooth sphere before final closure.

Snow Globe Amigurumi Pattern

Make a charming crochet snow globe you can display or gift. This pattern guides you round-by-round using tapestry crochet, color changes, and a simple base for stability. Youll create a 5-inch decorative globe with easy embellishment options to personalize. Perfect for holiday decor or a cozy handmade present.

Intermediate 5-7 Hours

Materials Needed for Snow Globe Amigurumi Pattern

β€” Main Fabric

  • 01
    Red Heart Super Saver medium weight #4 yarn, Color A - light blue
  • 02
    Red Heart Super Saver medium weight #4 yarn, Color B - white
  • 03
    Red Heart Super Saver medium weight #4 yarn, Color C - burgundy

β€” Tools Required

  • 01
    Crochet hook E/4 (3.5 mm)
  • 02
    Stitch marker
  • 03
    Large sewing needle
  • 04
    Poly-fil stuffing
  • 05
    Piece of cardboard
  • 06
    Scissors
  • 07
    Hot glue gun
  • 08
    Weighted stuffing material (Poly Pellets weighted stuffing beads)
  • 09
    Winter-themed buttons (flat back recommended)
  • 10
    Craft cutter to remove shanks

Progress Tracker

0% Complete

β€” Abbreviations :

Info :

BL, BLO - back loop, back loop only. Ch - chain. SC - single crochet. Sl St - slip stitch. St (Sts) - stitch (stitches).

Info :

Skill Level: Intermediate (must know tapestry crochet)

Infos :

Finished Size: Snow globe is about 5" (13 cm) tall. Yarn: Red Heart Super Saver medium weight #4 yarn. Color A - light blue, Color B - white, Color C - burgundy. Hook and other materials: Crochet hook E/4 (3.5 mm); Stitch marker; Large sewing needle; Poly-fil stuffing; Piece of cardboard; Scissors; Hot glue gun; Weighted stuffing material (I used Poly Pellets weighted stuffing beads); Winter-themed buttons of your choice (try to get flat back buttons. If you get shank buttons, you will need to remove the shanks); Craft cutter to remove the shanks.

β€” Notes :

Infos :

1. How to make magic ring Make a large loop by putting the yarn tail behind the working yarn (the yarn coming from the skein) leaving a 4-6 inch tail. Draw the working yarn through the loop, now you have one loop on the hook. 2. How to change to a new color Work the final stitch with the first color, but do not complete the stitch. You will have 2 loops remain on the hook. Drop first color and draw through the loops on the hook new color and complete the stitch. 3. The snow globe is worked in continuous rounds. Use stitch marker to mark first stitch of each round. 4. This pattern uses tapestry crochet technique - working over the color not in use. To carry the unused color, lay it on top of the previous row and work over it.

β€” Special Stitch :

Info :

INV DEC (invisible decrease) - put hook through the front loop only of two consecutive stitches. You have three loops on hook. Yarn over and pull through two loops. You have two loops on hook. Yarn over and pull through those two loops.

β€” Snow globe :

Info :

With Color A, make magic ring;

Round 1 :

Ch 1, 6 SC in magic ring. Total - 6 SC.

Round 2 :

2 SC in each St around. Total - 12 SC.

Round 3 :

[2 SC in first St, SC in next St] 6 times. Total - 18 SC.

Round 4 :

SC in first St, [2 SC in next St, SC in each of next 2 Sts] 5 times, 2 SC in next St, SC in next St. Total - 24 SC.

Round 5 :

[2 SC in first St, SC in each of next 3 Sts] 6 times. Total - 30 SC.

Round 6 :

SC in first St and in next St, [2 SC in next St, SC in each of next 4 Sts] 5 times, 2 SC in next St, SC in each of next 2 Sts. Total - 36 SC.

Round 7 :

[2 SC in first St, SC in each of next 5 Sts] 6 times. Total - 42 SC.

Round 8 :

SC in first St and in each of next 2 Sts, [2 SC in next St, SC in each of next 6 Sts] 5 times, 2 SC in next St, SC in each of next 3 Sts. Total - 48 SC.

Round 9 :

[2 SC in first St, SC in each of next 7 Sts] 6 times. Total - 54 SC.

Round 10 :

SC in first St and in each of next 3 Sts, [2 SC in next St, SC in each of next 8 Sts] 5 times, 2 SC in next St, SC in each of next 4 Sts. Total - 60 SC.

Round 11-19 :

SC in each St around.

Round 20 :

A:(SC - 4), B:(SC - 4), A:(SC - 9), B:(SC - 4), A:(SC - 7), B:(SC - 5), A:(SC - 7), B:(SC - 4), A:(SC - 7), B:(SC - 6), A:(SC - 3). Total - 60 SC.

Round 21 :

A:(SC - 3), B:(SC - 20), A:(SC - 3), B:(SC - 9), A:(SC - 3), B:(SC - 9), A:(SC - 2), B:(SC - 11). Fasten off Color A. Total - 60 SC.

Info :

Continue with Color B.

Round 22 :

[SC in each of next 8 Sts, INV DEC] 6 times. Total - 54 SC.

Round 23 :

SC in each of next 3 Sts, INV DEC, [SC in each of next 7 Sts, INV DEC] 5 times, SC in each of next 4 Sts. Total - 48 SC.

Round 24 :

[SC in each of next 6 Sts, INV DEC] 6 times. Total - 42 SC.

Round 25 :

SC in each of next 2 Sts, INV DEC, [SC in each of next 5 Sts, INV DEC] 5 times, SC in each of next 3 Sts. Total - 36 SC.

Round 26 :

Sl St in each St around. Fasten off Color B. Total - 36 Sl Sts.

Info :

Continue working on base. Join Color C to BL of first St of previous round,

Round 1 :

Ch 1, BLO: SC in same St and in each of next 7 Sts, 2 SC in next St, [SC in each of next 8 Sts, 2 SC in next] 3 times. Total - 40 SC.

Round 2 :

SC in each St around. Total - 40 SC.

Round 3 :

[SC in each of next 9 Sts, 2 SC in next St] 4 times. Total - 44 SC.

Round 4 :

SC in each St around. Total - 44 SC.

Round 5 :

[SC in each of next 10 Sts, 2 SC in next St] 4 times. Total - 48 SC.

Round 6 :

SC in next St, Sl St in each of next 2 Sts. Fasten off.

β€” Bottom :

Info :

With Color C, make magic ring;

Round 1 :

Ch 1, 6 SC in magic ring

Round 2 :

2 SC in each St around. Total - 12 SC.

Round 3 :

[2 SC in first St, SC in next St] 6 times. Total - 18 SC.

Round 4 :

SC in first, [2 SC in next St, SC in each of next 2 Sts] 5 times, 2 SC in next St, SC in next St. Total - 24 Sts.

Round 5 :

[2 SC in first St, SC in each of next 3 Sts] 6 times. Total - 30 Sts.

Round 6 :

SC in first St and in next St, [2 SC in next St, SC in each of next 4 Sts] 5 times, 2 SC in next St, SC in next St. Total - 36 Sts.

Info :

Leave long tail for sewing bottom to the base.

Infos :

Stuff your snow globe and the base, leave some space at the bottom. Stuff the snow globe well, make sure it has a nice, spherical shape. Cut out a circular piece of cardboard that is slightly smaller than the diameter of the bottom. A compass is very useful for this purpose.

Infos :

Using a sewing needle and saved long tail, start sewing the bottom to the base (don't forget to insert the cardboard circle inside). Sew about 3/4 of the diameter, add more stuffing as necessary. Add weighted material for stability, and finish sewing the bottom.

Info :

Your snow globe is now ready for embellishment! If your buttons have shanks, cut the shanks off.

Info :

Using a hot glue gun, glue the buttons to the snow globe in any pattern that you like.

Info :

Congratulations! Your crochet snow globe is complete!

Assembly Instructions

  • Cut a circular piece of cardboard slightly smaller than the diameter of the bottom and insert it into the base before closing.
  • Using the long tail from the bottom piece, sew the bottom to the base with a sewing needle, sewing about 3/4 of the diameter, then add stuffing and finish sewing securely.
  • Add weighted material (poly pellets or beads) inside the base for stability before fully closing the bottom.
  • Trim shanks from decorative buttons before gluing, then arrange buttons or embellishments around the globe and attach with a hot glue gun.
  • Stuff the globe evenly to create a smooth spherical shape and leave a little space at the bottom for assembly into the base.

Important Notes

  • πŸ’‘Use a stitch marker to mark the first stitch of each continuous round to prevent shifting and keep decreases aligned.
  • πŸ’‘Carry unused colors across the back when tapestry crocheting and keep the carried yarn snug to avoid loose loops on the surface.
  • πŸ’‘Leave a long yarn tail when finishing the bottom so you have enough length to sew the bottom to the base easily.
  • πŸ’‘Insert a cardboard circle and weighted material for a stable base; this prevents the snow globe from tipping over.

This cozy Snow Globe amigurumi pattern brings festive charm to your home with a handmade touch. Personalize each globe with buttons, trims, or tiny scenes to make it uniquely yours. Perfect for gifting or seasonal decorating β€” make one (or many) and spread a little homemade joy! πŸŽ„πŸ§Άβœ¨

You ask,

we answer.

FAQs

What size will the finished piece be?

The finished snow globe is about 5" (13 cm) tall when made with the recommended Red Heart Super Saver #4 yarn and a 3.5 mm hook.

Can I use different yarn weights for this pattern?

Yes, you can change yarn weight and hook size, but the finished size will change; use a suitable hook for your chosen yarn and expect differences in stitch count and final dimensions.

Do I need prior crochet experience for this pattern?

This pattern is rated intermediate and assumes familiarity with single crochet, working in continuous rounds, tapestry crochet color carrying, and invisible decreases.

How long does this project typically take to complete?

Most crocheters complete this project in 5-7 hours, though time will vary depending on experience, pace, and how much embellishment you add.