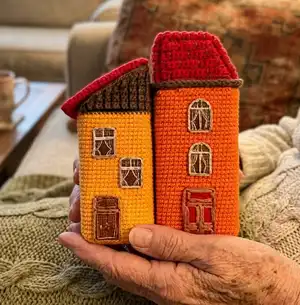
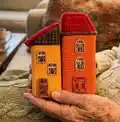
Create charming miniature crochet houses with clear step-by-step instructions for making two small houses with cardboard inserts, felt details and embroidered doors and windows. This pattern uses DK weight cotton yarn and a small 2.25 mm hook for a neat, tight fabric. Perfect as a decorative set or a thoughtful handmade gift, you will love assembling the felt details and roofs to bring each tiny home to life.
Progress Tracker
0% Complete
— HOUSE No.1 (the outer part) :
Info :
YARN - Alize Cotton Gold No.37 (orange) and a 2.25 mm crochet hook.
Info :
Place a stitch marker in the 2nd stitch (3 sc) not to lose the corner.
Round 2 :
1 sc, (3 sc in 1 stitch), 1 sc, (3 sc in 1 stitch), 1 sc, (3 sc in 1 stitch), 1 sc, (3 sc in 1 stitch) (16)
Round 3 :
2 sc, (3 sc in 1 stitch), 3 sc, (3 sc in 1 stitch), 3 sc, (3 sc in 1 stitch), 3 sc, (3 sc in 1 stitch) (24)
Round 4 :
4 sc, (3 sc in 1 stitch), 5 sc, (3 sc in 1 stitch), 5 sc, (3 sc in 1 stitch), 5 sc, (3 sc in 1 stitch) (32)
Round 5 :
6 sc, (3 sc in 1 stitch), 7 sc, (3 sc in 1 stitch), 7 sc, (3 sc in 1 stitch), 7 sc, (3 sc in 1 stitch) (40)
Round 6 :
8 sc, (3 sc in 1 stitch), 9 sc, (3 sc in 1 stitch), 9 sc, (3 sc in 1 stitch), 9 sc, (3 sc in 1 stitch) (48)
Round 7 :
10 sc, (3 sc in 1 stitch), 11 sc, (3 sc in 1 stitch), 11 sc, (3 sc in 1 stitch), 11 sc, (3 sc in 1 stitch) (56)
Round 8 :
12 sc, (3 sc in 1 stitch), 13 sc, (3 sc in 1 stitch), 13 sc, (3 sc in 1 stitch), 13 sc, (3 sc in 1 stitch) (64)
Round 9 :
14 sc, (3 sc in 1 stitch), 15 sc, (3 sc in 1 stitch), 15 sc, (3 sc in 1 stitch), 15 sc, (3 sc in 1 stitch) (72)
Info :
* Crochet the next round through the posts between stitches. To do this, insert the hook in the first stitch and draw it out in the second stitch, grabbing the working yarn and making sc.
Round 10 :
72 sc (through the posts between stitches)
Round 11-13 :
72 sc (3 rounds)
Info :
Trace the bottom of the square on the cardboard and cut it out. If you use thin cardboard, then cut two squares.
Info :
* Continue crocheting in a circle.
Round 14-44 :
88 sc (31 rounds)
Info :
Insert the cardboard template into the bottom of the house. Do not cut yarn.
Info :
Prepare the cardboard for the wools of the house. The density of cardboard from a large box of Greenfield tea will suffice. Measure one side of the house with a ruler to cut off the required amount of cardboard. (In my house, one side is 5 cm * 4 + 3 cm for the fold to glue the workpiece).
Info :
Trim the edge of the cardboard to the desired length. It must be shorter than the crochet part.
Info :
Complete crocheting the required number of sc to the corner of the house – 3 sc. (guide on your part). Cut yarn.
— HOUSE No.1 (the inner part) :
Info :
YARN - Alize Cotton Gold No.37 (orange) and a 2.25 mm crochet hook.
Round 2 :
1 sc, (3 sc in 1 stitch), 1 sc, (3 sc in 1 stitch), 1 sc, (3 sc in 1 stitch), 1 sc, (3 sc in 1 stitch) (16)
Round 3 :
2 sc, (3 sc in 1 stitch), 3 sc, (3 sc in 1 stitch), 3 sc, (3 sc in 1 stitch), 3 sc, (3 sc in 1 stitch) (24)
Round 4 :
4 sc, (3 sc in 1 stitch), 5 sc, (3 sc in 1 stitch), 5 sc, (3 sc in 1 stitch), 5 sc, (3 sc in 1 stitch) (32)
Round 5 :
6 sc, (3 sc in 1 stitch), 7 sc, (3 sc in 1 stitch), 7 sc, (3 sc in 1 stitch), 7 sc, (3 sc in 1 stitch) (40)
Round 6 :
8 sc, (3 sc in 1 stitch), 9 sc, (3 sc in 1 stitch), 9 sc, (3 sc in 1 stitch), 9 sc, (3 sc in 1 stitch) (48)
Round 7 :
10 sc, (3 sc in 1 stitch), 11 sc, (3 sc in 1 stitch), 11 sc, (3 sc in 1 stitch), 11 sc, (3 sc in 1 stitch) (56)
Round 8 :
12 sc, (3 sc in 1 stitch), 13 sc, (3 sc in 1 stitch), 13 sc, (3 sc in 1 stitch), 13 sc, (3 sc in 1 stitch) (64)
Info :
* Crochet the next round through the posts between stitches. To do this, insert the hook in the first stitch and draw it out in the second stitch, grabbing the working yarn and making sc.
Round 9 :
64 sc (through the posts between stitches)
Info :
* Crochet all the next rounds through both loops.
Info :
Draw the yarn tail to the right side.
Round 10-40 :
64 sc (31 rounds)
Info :
Insert the inner part into the outer part. Check if the height of both parts matches. Adjust the height. Complete or unravel the row if needed.
Info :
Complete crocheting the required stitches to the corner of the house. (Guide on your part). Cut yarn, leaving a long tail.
Info :
Draw the yarn tail of the outer part of the house to the wrong side using a crochet hook.
— JOIN THE PARTS OF THE HOUSE :
Info :
Sew both parts of the house in a circle.
Info :
Hide the yarn tail inside the house. Cut the excess yarn.
— HOUSE DESIGN :
Info :
Make the templates from a sheet of paper for two windows and a front door. Trace around the prepared templates on the felt and cut them out. Red felt is for the front door. Brown felt for the windows.
— FRONT DOOR DESIGN :
Info :
Apply horizontal and vertical lines on the felt with the marker. Embroider the vertical and horizontal stitches with brown thread.
Info :
Secure thread on the wrong side of the part. Cut thread. Apply the ready parts on the house. Glue them.
— WINDOWS DESIGN :
Info :
Draw curtains on the windows with permanent marker. Draw the curtains several times to make the drawing brighter as the marker sinks into the felt over time and becomes pale.
Info :
Apply vertical and horizontal lines (the window frame) with the marker.
Info :
Prepare a scrap of white embroidery thread. Split it into three threads. We will need two threads for embroidering the vertical and horizontal stitches.
Info :
Secure the thread on the wrong side of the part. Cut thread. Apply the ready parts on the house. Glue them.
— ROOF (back part) :
Info :
YARN - Alize Cotton Gold No.56 (red) and a 2.25 mm crochet hook.
Chain 16 :
Start crocheting in the second chain from hook - 15 sc, chain 1, turn.
Round 2-18 :
15 sc, chain 1, turn (17 rounds)
Info :
Cut yarn, leaving a long tail. Steam the part for a few seconds with the iron, through a damp cloth. Prepare the cardboard in half of the part. Fold the part in half, insert the cardboard, and sew the edges. Draw the needle to the other side of the part, and sew the edges too. Hide the yarn tail inside the part and cut the excess yarn. Pin the part to the house and try it on.
— ROOF (make 2 - front and back parts) :
Info :
YARN - Alize Cotton Gold No.56 (red) and a 2.25 mm crochet hook.
Chain 12 :
Start crocheting in the second chain from hook - 11 sc, chain 1, turn.
Round 2 :
11 sc, chain 2, turn
Round 3 :
12 sc, chain 1, turn
Round 4 :
12 sc, chain 2, turn
Round 5 :
13 sc, chain 1, turn
Round 6 :
13 sc, chain 2, turn
Round 7 :
14 sc, chain 1, turn
Round 8 :
14 sc, chain 2, turn
Round 9 :
15 sc, chain 1, turn
Info :
In the next rounds, keep an even row on one side of the part and chain 1. Decrease the other side of the part, and do not chain 1.
Round 10 :
15 sc, chain 1, turn
Round 11 :
15 sc, chain 1, turn
Round 13 :
14 sc, chain 1, turn
Round 15 :
13 sc, chain 1, turn
Round 17 :
12 sc, chain 1, turn
Info :
Cut yarn, leaving a long tail for sewing. Steam the part for a few seconds with the steam of the iron, through a damp cloth. Prepare the cardboard in half of the part. Fold the part in half, insert the cardboard and sew the edges. Draw the needle to the other side of the part, and sew the edges. Hide the yarn tail inside. Pin the part to the house and try it on.
— ROOF (the outer part) :
Info :
YARN - Alize Cotton Gold No.56 (red) and a 2.25 mm crochet hook.
Chain 19 :
Start crocheting in the second chain from hook - 18 sc, chain 1, turn.
Round 2-26 :
18 sc, chain 1, turn (25 rounds)
Info :
Cut yarn, leaving a long tail. Steam the part for a few seconds with the iron, through a damp cloth. Prepare the cardboard in half of the part. Fold the part in half, insert the cardboard, and sew the edges. Draw the needle to the other side of the part and sew the edges. Hide the yarn tail inside.
— ROOF (front part) :
Info :
YARN - Alize Cotton Gold No.56 (red) and a 2.25 mm crochet hook.
Chain 19 :
Start crocheting in the second chain from hook - 18 sc, chain 1, turn.
Round 2-24 :
18 sc, chain 1, turn (23 rounds)
Info :
Cut yarn, leaving a long tail. Steam the part for a few seconds with the iron, through a damp cloth. Prepare the cardboard in half of the part. Fold the part in half, insert the cardboard, and sew the edges. Draw the needle to the other side of the part and sew the edges. Hide the yarn tail inside.
— ROOF ASSEMBLY :
Info :
Pin the roof parts to the house and try them on. Embroider the vertical and horizontal stitches (tile) on the roof parts to create a tiled look before final assembly.
Info :
Prepare a scrap of brown embroidery thread. Split it into three threads. We will need two threads for embroidering the vertical and horizontal stitches.
Info :
First, embroider the horizontal stitches at the same distance from each other. Embroider the vertical stitches in a checkerboard pattern. Embroider the vertical stitches in a checkerboard pattern across the roof pieces and secure thread on the wrong side of the parts.
Info :
Apply glue to the wrong side of felt parts and attach windows and doors. Pin the finished roof to the house, sew or glue into position, and finish any remaining embroidery details. Your small houses are complete.
This delightful Small Houses pattern transforms simple DK cotton into tiny handcrafted homes full of personality. The combination of tight single crochet construction, cardboard inserts and embroidered felt details makes each house look polished and durable. Display them together or gift one as a cozy, handmade keepsake. 🧶🏡🧵