๐Ÿงถ Beautiful โœจ Detailed ๐Ÿ’ Adorable

Pusheen Cat with Ice Cream Amigurumi Pattern

Pusheen Cat with Ice Cream Amigurumi Pattern
4.7โ˜… Rating
5-7 Hours Time Needed
1.4K Made This
โœ‚๏ธ

Intermediate Level

Ideal for those with basic crochet experience, featuring slightly more advanced stitches and techniques to expand your skills.

โฑ๏ธ

Weekend Treat

Takes 5-7 hours, making it an enjoyable project to finish over a couple of days.

๐Ÿงธ

Cute Companion

An adorable friend to cherish, handcrafted with love to bring comfort and joy for years to come.

About This Pusheen Cat with Ice Cream Amigurumi Pattern

This pattern creates a sweet Pusheen cat holding an ice cream cone with sprinkles and a cherry. You will crochet the head and body as one piece and make all other parts separately before sewing them on. It uses DK and sport weight yarns and includes instructions for stripes, tail, ears, hands, ice cream scoop, cone and cherry.
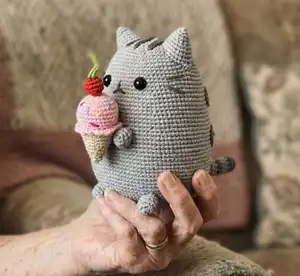
Pusheen Cat with Ice Cream Amigurumi Pattern crochet pattern - detailed view of completed project

Detailed round-by-round instructions are provided for every piece with helpful assembly notes. The finished Pusheen measures approximately 17 cm tall using the recommended yarn and hook.

Why You'll Love This Pusheen Cat with Ice Cream Amigurumi Pattern

I absolutely love this pattern because it captures Pusheen's sweet, round shape with simple yet charming details like stripes and whiskers. I enjoy how the pattern mixes DK and sport yarn to give the ice cream a delicate look while keeping the cat plush and sturdy. Sewing on the tiny ice cream and cherry is one of my favorite finishing steps because it brings the whole character to life. I also love that the pattern is modularโ€”once you've made the body you can personalize the ice cream colors and stripe placement to make your own unique Pusheen.

Pusheen Cat with Ice Cream Amigurumi Pattern step 1 - construction progress Pusheen Cat with Ice Cream Amigurumi Pattern step 2 - assembly progress Pusheen Cat with Ice Cream Amigurumi Pattern step 3 - details and accessories Pusheen Cat with Ice Cream Amigurumi Pattern step 4 - final assembly and finishing

Switch Things Up

I love customizing this pattern by switching the ice cream colors to create different flavorsโ€”try mint green, pale yellow or pastel blue for unique looks.

I often change the yarn weight and hook to make a mini keychain version; using thinner yarn and a smaller hook results in an adorable tiny Pusheen.

To make a chunkier, more huggable Pusheen, I use bulky yarn with a larger hook and add more stuffing for a plush finish.

I sometimes embroider different facial expressions by moving the mouth or eyes slightly to create a sleepier or cheeky Pusheen.

For a festive twist, I add a tiny crochet hat or scarf in seasonal colors and sew it onto the head before finishing the ears.

I like to mix yarn texturesโ€”try fuzzy or boucle yarn for the body to give Pusheen a fluffy effect while keeping smooth yarn for the ice cream.

If I want a posable version, I insert craft wire into the arms and tail before stuffing to allow gentle posing for photos or display.

I often switch the stripe placement on the back or change stripe colors to reflect my favorite color palette or to match nursery decor.

Try adding tiny accessories like a felt bow, sequined sprinkles, or a tiny crocheted spoon to personalize your project even more.

When I make multiples as gifts, I package them with a small tag listing yarns and care instructions so recipients can cherish their handmade Pusheen for years.

Common Mistakes & How to Fix Them

โœ— Skipping the stitch marker in continuous rounds will make it easy to lose track of the start position; place a marker in the last stitch of each round and move it up as you go to stay accurate. โœ— Forgetting to stuff as you go results in lumpy or misshapen sections; stuff gradually during shaping and add small amounts of fiberfill to maintain smooth, even curves. โœ— Not placing the safety eyes at the recommended rounds will give the face wrong proportions; add the eyes between rounds 42 and 43 with 11 stitches between for correct placement. โœ— Cutting yarn too short when finishing last rounds can make closing holes difficult; leave a long yarn tail for sewing and use the tail to close and stitch pieces securely. โœ— Over- or under-tight tension changes the final size and gauge; keep a consistent, moderate tension and swatch if necessary to match the gauge for best results.
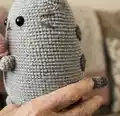
Pusheen Cat with Ice Cream Amigurumi Pattern

Make an adorable Pusheen holding a tiny ice cream with this complete crochet pattern. You will crochet the head and body in one piece and assemble sweet accessories like the cone, scoop and cherry. Clear round-by-round instructions and materials are included so you can recreate this cuddly cat at home. Perfect as a handmade gift or a charming desk companion.

Intermediate 5-7 Hours

Materials Needed for Pusheen Cat with Ice Cream Amigurumi Pattern

โ€” Main Fabric

  • 01
    Light grey - DK light worsted (number 3) yarn, approx. 100-150 g (main color for body)
  • 02
    Dark grey - DK light worsted (number 3) yarn, less than 50 g (stripes, tail, accents)
  • 03
    Light brown - sport/baby yarn (number 2), less than 50 g (ice cream cone)
  • 04
    Rosรฉ (pink) - sport/baby yarn (number 2), less than 50 g (ice cream scoop)
  • 05
    Red - sport/baby yarn (number 2), less than 50 g (cherry)
  • 06
    Green - sport/baby yarn (number 2), less than 50 g (cherry stalk)
  • 07
    Embroidery thread black or dark grey for nose & mouth

โ€” Tools Required

  • 01
    Hook: size 4/2.5 mm
  • 02
    Safety eyes 12 mm (2 pieces)
  • 03
    Embroidery needle
  • 04
    Yarn needle for sewing
  • 05
    Pin-needles
  • 06
    Stitch markers (use a stitch marker in the last stitch of each round, moving it up as you go)
  • 07
    Scissors
  • 08
    Polyester stuffing

Progress Tracker

0% Complete

โ€” Head/Body :

Info :

With light grey yarn

Round 1 :

6 sc in magic ring (6)

Round 2 :

2 sc in each stitch around (12)

Round 3 :

(1 sc, inc) x6 (18)

Round 4 :

(2 sc, inc) x6 (24)

Round 5 :

(3 sc, inc) x6 (30)

Round 6 :

(4 sc, inc) x6 (36)

Round 7 :

(5 sc, inc) x6 (42)

Round 8 :

(6 sc, inc) x6 (48)

Round 9 :

(7 sc, inc) x6 (54)

Round 10 :

(8 sc, inc) x6 (60)

Round 11 :

(9 sc, inc) x6 (66)

Round 12 :

(10 sc, inc) x6 (72)

Round 13 :

(11 sc, inc) x6 (78)

Round 14 :

(12 sc, inc) x6 (84)

Round 15 :

(13 sc, inc) x6 (90)

Round 16 :

(14 sc, inc) x6 (96)

Round 17-30 :

sc around (96)

Round 31 :

14 sc, invdec (90)

Round 32-35 :

sc around (90)

Round 36 :

(13 sc, invdec) x6 (84)

Round 37-40 :

sc around (84)

Round 41 :

(12 sc, invdec) x6 (78)

Round 42-43 :

sc around (78)

Round 44 :

(11 sc, invdec) x6 (72)

Round 45-48 :

sc around (72)

Round 49 :

(10 sc, invdec) x6 (66)

Info :

Add safety eyes between round 42 and 43. With 11 stitches in between. Stuff as you go.

Round 50 :

(9 sc, invdec) x6 (60)

Round 51 :

(8 sc, invdec) x6 (54)

Round 52 :

(7 sc, invdec) x6 (48)

Round 53 :

(6 sc, invdec) x6 (42)

Round 54 :

(5 sc, invdec) x6 (36)

Round 55 :

(4 sc, invdec) x6 (30)

Round 56 :

(3 sc, invdec) x6 (24)

Round 57 :

(2 sc, invdec) x6 (18)

Round 58 :

(1 sc, invdec) x6 (12)

Round 59 :

invdec around (6)

Info :

To close the last round, cut yarn, leaving a yarn end. With a yarn-needle go into outer loops from inside out, pull tight to close hole.

โ€” Ears (2x) :

Info :

With light-grey

Round 1 :

6 sc in magic ring (6)

Round 2 :

(1 sc, inc) x3 (9)

Round 3 :

sc around (9)

Round 4 :

(1 sc, inc) x3, 3 sc (12)

Round 5 :

(1 sc, inc) x6 (18)

Round 6 :

sc around (18)

Round 7 :

(1 sc, inc) x6, 6 sc (24)

Round 8 :

sc around (24)

Round 9 :

(2 sc, inc) x6, 6 sc (30)

Info :

Cut yarn. Keep a longer yarn tail for sewing. The side with the increases will later be at the outer edge of the head and the side without will be on the inner side.

โ€” Stripes on the back :

Info :

With dark-grey

Item Name (Smaller stripe) :

R1: ch 26, beginning in second ch from hook 25 sc, ch1, turn

Round 2 :

25 sc, ch 1, turn

Round 3 :

25 sc, (inc) x3, 22 sc, (inc) x3, slst (60)

Item Name (Bigger stripe) :

R1: ch 29, beginning in second ch from hook 28 sc, ch 1, turn

Round 2 :

29 sc, ch 1, turn

Round 3 :

27 sc, (inc) x3, 26 sc, (inc) x3, 1 sc, slst (67)

Info :

Cut yarn. Leave a long piece of yarn to sew the stripes to the back later.

โ€” Tail :

Info :

With dark-grey

Round 1 :

6 sc in magic ring (6)

Round 2 :

2 sc in each stitch around (12)

Round 3-4 :

sc around (12)

Info :

Color change to light-grey

Round 4-7 (4 rounds) :

sc around (12)

Info :

Change to dark-grey

Round 7-10 (4 rounds) :

sc around (12)

Info :

Change to light-grey

Round 11-14 (4 rounds) :

sc around (12)

Info :

Change to dark-grey

Round 15-18 (4 rounds) :

sc around (12)

Info :

Stuff tail. Hold both sides of the last round together. Slst across to close the tail. Cut yarn, leaving a yarn end for sewing on the body later.

โ€” Hands/Feet (x4) :

Round 1 :

6 sc in magic ring (6)

Round 2 :

2 sc in each stitch around (12)

Round 3-4 :

sc around (12)

Round 5 :

(1 sc, invdec) x3, 3 sc (9) Stuff.

โ€” Ice Cream :

Info :

With rosรฉ yarn

Round 1 :

6 sc in magic ring (6)

Round 2 :

2 sc in each stitch around (12)

Round 3 :

(1 sc, inc) x6 (18)

Round 4 :

(2 sc, inc) x6 (24)

Round 5 :

(3 sc, inc) x6 (30)

Round 6-10 (5 rounds) :

sc around (30)

Round 11 :

(3 sc, invdec) x6 (24)

Round 12 :

in FLO: [(hdc + sc)* x3, slst in next stitch, skip one stitch] repeat around *in same stitch

Round 13 :

in BLO sc around (24)

Info :

Color change to brown:

Round 14-15 :

Sc around (24)

Round 16 :

(3 sc, invdec) x5 (20)

Round 17 :

sc around (20)

Round 18 :

(2 sc, invdec) x5 (16)

Round 19 :

sc around (16)

Info :

Stuff icecream.

Round 20 :

(1 sc, invdec) x5 (10)

Round 21 :

sc around (10)

Round 22 :

Invdec around (5)

Info :

Cut yarn, hide yarn end. Embroider sprinkles.

โ€” Cherry :

Info :

With red yarn

Round 1 :

6 sc in magic ring (6)

Round 2 :

2 sc in each stitch around (12)

Round 3-4 :

sc around (12)

Info :

Stuff.

Round 4 :

invdec around (6)

Info :

Close last round

Info :

With green yarn. Ch 11, beginning in second ch from hook slst 10. Fasten off. Sew stalk to cherry. Sew cherry on ice cream.

โ€” Assembly :

Info :

Sew on ears, tail and feet. Position the tail and feet so that the cat can stand.

Info :

Sew on stripes, the smaller stripe on top. Embroider on hair, by taking the yarn double and going over each stripe twice.

Info :

Embroider on nose/mouth with dark grey/black yarn between the eyes. Embroider on whiskers.

Info :

Then position the ice cream and sew on the hands to the body. Sew ice cream to the hands.

Assembly Instructions

  • Sew on ears, tail and feet. Position the tail and feet so that the cat can stand.
  • Sew on stripes with the smaller stripe on top, and leave long yarn tails to sew stripes securely to the back.
  • Embroider hair by doubling the yarn and stitching over each stripe twice for a neat textured look.
  • Embroider nose and mouth between the eyes using dark grey or black embroidery thread, then embroider whiskers.
  • Position the ice cream and sew the hands to the body, then sew the ice cream scoop to the hands securely.

Important Notes

  • ๐Ÿ’กThe pattern is worked in continuous spiral rounds, without closing off the round with a slst; use a stitch marker to track your rounds.
  • ๐Ÿ’กSize of finished cat is approx. 17 cm using the recommended yarn and hook; changing yarn weight or hook will alter final size.
  • ๐Ÿ’กPlace safety eyes between rounds 42 and 43 with 11 stitches in between for correct facial proportions.
  • ๐Ÿ’กStuff pieces as you go to keep even shaping and avoid lumps when closing rounds.

This adorable Pusheen with Ice Cream pattern brings a tiny scoop of joy to your crochet basket. Whether you make it as a gift or keep it for yourself, each stitch adds charm and personality. Have fun stitching the stripes, sprinkles and cherry details โ€” they make this little cat truly special. ๐Ÿงถ๐Ÿงต๐Ÿ˜Š

You ask,

we answer.

FAQs

What size will the finished piece be?

The finished amigurumi measures approximately 17 cm tall when using the recommended DK and sport weight yarns and the 2.5 mm hook.

Can I use different yarn weights for this pattern?

Yes, but different yarn weights and hook sizes will change the final size and proportions; use a similar combination of DK for the body and sport for the ice cream for best results.

Do I need prior crochet experience for this pattern?

This pattern is rated intermediate and assumes you know basic amigurumi techniques such as magic ring, invisible decrease, front/back loop work, and continuous rounds.

How long does this project typically take to complete?

Most crocheters complete this project in 5-7 hours, though time may vary based on experience level, customization, and assembly complexity.

When should I add safety eyes?

Add safety eyes between rounds 42 and 43 of the head/body, with 11 stitches between the eyes, before stuffing the head fully.