🧶 Beautiful ✨ Detailed 💝 Adorable

Sharkito the Polite Shark Amigurumi Pattern

Sharkito the Polite Shark Amigurumi Pattern
4.8★ Rating
2-3 Hours Time Needed
2.1K Made This
✂️

Beginner Friendly Level

Perfect for those just starting their crochet journey, with clear instructions and simple techniques

⏱️

Bite-Sized Project

Finishes in 2-4 hours—perfect for an afternoon of creative relaxation.

🧸

Cute Companion

An adorable friend to cherish, handcrafted with love to bring comfort and joy for years to come.

About This Sharkito the Polite Shark Amigurumi Pattern

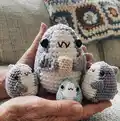
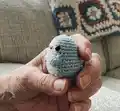
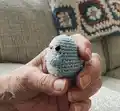
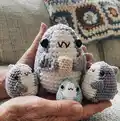
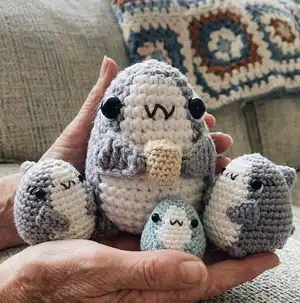
This pattern creates Sharkito, a sweet, rounded little shark with a white belly, tiny fins and a tiny cup accessory. Color-coded rounds make following the belly and body color transitions easy, and the pattern includes separate pieces for fins, tail and feet. You will assemble and embroider simple facial details to give Sharkito personality.

Sharkito the Polite Shark Amigurumi Pattern crochet pattern - detailed view of completed project

The pattern includes instructions for both a mini Sharkito (cotton thread) and a larger Sharkito Mama (worsted acrylic). It uses US terminology and is worked in continuous rounds for smooth shaping.

Why You'll Love This Sharkito the Polite Shark Amigurumi Pattern

I absolutely love this pattern because Sharkito is irresistibly charming and quick to make, giving you a satisfying finished toy in just a short session. I enjoy the simple shaping that still creates a characterful silhouette, and the color-coded notes make color changes easy to follow. The small size and optional cup accessory let you personalize your Sharkito while practicing basic amigurumi skills. I also love that this pattern works well with scrap yarns and is great for gift-making or desk decor.

Sharkito the Polite Shark Amigurumi Pattern step 1 - construction progress Sharkito the Polite Shark Amigurumi Pattern step 2 - assembly progress Sharkito the Polite Shark Amigurumi Pattern step 3 - details and accessories Sharkito the Polite Shark Amigurumi Pattern step 4 - final assembly and finishing

Switch Things Up

I love how easy it is to personalize Sharkito by changing yarn colors; try pastel shades for a soft look or bright colors for something playful.

You can make a keychain version by using finer thread and a 1.1mm hook, then attach a jump ring to the top.

Want a chunkier, cuddlier shark? Use worsted weight yarn with a 3.5mm hook to scale up the pattern.

I often add felt highlights to the eyes instead of embroidered white stitches for a cleaner glossy look.

Try embroidering different mouth expressions to change Sharkito's personality - a small smile or a surprised "w" will instantly alter the character.

Make a family set by crocheting several sizes: mini, medium and mama, and display them together for a charming collection.

Add tiny accessories like a crocheted scarf or a mini hat to match seasons and holidays for extra gift appeal.

Experiment with safety eye sizes to change the look; larger eyes give a cuter, more cartoonish appearance.

I sometimes stuff the cup with a little felt or fabric scrap before sewing to create a more realistic tea look.

When sewing parts, pin and photograph placement before stitching so you can compare and adjust before final attachment.

Common Mistakes & How to Fix Them

✗ Not using a slightly smaller hook can cause holes at the color switches; use a smaller hook than the yarn recommendation to keep stitches tight and seamless. ✗ Forgetting to place safety eyes before stuffing can be tricky to fix later; insert and secure the eyes between the specified rounds before stuffing the head firmly. ✗ Skipping stitch markers leads to losing track of round starts and increases; use a stitch marker at the start of each round to keep counts accurate. ✗ Overstuffing the amigurumi will distort the shape and make sewing parts difficult; stuff gradually and evenly to achieve a smooth shape before closing. ✗ Cutting tails too short when finishing pieces makes sewing parts on harder; leave long yarn tails after fastening off to make assembly easier.

Sharkito the Polite Shark Amigurumi Pattern

Make your own adorable Sharkito the Polite Shark with this color-coded crochet pattern. You'll find clear, friendly instructions to guide you through each part — head, fins, tail and cute accessories. Perfect for gifting or expanding your amigurumi collection, this pattern makes charming mini and mama sizes.

Beginner Friendly 2-3 Hours

Materials Needed for Sharkito the Polite Shark Amigurumi Pattern

— Main Fabric

  • 01
    Monaco Mercerized Cotton Thread (for Mini Sharkito) - recommended size used in samples
  • 02
    4-ply Medium Worsted Weight Acrylic Yarn (for Sharkito Mama) - main color approx 25-50g
  • 03
    White felt - small piece for eye highlights
  • 04
    Small amounts of ecru or tan yarn for cup accessory
  • 05
    Small amounts of green yarn for tea filling (for cup accessory)

— Tools Required

  • 01
    Crochet hook size 1.10mm (for mini Sharkito)
  • 02
    Crochet hook size 2.25mm (for Sharkito Mama)
  • 03
    Safety eyes 3mm (2 pieces) for Mini Sharkito
  • 04
    Safety eyes 8mm (2 pieces) for Sharkito Mama
  • 05
    Scissors
  • 06
    Tapestry/sewing needle
  • 07
    Stitch marker
  • 08
    Embroidery/sewing threads in black
  • 09
    Toy stuffing (polyfill)
  • 10
    Glue (for optional felt pieces)

Progress Tracker

0% Complete

— Head/Body :

Info :

Note: (the highlighted parts represent where you switch to white)

Round 1 :

6sc in MR (6)

Round 2 :

inc x6 (12)

Round 3 :

(inc, 2sc) x2, inc, 2sc, inc, 2sc (16)

Round 4 :

(inc, 3sc) x2, sc, sc in same st, 4sc, sc in same st, 3sc (20)

Round 5 :

3sc, inc, 4sc, inc, 2sc, 2sc, inc, 2sc, 2sc, inc, sc (24)

Round 6 :

sc, (inc, 5sc) x2, sc, sc in same st, 6sc, sc in same st, 4sc (28)

Round 7 :

16sc, 7sc, 5sc (28)

Round 8 :

2sc, (inc, 6sc) x2, inc, 6sc, inc, 4sc (32)

Round 9 :

2sc, (inc, 7sc) x2, sc, sc in same st, 8sc, sc in same st, 5sc (36)

Round 10 :

21sc, 9sc 6sc (36)

Round 11 :

inc, 12sc, inc, 7sc, 9sc, 6sc (38)

Round 12 :

8sc, inc, 9sc, inc, 4sc, 4sc, inc, 4sc, 5sc, inc (42)

Round 13 :

25sc, 10sc, 7sc (42)

Round 14 :

inc, 19sc, inc, 4sc, 10sc, 7sc (44)

Info :

Insert the eyes between rounds 6 & 7 around 2 stitches from the white belly.

Round 15 :

27sc, 10sc 7sc (44)

Round 16 :

dec, 19sc, dec, 4sc, 10sc, 7sc (42)

Round 17 :

(dec, 5sc) x3, dec, 2sc, 3sc, dec, 5sc, dec, 5sc (36) cut off white yarn.

Round 18 :

(dec, 4sc) x6 (30)

Round 19 :

(dec, 3sc) x6 (24)

Round 20 :

(dec, 2sc) x6 (18) Stuff amigurumi well.

Round 21 :

(dec, sc) x6 (12)

Round 22 :

(dec) x6 (6) Finish off and sew close.

— Dorsal fin - Make in grey :

Round 1 :

4sc in MR (4)

Round 2 :

(inc, sc) x2 (6)

Round 3 :

(inc, 2sc) x2 (8)

Round 4 :

(inc, 3sc) x2 (10)

Round 5 :

(inc, 4sc) x2 (12)

Info :

Cut thread leave long tail for sewing.

— Fins - Make 2 in grey :

Info :

Leave long tail before you start your chain

Item Name (P1) :

Ch 7, sk 2nd ch from hook, hdc, dc, dc, tc, tc

Info :

Cut thread leave long tail for sewing.

— Feet - Make 2 in grey :

Round 1 :

8sc in MR (8)

Info :

Cut thread leave long tail for sewing.

— Tail - Make in grey :

1st piece :

R1 – ch2, 4sc in 2nd ch from hook (4)

Round 2 :

R2 – (inc, sc) x2 (6)

Info :

Cut thread and fasten off, then start on the 2nd piece.

2nd piece :

R1 – ch2, 4sc in 2nd ch from hook (4)

Info :

You will now have 2 pieces of the tail. Join the 2nd piece that's on the hook to the 1st piece we made by crocheting the next round with the combined pieces [Watch video demo: Joining the tail]

Joined round :

(inc, 2sc) x2, to the 1st piece, (inc, sc) x2, to the 2nd piece (14) [img B]

Info :

Cut thread and leave long tail for sewing. Do not stuff tail.

— Bonus: Cup of green tea :

Start in ecru or tan yarn :

R1 – 6sc in MR (6)

Round 2 :

R2 – inc x6 (12)

Round 3 :

R3 – BLO sc around (12)

Round 4-6 :

R4-6 – sc around [3 rounds] (12)

Info :

Stuff cup with polyfill

Round 5 :

R5 – s2green BLO sc around (12)

Round 6 :

R6 – dec x6 (6)

Info :

Cut green yarn and sew hole shut, insert needle through the center of the tea and exit through the center MR on the other side. Pull down yarn tail hard. With the yarn used for the cup, cut long tail to sew on to the belly later.

— Assembly :

Info :

Note: Pin the parts before sewing to see if you're happy with the placement.

Step 1 :

Sew the fins slightly slanted facing the belly laying flat on Rounds 9-11. If you will be letting them hold the cup of tea. Sew on the cup to the belly first and then attach the fins to the cup to let him hold it.

Step 2 :

Pin the dorsal fin at the back of the shark's body (between rounds 5 & 9) then sew it in place straight. Attach the tail at the back of the base of the body where it starts to curve. The larger tail fin is above the lower tail fin. [Watch video demo: Sewing dorsal fin]

Step 3 :

Sew the feet on the junction of the shark's belly where the grey and white yarns switches on Round 17. [Watch video demo: Sewing feet]

Info :

Face details: Embroider a "w" mouth on the belly part on Round 6. It should be in line with the eyes and have 2 white stitches on either side. With black yarn, embroider the gills beside the eyes on round 7 by making 2 slanting lines. (Optional) Embroider the eye details with white yarn/felt. [Watch video demo: Face details]

Assembly Instructions

  • Sew the fins slightly slanted facing the belly laying flat on Rounds 9-11; sew the cup to the belly first and then attach the fins to the cup if you want Sharkito to hold it.
  • Pin the dorsal fin at the back of the shark's body between rounds 5 & 9 and sew it in place straight; attach the tail at the back base of the body where it begins to curve with the larger tail fin above the lower tail fin.
  • Sew the feet on the junction of the shark's belly where the grey and white yarns switch on Round 17, spacing them symmetrically for balance.
  • Embroider facial details after parts are sewn: stitch the mouth on Round 6 and the gills beside the eyes on Round 7, then add white yarn or felt highlights to the eyes as desired.
  • Pin all parts before sewing to double-check placement and adjust angles (fins slightly slanted, feet centered) for the most natural pose.

Important Notes

  • 💡Use a slightly smaller crochet hook than suggested for your yarn to achieve tighter stitches and neater color switches.
  • 💡This pattern uses US terminology and is worked in a continuous round, so do not join rounds unless instructed.
  • 💡Place safety eyes between rounds 6 and 7 before stuffing to ensure secure and correct placement.
  • 💡Stuff the amigurumi well but not excessively to maintain shape and make sewing edges align neatly.

This cute Sharkito pattern is perfect for quick makes and thoughtful handmade gifts. 🦈 Whether you make a tiny mini or a mama-sized version, each little shark is full of charm and personality. 🧶 Have fun stitching, personalizing and sharing your Sharkito with loved ones! 🧵
You ask,

we answer.

FAQs

What size will the finished piece be?

Using a 1.10mm hook with Monaco Mercerized Cotton 8, the mini Sharkito measures approximately 3.5 cm tall; using a 2.25mm hook and acrylic yarn, Sharkito Mama measures approximately 7 cm tall.

Can I use different yarn weights for this pattern?

Yes, you can use different yarn weights; using a thicker yarn with a larger hook will create a bigger, chunkier shark while thinner thread makes a smaller mini version—adjust eyes and accessories accordingly.

Do I need prior crochet experience for this pattern?

This pattern is labeled beginner friendly and suitable for beginners and advanced crocheters, but it helps to know basic amigurumi techniques such as magic ring, single crochet, increases and decreases.

How long does this project typically take to complete?

Most crafters finish a mini Sharkito in about 2-3 hours; the larger Sharkito Mama will take longer depending on yarn and hook size.