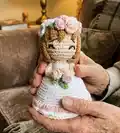
🧢 Beautiful ✨ Detailed πŸ’ Adorable

Reversible Flower Bouquet & Bride Amigurumi Pattern

Reversible Flower Bouquet & Bride Amigurumi Pattern
4.2β˜… Rating
8-10 Hours Time Needed
1.6K Made This
βœ‚οΈ

Intermediate Level

Ideal for those with basic crochet experience, featuring slightly more advanced stitches and techniques to expand your skills.

⏱️

All-Day Adventure

Requires 8-10 hours, ideal for a full day of immersive crocheting.

🧸

Cute Companion

An adorable friend to cherish, handcrafted with love to bring comfort and joy for years to come.

About This Reversible Flower Bouquet & Bride Amigurumi Pattern

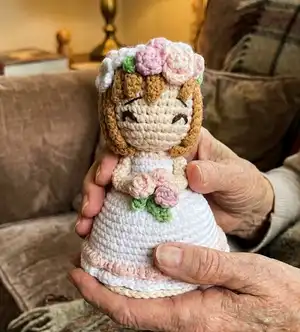
This pattern creates a reversible amigurumi: a floral bouquet that turns inside-out into a tiny bride figure. The design includes separate pieces for head, hair, arms, skirt and many small flowers and leaves. Clear rounds and photo guidance help you place each part and finish with an invisible join.

Reversible Flower Bouquet & Bride Amigurumi Pattern crochet pattern - detailed view of completed project

You will make both the bouquet wrapper and the bride skirt so they join together seamlessly. Flowers, leaves and a ribbon complete the reversible look for a delightful finished toy.

Why You'll Love This Reversible Flower Bouquet & Bride Amigurumi Pattern

I absolutely love this pattern because it combines two cute projects into one clever reversible design that feels like a small miracle when it flips between bouquet and bride. I enjoyed designing the tiny floral details and the way the skirt nests into the wrapper. Sewing the flowers and leaves in place is a relaxing, creative finishing step I always look forward to. The pattern challenges you with assembly and finishing techniques that make the final piece look polished and professional.

Reversible Flower Bouquet & Bride Amigurumi Pattern step 1 - construction progress Reversible Flower Bouquet & Bride Amigurumi Pattern step 2 - assembly progress Reversible Flower Bouquet & Bride Amigurumi Pattern step 3 - details and accessories Reversible Flower Bouquet & Bride Amigurumi Pattern step 4 - final assembly and finishing

Switch Things Up

I love customizing this pattern by changing colors to fit a wedding theme; try ivory and gold for a vintage look or bold jewel tones for a modern twist.

To make a larger version, I switch to a bulkier yarn and a larger hook which gives a chunkier, more cuddly doll.

For a tiny keychain, I use thinner yarn and a smaller hook to scale the pattern down and add a metal keyring.

I often add wire inside the arms for posability so I can pose the bride holding the bouquet at different angles.

You can create seasonal bouquets by swapping flower colorsβ€”pastels for spring or deep reds and oranges for autumn.

Try embroidering different facial expressions to give each bride a unique personalityβ€”smiles, closed eyes, or surprised looks work great.

Mix and match flower types: add tiny leaves or bead centers to some flowers for added texture and shine.

I sometimes add a tiny felt veil or crocheted veil overlay to make a more formal bridal look.

Change the ribbon style and color to make the bouquet dress match the bride's trim or to add a contrasting accent.

Don’t be afraid to rearrange or layer flowers when sewing them onβ€”moving them before fastening helps you find the most balanced and pretty layout.

Common Mistakes & How to Fix Them

βœ— Working with too large a hook will make gaps and loose stuffing show through; use a smaller hook (recommend 2.0 mm or suitable) and maintain tight stitches so the plushie stays neat. βœ— Skipping stitch markers in continuous spiral rounds causes you to lose track of the beginning of rounds; place a marker at the first stitch of each round and move it as you go. βœ— Overstuffing the head or body creates bulges and distorts shaping; stuff gradually and evenly, checking the silhouette often while adding small amounts. βœ— Not securing long tails firmly when joining skirt and wrapper can cause separation; tie a secure knot and sew through the back loops to hide and reinforce the join.

Reversible Flower Bouquet & Bride Amigurumi Pattern

Make a charming reversible flower bouquet that transforms into a tiny bride amigurumi. This pattern gives you both a bouquet and a bride in one toy, perfect for gifts or decoration. Detailed rounds, assembly photos and finishing tips guide you every step of the way. Suitable for crafters who enjoy small, detailed projects.

Intermediate 8-10 Hours

Materials Needed for Reversible Flower Bouquet & Bride Amigurumi Pattern

β€” Main Fabric

  • 01
    4 ply cotton blend yarn (I used 4 ply) in white - yardage as needed for skirt and bouquet
  • 02
    4 ply cotton blend yarn in cream - for bouquet wrapper and accents
  • 03
    4 ply cotton blend yarn in skin color (or use cream as skin color) - for head and arms
  • 04
    4 ply cotton blend yarn in light brown - for hair
  • 05
    4 ply cotton blend yarn in light pink - for flowers and trim
  • 06
    4 ply cotton blend yarn in pink - for flowers
  • 07
    4 ply cotton blend yarn in light peach/peach - for trim and flowers
  • 08
    4 ply cotton blend yarn in green - for leaves and flower stems
  • 09
    Fiberfill for stuffing

β€” Tools Required

  • 01
    Crochet hook size 2.0 mm (or size suitable for yarn used)
  • 02
    Tapestry needle
  • 03
    Embroidery needle
  • 04
    Pin needle
  • 05
    Scissors
  • 06
    Stitch markers
  • 07
    Multipurpose glue (optional)
  • 08
    Polyester stuffing (fiberfill)

Progress Tracker

0% Complete

β€” Bride's Head and Body :

Info :

Start with skin color yarn

R1 :

6sc in MR (6)

R2 :

6inc (12)

R3 :

[sc, inc]x6 (18)

R4 :

[sc, inc, sc]x6 (24)

R5 :

[5sc, inc]x4 (28)

R6-12 :

28sc (28)

R13 :

[5sc, dec]x4 (24)

R14 :

[sc, dec, sc]x6 (18)

Info :

Start stuffing with fiberfill.

R15 :

[sc, dec]x6 (12)

R16 :

FLO [sc, inc]x6 (18)

Info :

Change to white yarn.

R17-18 :

18sc (18)

Info :

Fasten off, leave a long tail for sewing. Do an invisible finish.

Info :

Attach the arm to the body with the wrong/ugly side faces outside, between R16-17.

β€” Bride's Hair :

Info :

Start with light brown yarn

R1 :

8sc in MR (8)

R2 :

8inc (16)

Info :

sl st to the first st of R2. Then continue to make the hair strands.

Strand 1 :

14ch. Start from the second loop from the hook: sl st, 12sc. Sl st to the next st

Strand 2-5 :

8ch. Start from the second loop from the hook: sl st, 6sc. Sl st to the next st

Strand 6 :

do the same as strand 1

Strand 7-16 :

16ch. Start from the second loop from the hook: sl st, sc, 13hdc. Sl st to the next st

Info :

Fasten off, leave a long tail for sewing.

Info :

Use the dark brown yarn to embroider the eyes at R10. With dark brown yarn (use only 1 ply), embroider the eyebrows at R8. Embroider the blush on the cheeks using pink yarn, between R11-12.

β€” Bride's Arms :

Info :

BRIDE'S ARMS (make 2)

Info :

Start with skin color yarn. Make 12ch. Start from the second loop from the hook, make 11sc. Fasten off, leave a long tail for sewing.

β€” Hair Attachment Notes :

Info :

Attach the hair to the head with the wrong side facing outwards.

Infos :

You can sew the hair or use glue. If you use glue, be aware that the area where the glue is applied will become stiffer which can make it difficult to sew the flowers later. If you plan to sew all strands together, don't sew them all the way to the hair tip; sew about 5st above the sl st so the hair can curl and stay closer to the head.

β€” Bride's Skirt :

Info :

Start with white yarn. Leave a long starting yarn tail, approximately 10 cm (4"). This tail will be used to join both bouquet and bride at the end of this pattern.

R1 :

6sc in MR (6)

R2 :

6inc (12)

R3 :

[sc, inc]x6 (18)

R4 :

[sc, inc, sc]x6 (24)

R5 :

[3sc, inc]x6 (30)

R6 :

[2sc, inc, 2sc]x6 (36)

R7 :

[5sc, inc]x6 (42)

R8 :

42sc (42)

R9 :

[3sc, inc, 3sc]x6 (48)

R10-13 :

48sc (48)

R14 :

[7sc, inc]x6 (54)

R15-16 :

54sc (54)

R17 :

BLO 54sc (54)

R18 :

54sc (54)

Info :

Stop for a while but do not cut the yarn*, because it will be used for the step on page 9.

Info :

Hold the skirt with its bottom facing you. Attach the light peach yarn at the FL of R16 (you worked R17 BLO). Work: [sl st, sc, hdc inc, sc]x13, 2sl st. Fasten off, secure and hide the tail.

β€” Bouquet Wrapper :

Info :

Start with cream yarn. Leave a long starting yarn tail, approximately 10 cm (4"). This tail will be used to join both bouquet and bride at the end of this pattern.

R1 :

6sc in MR (6)

R2 :

6inc (12)

R3 :

[sc, inc]x6 (18)

R4 :

BLO [sc, inc, sc]x6 (24)

R5 :

[3sc, inc]x6 (30)

R6 :

[2sc, inc, 2sc]x6 (36)

R7 :

[5sc, inc]x6 (42)

R8 :

42sc (42)

R9 :

[3sc, inc, 3sc]x6 (48)

R10-13 :

48sc (48)

R14 :

[7sc, inc]x6 (54)

R15-18 :

54sc (54)

Info :

Fasten off. Leave a long tail for sewing, about 50 cm long.

Info :

Hold the bouquet with its opening part facing you. Attach the cream yarn at the FL left of R3 (you worked R4 BLO). Make 1ch.

R1 :

[hdc, hdc inc]x9 (27)

R2 :

[2hdc, hdc inc]x9 (36)

R3-4 :

36hdc (36)

Info :

Fasten off. Do an invisible finish and secure and hide the tails.

β€” Ribbon :

Info :

Work in rows. Start with peach yarn. Make 25ch. Then, start from the second loop from the hook:

R1 :

[2sc, 2hdc, 4dc, 2hdc, 2sc]x2 (24), 1ch

R2 :

turn, BLO [2sc, 2hdc, 4dc, 2hdc, 2sc]x2 (24)

Info :

Fasten off, leave a long tail. Fold the bow so that both ends meet in the middle. Make a knot using both yarn tails to fix the position of the folded ribbon.

Info :

Then, make a bow's tail using the same color yarn. Make a MR, Then work: [10ch, start from the third loop from the hook: 5dc, 2hdc, sc. Sl st to the MR]x2. Pull tight the MR and fasten off. Using the yarn tail, attach the bow's tail to the center back of the bow. Let its wrong/ugly side faces outside.

Info :

And then, sew the ribbon to the bouquet, near to its bottom.

β€” Flower 1 (make 6) :

Info :

Make 1 in pink and white. Make 2 in light pink and light peach.

Instructions :

Make 6ch. Start from the second loop from the hook: hdc, hdc inc, hdc, 2ch, hdc inc in the same st, 2ch, hdc inc in the next st, 2ch, hdc in the same st, hdc, 2ch, hdc inc in the same st. Fasten off, leave a long tail for sewing. Roll up the flower and sew it together so that it won't roll open.

β€” Flower 2 (make 10) :

Info :

Make 6 in light peach, 3 in light pink, and 1 in pink.

Instructions :

Make 6ch. Start from the second loop from the hook: sc, inc, 3inc3. Fasten off, leave a long tail for sewing. Roll up the flower and sew it together so that it won't roll open.

β€” Flower 3 (make 3) :

Info :

Use the white yarn.

Instructions :

In a MR, make: [4ch, sl st to the MR]x5. Tighten the MR. Fasten off, leave a long tail for sewing.

β€” Leaves 1 (make 3) :

Info :

Start with green yarn.

Instructions :

Make 5ch, start from the second loop from the hook, make sl st, sc, hdc, sl st. Don't cut the yarn and make again 4ch, start from the second loop from the hook, make sl st, sc, sl st. Fasten off. Leave a long tail for sewing.

β€” Leaves 2 (make 3) :

Info :

Start with green yarn.

Instructions :

Make 4ch, start from the second loop from the hook, make sl st, sc, sl st. Fasten off. Leave a long tail for sewing.

β€” Joining the Bouquet Wrapper & the Bride's Skirt :

Info :

Turn the bouquet wrapper and the bride's skirt inside out with the wrong/ugly sides facing you. Tie a knot with the yarn tails from the magic rings of both bouquet wrapper and the bride's skirt, leaving a space between them.

Info :

After joining the bouquet and the bride's skirt, continue working the bouquet side. Hold the bouquet with its flowers facing you. Attach the cream yarn to the FL of R18. And work: [sl st, sc, hdc inc, sc]x13, 2sl st. Fasten off, secure and hide the tails.

Info :

Attach the bride's body to the skirt between R3-4. No need to stuff the body with fiberfill, or just stuff it slightly. Then attach the ends of the arms, the leaves 1 and 3 pieces of flower 2 (in light pink and light peach) at the skirt.

Info :

Turn the bouquet wrapper back with the right/good side facing you, and leave the skirt intact at the wrong/ugly side. Push the skirt inside the bouquet wrapper.

Info :

Join the last rounds of the bouquet wrapper and the bride. Sew them together with light pink tail through the BL of each piece. To finish, make a knot and hide the tail.

β€” Final Steps :

Info :

Now, turn the bouquet inside out so the bride is facing outside, because now we are going to work the bride's side. Hold the bride with her skirt facing you. With the white yarn tail left from the last round of the bride's skirt (page 4)*, work at the FL R18: ch1, sc at the same st, [sl st, sc, hdc inc, sc]x13, sl st. Fasten off, do an invisible finish, secure and hide the tail.

Info :

Attach the hair, sew on all flowers and leaves on top of the bride's head as shown in the pictures. Sew ribbon to the bouquet near its bottom. Fasten off and hide all tails.

Info :

Congratulation! Your reversible flower bouquet and bride amigurumi is ready.

Assembly Instructions

  • Attach the bride's body to the skirt between R3-4; no need to fully stuff the body, stuff slightly or not at all for best fit.
  • Attach the arms between R16-17 on the body; position with the wrong/ugly side facing outwards while sewing, then turn right side out.
  • Turn the bouquet wrapper and the bride's skirt inside out, tie the starting tails from their magic rings together leaving a gap, push the skirt into the wrapper and then join the outer rounds through the BL with the light pink tail.
  • Sew flowers and leaves onto the bride's head and bouquet: place leaves and three pieces of Flower 2 at the skirt, then arrange and sew the bouquet flowers and leaves into the wrapper opening.
  • Sew the ribbon to the outside of the bouquet near its bottom and attach the bow and bow tails to the center back of the bow before sewing it in place.
  • When joining final rounds, work through the back loops (BL) of each piece for a clean edge; finish with an invisible finish and hide all tails.

Important Notes

  • πŸ’‘Try working tight stitches and use a smaller crochet hook for a neat amigurumi; this helps reduce gaps and makes stuffing less visible.
  • πŸ’‘Count your stitches every round, especially during increases and decreases, to keep shaping even and symmetric throughout the project.
  • πŸ’‘Use stitch markers or a piece of yarn to mark the beginning/end of rounds; the pattern is worked in continuous spiral unless stated otherwise.
  • πŸ’‘Crochet through both loops unless the pattern specifies BLO or FLO; pay attention to FL/BLO instructions for decorative edges.
  • πŸ’‘When using glue to attach hair, be cautious: glued areas become stiffer and may make later sewing of flowers more difficult.

This reversible bouquet and bride amigurumi is a tiny keepsake that flips between two charming looks and is perfect for gifts or display. Create the bouquet side for a pretty floral gift, or flip it to reveal a sweet little bride for weddings and celebrations. Add your colors and personal touches to make each piece uniquely yours. πŸ§ΆπŸ’

You ask,

we answer.

FAQs

What size will the finished piece be?

The finished amigurumi measures approximately 10.5 cm (4.1") tall for the bride side and about 7 cm (2.76") tall for the bouquet side when using the recommended 4 ply cotton blend and a 2.0 mm hook.

Can I use different yarn weights for this pattern?

Yes, you can change yarn weight, but final size will vary. Use an appropriate hook for the yarn and be mindful of stuffing and proportion adjustments when changing yarn thickness.

Do I need prior crochet experience for this pattern?

This pattern is rated intermediate because it uses continuous spiral rounds, BLO/FLO placement, small detailed flowers, and assembly techniques; basic crochet skills and experience with amigurumi are recommended.

How long does this project typically take to complete?

Most crocheters finish this project in 8-10 hours depending on experience level and the speed at which you make small flowers and sew the pieces together.

How should I attach the hair and flowers for the best look?

Attach hair with the wrong/ugly side facing outwards when sewing on; sew flowers and leaves into place with long tails and use pictures as a guide to cluster them for a natural-looking arrangement.