🧢 Beautiful ✨ Detailed πŸ’ Adorable

Sea Urchin Shells Pattern

Sea Urchin Shells Pattern
4.3β˜… Rating
2-3 Hours Time Needed
1.1K Made This
βœ‚οΈ

Intermediate Level

Ideal for those with basic crochet experience, featuring slightly more advanced stitches and techniques to expand your skills.

⏱️

Bite-Sized Project

Finishes in 2-4 hoursβ€”perfect for an afternoon of creative relaxation.

🏑

Cozy Accent

A warm touch for your space that transforms ordinary corners into inviting nooks filled with handmade charm.

About This Sea Urchin Shells Pattern

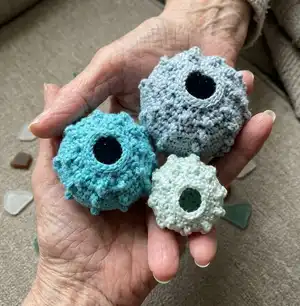
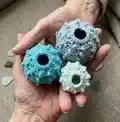
This pattern creates three sizes of textured crochet sea urchin shells with a pretty tubercled surface and a rounded shape. You will work circular rounds, use treble crochet to form bumps, and finish the shells by stiffening and shaping with a glue-and-water mix. The shells are made with 100% cotton yarn and small hooks for tight, neat stitches. Perfect for coastal decor, gifts, or tiny handmade collections.

Sea Urchin Shells Pattern crochet pattern - detailed view of completed project

Includes complete round-by-round instructions for small, medium and large shells and detailed shaping instructions. Photos and tips guide you through stitch placement, tightening after trebles, and drying for a firm, durable result.

Why You'll Love This Sea Urchin Shells Pattern

I absolutely love this pattern because it transforms simple stitches into delicate, tactile shells that feel almost sculptural. I enjoy the rhythmic rounds and the way a few trebles create the distinctive bumps that make the design pop. Shaping the shells with a glue-and-water mix is a satisfying hands-on finishing step that elevates the piece. I love gifting these as little beachy treasures β€” they are quick to make yet look very special.

Sea Urchin Shells Pattern step 1 - construction progress Sea Urchin Shells Pattern step 2 - assembly progress Sea Urchin Shells Pattern step 3 - details and accessories Sea Urchin Shells Pattern step 4 - final assembly and finishing

Switch Things Up

I love how easy it is to customize these shells by changing yarn and hook size; experiment with thicker yarn for chunky shells or finer thread for delicate miniatures.

I often try pastel shades for a soft coastal look or bold jewel tones for striking decorative accents.

I recommend switching to metallic or mercerized cotton for a slight sheen β€” it gives the tubercles a subtle sparkle under light.

For a rustic display try natural undyed cotton and a looser shaping method using only water to keep a soft feel.

I sometimes stitch seed beads into the bumps before shaping to add texture and sparkle β€” do this before the glue stage so beads are secured.

If you want a very stiff shell use a 1:1 glue-to-water mix, or reduce glue for a more flexible result; always try on a scrap first.

You can make a garland by stringing several shells together or glue a few onto driftwood for a larger centerpiece.

I also like painting the dried shells with diluted acrylics or watercolors to add gentle hues and then sealing with varnish for durability.

To make keychains, attach a small ring before shaping or sew on a loop after drying; use very tight stitches for durability.

I sometimes use wire inside larger shells for a posable decorative element or to mount on stands for shelf displays β€” be creative and test techniques on practice pieces first.

Common Mistakes & How to Fix Them

βœ— Using a hook that is too large will make loose stitches and flatten the shell; use a smaller hook than the yarn label recommends for tighter stitches and better texture. βœ— Not pushing the treble stitch to the front will make tubercles less pronounced; gently push each treble forward and make the following single crochet tight to form a neat bump. βœ— Forgetting stitch markers when working continuous rounds can cause miscounted repeats; place a marker in the first stitch of each round to track the beginning accurately. βœ— Using too strong a glue mix for thin yarn will over-stiffen the shell and lose softness; start with 2 parts water to 1 part glue or even 1:1 if you want a stiffer result and experiment on a scrap first. βœ— Skipping the back-loop rounds cleaning up stage will create inconsistent edging; work the back loops only rounds exactly as written to produce the neat rim before shaping.

Sea Urchin Shells Pattern

Make delicate crochet sea urchin shells in three different sizes using cotton yarn and simple stitches. This pattern walks you through every round, shaping tips with glue and water, and finishing advice so you can create pretty decorative shells for gifts or beachy decor. Follow clear instructions and photos to get that textured, tubercled look and a lovely rounded shape.

Intermediate 2-3 Hours

Materials Needed for Sea Urchin Shells Pattern

β€” Main Fabric

  • 01
    100% cotton yarn for crocheting (main material)
  • 02
    Madame Tricote "Camilla" 100% cotton, 50 g = 125 m β€” used for smaller set (finished shells approx. 4 cm, 5 cm and 6 cm in diameter)
  • 03
    Drops "Muskat" 100% cotton, 50 g = 100 m β€” used for larger set (finished shells approx. 5 cm, 6.5 cm and 8 cm in diameter)
  • 04
    Small amounts of cotton yarn for test swatches and experiments with color/paint

β€” Tools Required

  • 01
    Crochet hook size 1.5 mm (recommended for small set)
  • 02
    Crochet hook size 1.75 mm or 2.0 mm (optional alternative for comfort)
  • 03
    Crochet hook size 2.5 mm (used successfully with thicker yarn like Drops Muskat)
  • 04
    Crochet hook size 3.0 mm (yarn label suggestion for some cottons)
  • 05
    Scissors
  • 06
    Needle to weave in ends (yarn needle)
  • 07
    Stitch markers
  • 08
    White glue for shaping
  • 09
    Water for glue mix
  • 10
    Cup and something to stir (for glue mix)
  • 11
    Rubber gloves (optional, for sensitive skin)
  • 12
    Chopstick or large-size crochet hook (to insert while shaping)

Progress Tracker

0% Complete

β€” Abbreviations :

Infos :

CH - CHAIN. SL ST - SLIP STITCH. SC - SINGLE CROCHET. DC - DOUBLE CROCHET. TR - TREBLE CROCHET. SC2TOG - DECREASE BY CROCHETING 2 SINGLE CROCHET STITCHES TOGETHER. ST(S) - STITCH(ES). BLO - BACK LOOPS ONLY. (6) - NUMBER OF STITCHES YOU SHOULD HAVE AT THE END OF THE ROUND.

β€” Materials :

Infos :

For crocheting: 100% cotton yarn, Crochet hook, Scissors, (Needle to weave in ends).

Infos :

I used for smaller set: Madame Tricote "Camilla", 100% cotton, 50 g = 125 m. 1.5 mm hook. Finished shells measured approx. 4 cm, 5 cm and 6 cm in diameter.

Infos :

I used for larger set: Drops "Muskat", 100% cotton, 50 g = 100 m. 2,5 mm hook. Finished shells measured 5 cm, 6,5 cm and 8 cm in diameter.

Infos :

For shaping: White glue, water, Cup, something to stir, Rubber gloves (optional).

β€” Small sea urchin shell :

Round 1 :

ch 3 (= 1 dc) and 14 dc in magic ring; join with sl st into top of ch 3 (15)

Round 2 :

ch 1 (=1 sc), sc in same st, 2 sc in each st all around; join with sl st to ch 1 (30)

Round 3 :

ch 1 (=1 sc), sc in next st, tr in next; * sc in next 2 sts, tr in next; rep from * 8 more times; join with sl st to ch 1 (30)

Info :

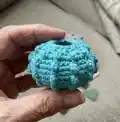
Make sure you push treble crochet stitch forward to front of your work so it forms a little bump (look at the photos), it helps if you make a single crochet stitch which comes after treble as tight as possible!

Round 4 :

ch 1 (=1 sc), sc in each st; join with sl st to ch 1 (30)

Round 5, 7, 9 :

ch 1 (=1 sc), sc in next st, tr in next; * sc in next 2 sts, tr in next; rep from * 8 more times; join with sl st to ch 1 (30)

Round 6, 8, 10 :

ch 1 (=1 sc), sc in each st; join with sl st to ch 1 (30)

Round 11 :

ch 1 (=1 sc), sc in next, tr in next; * sc2tog, tr in next; rep from * 8 more times; skip ch1 and join with sl st to next sc (20)

Round 12 :

ch 1 (=1 sc), sc in each st (20)

Round 13 :

working in back loops only sl st in each st all around (20)

Info :

Fasten off and weave in all ends.

β€” Medium sea urchin shell :

Round 1 :

ch 3 (=1 dc) and 14 dc in magic ring; join with sl st into top of ch 3 (15)

Round 2 :

ch 1 (=1 sc), sc in same st, 2 sc in each st all around; join with sl st to ch 1 (30)

Round 3 :

ch 1 (=1 sc), sc in next st, tr in next; * sc in next 2 sts, tr in next; rep from * 8 more times; join with sl st to ch 1 (30)

Round 4 :

ch 1 (=1 sc), sc in each st; join with sl st to ch 1 (30)

Round 5 :

ch 1 (=1 sc), sc in next, sc and tr in next; * sc in next 2 sts, sc and tr in next; rep from * 8 more times; join with sl st to ch 1 (40)

Round 6, 8, 10 :

ch 1 (=1 sc), sc in each st; join with sl st to ch 1 (40)

Round 7, 9, 11 :

ch 1 (=1 sc), sc in next 2 sts, tr in next; * sc in next 3 sts, tr in next; rep from * 8 more times; join with sl st to ch 1 (40)

Round 12 :

ch 1 (=1 sc), sc2tog; * sc in next 2 sts, sc2tog; rep from 8 more times; sc in last st and join with sl st to ch 1 (30)

Round 13 :

ch 1 (=1 sc), sc in next st, tr in next; * sc in next 2 sts, tr in next; rep from * 8 more times; join with sl st to ch 1 (30)

Round 14 :

ch 1 (=1 sc), sc in next 2 sts; * sc2tog, sc in next; rep from * 8 more times; skip ch 1 in beg of rnd and join with sl st to next sc (20)

Round 15 :

ch 1 (=1 sc), sc in each st; join with sl st to ch 1 (20)

Round 16 :

working in back loops only sl st in each st all around (20)

Info :

Fasten off and weave in all ends.

β€” Large sea urchin shell :

Round 1 :

ch 3 (=1 dc) and 14 dc in magic ring; join with sl st into top of ch 3 (15)

Round 2 :

ch 1 (=1 sc), sc in same st, 2 sc in each st all around; join with sl st to ch 1 (30)

Round 3 :

ch 1 (=1 sc), sc in next st, tr in next; * sc in next 2 sts, tr in next; rep from * 8 more times; join with sl st to ch 1 (30)

Round 4 :

ch 1 (=1 sc), sc in each st; join with sl st to ch 1 (30)

Round 5 :

ch 1 (=1 sc), sc in next, sc and tr in next; * sc in next 2 sts, sc and tr in next; rep from * 8 more times; join with sl st to ch 1 (40)

Round 6 :

ch 1 (=1 sc), sc in each st; join with sl st to ch 1 (40)

Round 7 :

ch 1 (=1 sc), sc in next 2 sts, sc and tr in next; * sc in next 3 sts, sc and tr in next; rep from * 8 more times; join with sl st to ch 1 (50)

Round 8 :

ch 1 (=1 sc), sc in each st; join with sl st to ch 1 (50)

Round 9 :

ch 1 (=1 sc), sc in next 3 sts, tr in next; * sc in next 4 sts, tr in next; rep from * 8 more times; join with sl st to ch 1 (50)

Round 10, 12, 14 :

ch 1 (=1 sc), sc in each st; join with sl st to ch 1 (50)

Round 11, 13, 15 :

ch 1 (=1 sc), sc in next 3 sts, tr in next; * sc in next 4 sts, tr in next; rep from * 8 more times; join with sl st to ch 1 (50)

Round 16 :

ch 1 (=1 sc), sc in next, sc2tog, * sc in next 3 sts, sc2tog; rep from 8 more times; sc in last; join with sl st to ch 1 (40)

Round 17 :

ch 1 (=1 sc), sc in next 2 sts, tr in next; * sc in next 3 sts, tr in next; rep from * 8 more times; join with sl st to ch 1 (40)

Round 18 :

ch 1 (=1 sc), sc2tog, * sc in next 2 sts, sc2tog; rep from 8 more times; sc in last st; join with sl st to ch 1 (40)

Round 19 :

ch 1 (=1 sc), sc in next st, tr in next; * sc in next 2 sts, tr in next; rep from * 8 more times; join with sl st to ch 1 (30)

Round 20 :

ch 1 (=1 sc), sc in next 2 sts; * sc2tog, sc in next; rep from * 8 more times; skip the ch 1 in beg of rnd and join with sl st to next sc (20)

Round 21 :

ch 1 (=1 sc), sc in each st; join with sl st to ch 1 (20)

Round 22 :

working in back loops only sl st in each st all around (20)

Info :

Fasten off and weave in all ends.

β€” Shaping the shell :

Info :

In a cup mix 2 parts of water with 1 part of glue.

Info :

Immerse crocheted shell into the glue and water mixture (wear rubber gloves if necessary) until it’s fully wet.

Info :

Carefully squeeze out excess glue-water mix.

Info :

Start shaping the shell by gently pulling at the crochet fabric and giving it a desired shape. Use something (chopstick, large size crochet hook) to insert into the shell and push the sides of shell slightly outside to give it a nice rounded shape.

Info :

Pull at tubercles to shape them nicely.

Info :

Continue until you are satisfied with it.

Info :

Leave it to dry on a towel.

Assembly Instructions

  • Fasten off and weave in all ends after completing the final round of each shell to create a neat finish.
  • Immerse the finished shell in the glue-and-water mix, squeeze out excess, then insert a chopstick or large hook into the opening to push the sides outward and create the rounded shell shape.
  • While the shell is wet with glue mix, gently pull and shape the tubercles (the bumps made by trebles) to be neat and even, adjusting each as needed for symmetry.
  • Leave the shaped shell on a towel to dry completely before handling; drying time will vary depending on glue mix and humidity.
  • If you want to add paint, beads, or glitter, do paint or stitch beads before the glue shaping step when instructed, or paint after drying and seal if desired.

Important Notes

  • πŸ’‘Use stitch markers to keep track of the beginning of each round, especially when working repeated motifs and trebles.
  • πŸ’‘Work with a smaller-than-label hook to achieve tight stitches for better texture and shaping results.
  • πŸ’‘Wear rubber gloves if you have sensitive skin when handling glue-water mixes for shaping.
  • πŸ’‘Always test your glue-to-water ratio on a scrap shell before committing to the final piece to avoid over-stiffening.

Create coastal charm with these tiny sea urchin shells β€” a lovely handmade accent for shelves, gifts, or beachy displays. Try varying colors and sizes to build a sweet collection that catches the eye. Happy crocheting and shaping β€” may your hooks be nimble and your shells perfectly tubercled! 🧢🌊

You ask,

we answer.

FAQs

What size will the finished piece be?

Finished shells measure approximately 4 cm, 5 cm and 6 cm (small set with Camilla yarn) or 5 cm, 6.5 cm and 8 cm (larger set with Drops Muskat) depending on yarn and hook used.

Can I use different yarn weights for this pattern?

Yes, you can use different yarn weights; thicker yarns will produce larger shells and may not need glue for shaping. Use a smaller hook for any yarn to keep stitches tight and the texture defined.

Do I need prior crochet experience for this pattern?

This pattern is rated intermediate, so basic knowledge of single crochet, double crochet, treble crochet, decreases and working in rounds is recommended for best results.

How should I shape and stiffen the shells?

Mix white glue with water (commonly 2 parts water to 1 part glue or 1:1 for stiffer result), immerse the shell until fully wet, squeeze excess, then shape with a chopstick or large hook and leave to dry on a towel.