๐Ÿงถ Beautiful โœจ Detailed ๐Ÿ’ Adorable

Cow Phone Pouch Pattern

Cow Phone Pouch Pattern
4.5โ˜… Rating
5-7 Hours Time Needed
2.3K Made This
โœ‚๏ธ

Intermediate Level

Ideal for those with basic crochet experience, featuring slightly more advanced stitches and techniques to expand your skills.

โฑ๏ธ

Weekend Treat

Takes 5-7 hours, making it an enjoyable project to finish over a couple of days.

โœจ

Stylish Touch

An elegant detail to elevate any look, combining traditional techniques with contemporary design sensibilities.

About This Cow Phone Pouch Pattern

This pattern makes a cozy phone pouch with a sweet cow amigurumi attached to the front. You will crochet the bag, lid and shoulder strap, then make the cow (head, ears, horns, arms, legs) and a tiny milk bottle. The pattern includes step-by-step rounds, photos, and assembly instructions to guide you from start to finish.

Cow Phone Pouch Pattern crochet pattern - detailed view of completed project

Designed for intermediate crocheters comfortable with amigurumi shaping and small pieces. The result is a sturdy, cute pouch about 17 x 10 cm when using the recommended yarn and hook.

Why You'll Love This Cow Phone Pouch Pattern

I absolutely love this pattern because the little cow adds so much personality to a practical phone pouch. I enjoy the mix of bag construction and amigurumi โ€” it keeps the project varied and fun. The pattern allows creative color placement and small custom details, so every piece feels unique. I get excited by how many handmade gifts these make; they are quick to work up and always bring smiles.

Cow Phone Pouch Pattern step 1 - construction progress Cow Phone Pouch Pattern step 2 - assembly progress Cow Phone Pouch Pattern step 3 - details and accessories Cow Phone Pouch Pattern step 4 - final assembly and finishing

Switch Things Up

I love swapping colors to create different personalities for the cow; try pastel shades for a gentler look or bright contrasts for a playful style.

I often change the yarn weight and hook to make a mini keychain version or a larger chunky pouch; adjust the strap length accordingly.

I recommend experimenting with different single crochet styles: if you prefer the v-stitch look, use that instead of x-stitch to create another texture.

I sometimes replace safety eyes with embroidered eyes for a softer, child-friendly option; it changes the expression nicely.

I like adding tiny felt accessories or embroidered patches on the bag to personalize it โ€” initials, a heart, or a mini name tag look great.

For a secure closure, you can use a small magnet instead of the button and strap; just make sure it is sewn or glued in place safely.

I also enjoy making a whole set of coordinated items โ€” a matching key fob, mini bottle pouch or coin purse โ€” using leftover yarn from this project.

I will occasionally add wire inside the arms for posability so the cow can hold the bottle at different angles; wrap the wire before inserting for safety.

To make it gift-ready, try lining the pouch with fabric for a cleaner interior finish; glue or sew the lining in before final assembly.

I recommend trying different stitch counts for the strap to create a braided or wider strap alternative โ€” it changes the look and feel of the finished bag.

I sometimes embroider a small mouth or freckles to change the cow's expression; the placement of facial details really transforms the character.

Common Mistakes & How to Fix Them

โœ— Skipping the stitch marker when working in spirals leads to losing the beginning of rounds; use a marker at the start of every round and move it each round. โœ— Not counting stitches after increases and decreases causes the bag to become uneven; count your stitches after each increase/decrease round to ensure totals match. โœ— Using inconsistent tension with the x-stitch or v-stitch will make the texture and size vary; practice the chosen single crochet style and keep tension steady for even fabric. โœ— Overstuffing the head or legs creates lumps and distorts shaping; stuff gradually with small amounts to achieve a smooth, rounded shape. โœ— Placing safety eyes too low or too close changes the character expression; insert eyes between the recommended rows and leave the suggested stitch spacing to match the sample. โœ— Sewing parts without pinning or temporarily placing them can lead to misaligned features; pin or glue pieces in place first, check positioning, then sew securely.

Cow Phone Pouch Pattern

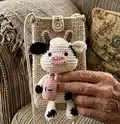
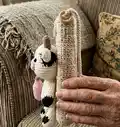
Make a charming cow-themed phone pouch that doubles as a cute accessory and tiny amigurumi scene. This pattern guides you step-by-step through the bag, strap, lid and the adorable cow with full assembly notes. You will learn small-item construction, color changes, and neat finishing tips to make a professional-looking pouch. Perfect for gifting or keeping your phone safe with style.

Intermediate 5-7 Hours

Materials Needed for Cow Phone Pouch Pattern

โ€” Main Fabric

  • 01
    Jeans from YarnArt - beige (05) - small amount for bag
  • 02
    Jeans from YarnArt - white (01) - small amount for cow body and details
  • 03
    Jeans from YarnArt - black (53) - small amount for spots and details
  • 04
    Jeans from YarnArt - pink pastel (74) - small amount for snout and bottle trim
  • 05
    Jeans from YarnArt - brown (71) - small amount for horns
  • 06
    Jeans from YarnArt - cream (03) - small amount for bottle and accents
  • 07
    Jeans from YarnArt - pink (36) - small amount for details

โ€” Tools Required

  • 01
    Crochet hook size 2.3 mm
  • 02
    Two 6 mm safety eyes
  • 03
    Two 15 mm buttons
  • 04
    Polyester fiberfill (stuffing)
  • 05
    Stitch markers
  • 06
    Yarn needle for sewing
  • 07
    Scissors
  • 08
    Fabric glue (for securing head and milk bottle)
  • 09
    Pins for positioning (optional)

Progress Tracker

0% Complete

โ€” BAG :

Info :

There are 2 ways to make a single crochet: v-stitch (yarn over single crochet) and x-stitch (yarn under single crochet). There are a lot of video tutorials on youtube, you can watch on it. I use x-stitch (yarn under single crochet).

Info :

Work in spirals

Round 1 :

Make 24 ch, start in the second ch from hook. 22 sc, 3 sc in the last stitch, continue on the other side of the foundation chain, 21 sc, inc (48)

Round 2 :

inc, 21 sc, 3 inc, 21 sc, 2 inc (54)

Round 3 :

inc, 24 sc, 3 inc, 24 sc, 2 inc (60)

Round 4 :

60 sc (60)

Round 5 :

(1 ch, skip 1 stitch, 1 sc in the next stitch)*30 (60)

Round 6 :

(1 sc in the space of 1 ch, 1 sc in the next stitch)*30 (60)

Info :

From here: the odd rounds (7, 9, 11, 13, 15โ€ฆ) will be made same as round 5, the even rounds (8, 10, 12, 14, 16โ€ฆ) will be made same as round 6. And stop after finish the 48th round.

โ€” Lid of pouch :

Info :

Identify the 14 stitches in the middle of the 46th round

Round 1 :

14 sc, turn

Round 2-13 :

14 sc. Cut and weave the yarn. Sew the button into the lid of pouch.

โ€” Make shoulder-strap :

Info :

Make 3 ch, start in the second ch from hook: 2 sc, turn

Round 2 :

2 sc, turn

Info :

Crochet repeat 2 sc until the shoulder-strap is about 120 cm. Fasten off and weave the yarn. Sew the shoulder - strap and button into the pouch.

โ€” COW :

Info :

Black word: white yarn. Red word: black yarn (B)

โ€” Head :

Round 1 :

6 sc in the magic ring (6)

Round 2 :

6 inc (12)

Round 3 :

(3 inc, 3 sc)*2 (18)

Round 4 :

(4 inc, 5 sc)*2 (26)

Round 5 :

inc, 2 sc, inc, [B 2 sc, inc, 1 sc], 1 sc, inc, 3 sc, (inc, 2 sc)*3, inc, 3 sc (34)

Round 6 :

5 sc, [B inc, 3 sc, inc, 2 sc], 10 sc, inc, 3 sc, inc, 7 sc (38)

Round 7 :

5 sc, [B 9 sc], 9 sc, [B 5 sc], 10 sc (38)

Round 8 :

5 sc, [B 9 sc], 10 sc, [B 5 sc], 9 sc (38)

Round 9 :

5 sc, [B 8 sc], 12 sc, [B 5 sc], 8 sc (38)

Round 10 :

6 sc, [B 6 sc], 13 sc, [B 5 sc], 8 sc (38)

Round 11 :

9 sc, 6 inc, 8 sc, 2 inc, [B 4 inc, 1 sc], 8 sc (50)

Round 12 :

34 sc, [B 7 sc], 9 sc (50)

Round 13-15 :

50 sc (50)

Round 16 :

9 sc, (dec, 8 sc)*3, dec, 9 sc (46)

Round 17 :

9 sc, dec, 6 sc, dec, 8 sc, dec, 6 sc, dec, 9 sc (42)

Round 18 :

9 sc, (dec, 1 sc)*2, dec, 8 sc, (dec, 1 sc)*2, dec, 9 sc (36)

Round 19 :

(4 sc, dec)*6 (30)

Round 20 :

(dec, 3 sc)*6 (24)

Round 21 :

(2 sc, dec)*6 (18)

Info :

Stuff the head

Round 22 :

(dec, 1 sc)*6 (12)

Round 23 :

6 dec (6)

Info :

Stuff the head. Fasten off and weave the yarn.

Info :

Put in the eyes between rows 10-11, leaving 6 stitches space between them.

Info :

Use fabric glue to pin the head into the pouch.

โ€” Horn (make 2) :

Info :

Start in brown

Round 1 :

6 sc in the magic ring (6)

Round 2 :

(2 sc, inc)*2 (8)

Round 3 :

(inc, 3 sc)*2 (10)

Round 4-6 :

10 sc (10)

Info :

Slst, fasten off the yarn, leaving a long tail for sewing.

Info :

Stuff the horns. Put in the horns between rows 3-6.

โ€” Ear (make 2) :

Info :

Make 1 black ear and 1 white ear

Round 1 :

6 sc in the magic ring (6)

Round 2 :

6 inc (12)

Round 3 :

(inc, 5 sc)*2 (14)

Round 4-7 :

14 sc (14)

Info :

Slst, fasten off the yarn, leaving a long tail for sewing.

Info :

Don't stuff the ears, flatten and fold the top of the ears. Put in the ears between rows 6-8.

โ€” Muzzle :

Info :

Start in pink

Info :

Make 6 ch, start in the second chain from hook

Round 1 :

4 sc, 3 sc in the last chain, continue on the other side of the foundation chain, 3 sc, inc (12)

Round 2 :

inc, 3 sc, 3 inc, 3 sc, 2 inc (18)

Info :

Fasten off the yarn, leaving a long tail for sewing between rows 10-15.

Info :

Sew the nose with red yarn.

โ€” LEG (make 2) :

Info :

The first leg. Start in the white

Round 1 :

6 sc in the magic ring (6)

Round 2 :

6 inc (12)

Round 3 :

(2 sc, inc)*4 (16)

Round 4-5 :

16 sc (16)

Round 6 :

(dec, 2 sc)*4 (12)

Round 7 :

(dec, 2 sc)*3 (9)

Round 8-9 :

9 sc (9)

Info :

Slst, fasten off the yarn, leaving a long tail for sewing. Stuff up to the 5th row of the leg.

Info :

The second leg. Black word: white yarn. Red word: black yarn (B). Start in white yarn.

Round 1 :

6 sc in the magic ring (6)

Round 2 :

6 inc (12)

Round 3 :

2 sc, inc, [B 2 sc, inc], (2 sc, inc)*2 (16)

Round 4 :

3 sc, [B 4 sc], 9 sc (16)

Round 5 :

3 sc, [B 3 sc], 10 sc (16)

Round 6 :

(dec, 2 sc)*4 (12)

Round 7 :

(dec, 2 sc)*3 (9)

Round 8-9 :

9 sc (9)

Info :

Slst and fasten off the yarn, leaving a long tail for sewing. Stuff up to the 5th row of the leg. Sew the legs at row 4.

โ€” ARM (make 2) :

Info :

The first arm. Black word: white yarn. Red word: black yarn (B). Start in white.

Round 1 :

6 sc in the magic ring (6)

Round 2 :

(inc, 2 sc)*2 (8)

Round 3 :

8 sc (8)

Round 4 :

3 sc, [B 3 sc], 2 sc (8)

Round 5 :

2 sc, [B 3 sc], 3 sc (8)

Round 6-7 :

8 sc (8)

Info :

Slst and fasten off the yarn, leaving a long tail for sewing. Don't stuff the arm.

Info :

The second arm. Start in the white

Round 1 :

6 sc in the magic ring (6)

Round 2 :

(inc, 2 sc)*2 (8)

Round 3-7 :

8 sc (8)

Info :

Slst and fasten off the yarn, leaving a long tail for sewing. Don't stuff the arm. Sew the arms between rows 16-18.

โ€” MILK BOTTLE :

Info :

Bottle. Start in cream

Round 1 :

6 sc in the magic ring (6)

Round 2 :

6 inc (12)

Round 3 :

(1 sc, inc)*6 (18)

Round 4-9 :

18 sc (18)

Info :

Fasten off and weave the yarn. Stuff the bottle.

Info :

Bottle cap

Round 1 :

5 sc in the magic ring (5)

Round 2-3 :

5 sc (5)

Round 4 :

5 inc (10)

Round 5 :

(1 sc, inc)*5 (15)

Round 6 :

(4 sc, inc)*3 (18)

Info :

Fasten off the yarn, leaving a long tail for sewing.

Info :

Start in pink, make 22 ch, start in the second chain from hook: 21 hdc. Fasten off and weave the yarn. Use fabric glue to paste it into the bottle.

โ€” Assembling :

Item Name (P1) :

1. Sew the legs at row 4

Item Name (P1) :

2. Use fabric glue to paste the milk bottle into the pouch.

Item Name (P1) :

3. Sew the arms into the pouch between rows 16-18.

Item Name (P1) :

4. Use fabric glue to paste the head into the pouch.

Item Name (P1) :

5. Sew the shoulder-strap and button into the pouch. Sew buttons onto lid and pouch as shown.

Assembly Instructions

  • Sew the legs at row 4, aligning toes toward the front and sewing securely through the bag wall.
  • Use fabric glue to paste the milk bottle into the pouch, centering it between the legs and holding until set.
  • Sew the arms into the pouch between rows 16-18, positioning them slightly in front of the bottle so they appear holding it.
  • Use fabric glue to paste the head into the pouch and add extra stitches if needed to secure it firmly.
  • Sew the shoulder-strap and the 15 mm wooden buttons onto the pouch; attach the strap to the sides and fasten the strap button to the lid.
  • Sew horns and ears in place (horns between rows 3-6, ears between rows 6-8) and make sure safety eyes are fixed between rows 10-11 with 6 stitches spacing.

Important Notes

  • ๐Ÿ’กUse stitch markers to keep track of round beginnings while working in spirals to avoid losing your place.
  • ๐Ÿ’กStuff firmly but not too tightly for smooth shaping; add small amounts of fiberfill and shape as you go to avoid lumps.
  • ๐Ÿ’กUse fabric glue for the head and bottle placement if you prefer not to sew through the pouch; leave to dry fully before handling.
  • ๐Ÿ’กPlace safety eyes between rows 10-11 leaving 6 stitches between them to match the pattern's facial proportions.
  • ๐Ÿ’กDo not stuff the ears and arms; flatten and fold ears before sewing to maintain shape, and leave arms unstuffed for better positioning.

This Cow Phone Pouch pattern is a delightful combination of function and cuteness, perfect for handmade gifts and market stalls. It includes detailed rounds for the bag, lid, strap, and adorable cow amigurumi to attach. Follow the step-by-step instructions and photos to create a polished, charming accessory with lots of personality. ๐Ÿ„๐Ÿงถ

You ask,

we answer.

FAQs

What size will the finished piece be?

If you use the same yarn and hook as recommended, the finished phone pouch will be approximately 17 cm in length and 10 cm in width.

Can I use different yarn weights for this pattern?

Yes, you can use different yarn weights, but the final size and texture will change; choose an appropriate hook for your yarn and expect size differences.

Do I need prior crochet experience for this pattern?

This pattern is rated intermediate and assumes familiarity with amigurumi techniques, working in spirals, increases, decreases, and basic color changes.

How long does this project typically take to complete?

Most crocheters finish this project in about 5-7 hours, depending on experience, color changes and assembly time.