🧢 Beautiful ✨ Detailed πŸ’ Adorable

Clownfish (Nemo) Amigurumi Pattern

Clownfish (Nemo) Amigurumi Pattern
3.9β˜… Rating
2-3 Hours Time Needed
3.3K Made This
βœ‚οΈ

Intermediate Level

Ideal for those with basic crochet experience, featuring slightly more advanced stitches and techniques to expand your skills.

⏱️

Bite-Sized Project

Finishes in 2-4 hoursβ€”perfect for an afternoon of creative relaxation.

🧸

Cute Companion

An adorable friend to cherish, handcrafted with love to bring comfort and joy for years to come.

About This Clownfish (Nemo) Amigurumi Pattern

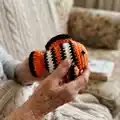
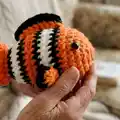
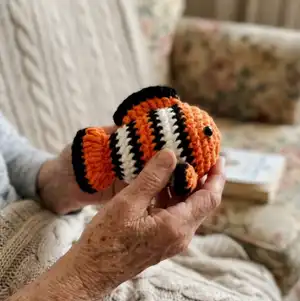
This pattern creates a small, striped clownfish (Nemo) amigurumi worked from the body up to the tail with no sewing required for the main body. It uses Super Bulky (Category 6) yarn and makes use of color changes to create the iconic orange, white, and black stripes. The pattern includes instructions for dorsal fins, placement of safety eyes, and finishing details to complete the toy.

Clownfish (Nemo) Amigurumi Pattern crochet pattern - detailed view of completed project

Perfect for crafters who enjoy quick amigurumi projects with clear color-change instructions. Includes materials, abbreviations, step-by-step rows, and fin construction details.

Why You'll Love This Clownfish (Nemo) Amigurumi Pattern

I absolutely love this pattern because it packs a lot of character into a small, quick project. The stripe color changes are fun and satisfying, giving a classic clownfish look without complex shaping. I enjoy how the body-up construction eliminates major sewing and keeps assembly simple and neat. The dorsal fins add a cute, handmade detail that brings the fish to life. Making several in different colorways is one of my favorite ways to personalize gifts.

Clownfish (Nemo) Amigurumi Pattern step 1 - construction progress Clownfish (Nemo) Amigurumi Pattern step 2 - assembly progress Clownfish (Nemo) Amigurumi Pattern step 3 - details and accessories Clownfish (Nemo) Amigurumi Pattern step 4 - final assembly and finishing

Switch Things Up

I love experimenting with colors, and you can easily change the palette to create different species of fish or playful fantasy versions.

I often use lighter worsted yarn with a smaller hook to make mini keychain-size versions that are perfect for gifts.

I sometimes swap the safety eyes for embroidered eyes if the toy is intended for very young children to make it safer.

I like to add a little wire in the tail or fins for slight posability so the fish can 'swim' in different poses.

Try changing the stripe frequency: add extra white or black bands to create new stripe patterns and a unique look.

I enjoy adding small accessories like a tiny crocheted seaweed base or a bubble loop to hang the fish as a mobile.

To make a softer, squishier fish, use a bulkier yarn and larger hook, adjusting stuffing to achieve a plush finish.

If you want a sturdier toy, use tighter tension and firmly stuff the body before finishing the tail for better shape retention.

I sometimes embellish the fins with a thin contrasting border using slip stitch or surface crochet for a delicate outline.

For gift sets, I make a school of fish in complementing colors and varying sizes by switching yarn weight and hook β€” each one feels unique and handmade.

Common Mistakes & How to Fix Them

βœ— Skipping stitch markers at the start of each round can cause you to lose track of your rounds; place a marker at the beginning of each round to maintain accurate counts. βœ— Not changing colors at the correct stitch can break the stripe pattern and make edges look messy; change yarn exactly where instructed and carry yarn neatly or fasten off between color bands. βœ— Forgetting to stuff at the indicated point will make closing the tail difficult and the shape uneven; follow the stuffing note at Row 17-18 and stuff gradually to achieve an even, firm shape. βœ— Pulling your stitches too tight when using Super Bulky yarn will make the amigurumi stiff and hard to work; keep a relaxed, consistent tension for nice drape and easier color changes.

Clownfish (Nemo) Amigurumi Pattern

Make a charming clownfish amigurumi with this detailed crochet pattern. You will work from the body up to the tail with clear color-change instructions and step-by-step shaping. Perfect for gifting or adding to a sea-themed collection, this pattern teaches small-piece assembly and finishing. Enjoy creating a cuddly, striped Nemo that brings a smile to any handmade toy lover.

Intermediate 2-3 Hours

Materials Needed for Clownfish (Nemo) Amigurumi Pattern

β€” Main Fabric

  • 01
    Yarn: Super Bulky / Category 6
  • 02
    Color: orange - for main body (as listed)
  • 03
    Color: black - for stripes and fin edges (as listed)
  • 04
    Color: white - for stripes (as listed)
  • 05
    Fiberfill for stuffing

β€” Tools Required

  • 01
    3.5mm (E) Hook
  • 02
    Stitch maker
  • 03
    Sewing needle
  • 04
    Scissors
  • 05
    Plastic safety eyes (8mm)
  • 06
    Hot gun glue

Progress Tracker

0% Complete

β€” Body (from the body up to the tail) :

Row 1 :

6 SC in an MR (6)

Row 2 :

6 INC (12)

Row 3 :

(SC, INC) 6 times (18)

Row 4 :

(2 SC, INC) 6 times (24)

Row 5 :

(3 SC, INC) 6 times (30)

Row 6 :

30SC (30)

Info :

Change to Black yarn

Row 7 :

30SC (30)

Info :

Change to White yarn

Row 8-9 :

30SC (30)

Info :

Change to Black yarn

Row 10 :

30SC (30)

Info :

Change to Orange yarn

Row 11 :

30SC (30)

Row 12 :

(3SC, DEC) 6 times (24)

Info :

Change to Black yarn

Row 13 :

24SC (24)

Info :

Change to White yarn

Row 14 :

24SC (24)

Row 15 :

(2SC, DEC) 6 times (18)

Info :

Change to Black yarn

Row 16 :

18SC (18)

Info :

Change to Orange yarn

Row 17 :

(SC, DEC) 6 times (12)

Info :

*Stuffing*

Row 18 :

Crochet 2 side together with 6SC

Row 19 :

Turn, 2CH, DC-INC 6 times (12)

Info :

Change to Black yarn

Row 20 :

Turn, CH, 12SC (12)

Info :

Weave in the yarn end and cut

β€” Dorsal Fins :

Part 1 (Make 2) :

Begin with Orange yarn. Pick up the yarn from row 8, apart 8 stitch.

Row 1 :

(Chains 1, HDC, 3DC, HDC) in one stitch (5)

Info :

Change to Black yarn

Row 2 :

Turn, CH, 5SC (5)

Info :

Weave in the yarn end and cut

Part 2 :

Begin with Orange yarn. Pick up the yarn from R7 to R16, in the vertical line from head to tail.

Row 1 :

(Chains 1, SC, 7DC, SC) in one stitch (9)

Info :

Change to Black yarn

Row 2 :

Turn, CH, 9SC (9)

Info :

Weave in the yarn end and cut.

Info :

Attach the eyes at R5-R6, apart 8 stitch

Assembly Instructions

  • Attach the dorsal fins by picking up the yarn from the specified rows (Part 1: pick up from row 8 apart 8 stitches; Part 2: pick up from R7 to R16 vertically) and sew/secure the fin edges, weaving in ends.
  • Attach the safety eyes at rounds R5-R6, spacing them apart by 8 stitches as indicated, and secure the safety backs firmly.
  • Weave in all yarn ends after finishing each piece and trim excess yarn to keep the toy neat and tidy.
  • Stuff the body at the indicated stuffing point after Row 17 and before closing the tail to achieve an even and firm shape.
  • During final assembly, position fins and check symmetry before securing; pin pieces in place first if needed, then sew securely with the sewing needle.

Important Notes

  • πŸ’‘Before you start, carefully read what you need to know and prepare all listed tools and materials for a smooth process.
  • πŸ’‘Any changes for larger or smaller sizes will be indicated at the start of each pattern piece; adjust yarn weight and hook accordingly.
  • πŸ’‘Use stitch markers to keep track of rounds during color changes and shaping to avoid miscounts and misaligned stripes.
  • πŸ’‘Weave in the yarn ends and cut after each fin piece and after finishing the body to maintain a clean look.

This cheerful Clownfish (Nemo) pattern makes a delightful handmade friend you can finish in an afternoon 🌊. It features bold stripes, simple shaping, and easy fin details for a classic look. Make one for a gift or a playful shelf companionβ€”happy crocheting! 🧢🐠

You ask,

we answer.

FAQs

What size will the finished piece be?

The finished amigurumi size depends on your tension and yarn, but using Super Bulky (Category 6) and 3.5mm hook will produce a small palm-sized clownfish perfect for display or gifting.

Can I use different yarn weights for this pattern?

Yes, you can use different yarn weights, but the final size will change; switch to a suitable hook size and expect different stitch counts and proportions when substituting yarn.

Do I need prior crochet experience for this pattern?

This pattern is rated intermediate and uses basic stitches like SC, HDC, DC and color changes, so some crochet experience is recommended for best results.

How long does this project typically take to complete?

Most crocheters complete this project in 2-3 hours depending on experience and pace, though time may vary especially if making multiple color changes and finishing details.