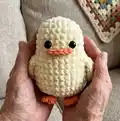
About This Duck No Sew Amigurumi Pattern
This pattern creates a small no-sew duck amigurumi using super bulky yarn for a plush, cuddly finish. You will crochet the body and head in one piece, add small crocheted legs, a beak (speculum), and wings — no large sewing required. The pattern includes color-change notes so you can make a yellow duck or a mallard-style duck with green and brown colorwork.
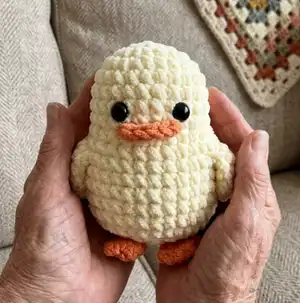
Clear round-by-round instructions and helpful photos guide you through shaping and finishing. Materials and abbreviations are listed so you can begin right away.
Why You'll Love This Duck No Sew Amigurumi Pattern
I absolutely love this pattern because it is fast to make and instantly satisfying; the super bulky yarn creates a plush texture that feels wonderful in the hand. I enjoy the clever no-sew construction — crocheting the body up into the head means less finishing and a cleaner look. The color-change options let me make different personalities: a sunny yellow duck or a handsome mallard, both using the same shaping. Each little detail like the tiny beak and feet give the finished duck loads of charm.
Switch Things Up
I love experimenting with color to give each duck a different personality — try pastel yellows, soft greys, or bright neons for a modern twist.
I often change yarn weight and hook size to make minis or larger huggable versions; using worsted weight with a smaller hook gives a compact mini while bulky yarn makes a chunky friend.
I sometimes add embroidery on the chest or tiny felt cheeks for extra character; a few simple stitched lines change the expression and make each one unique.
For more realism, use safety eyes of different sizes or embroider the eyes for a safer toy for small children.
I add a tiny keyring loop to the top so the duck becomes a portable charm — just attach a small metal ring before finishing off the top rounds.
Try substituting faux fur or textured yarn for the wings or body to create a fluffy, tactile version that’s fun to touch.
I like to crochet little outfits — a tiny scarf, hat, or jacket — using leftover yarn to make a coordinating set of ducks with matching accessories.
If you want a posable duck, add thin wire inside the wings or legs before stuffing them, then secure the ends inside the body so they can be posed gently.
To change the face, move the eyes up or down a round or shift them a stitch left/right — small adjustments dramatically alter the expression.
I recommend blocking color transitions by weaving in the color tails neatly and hiding ends inside the body to keep the surface tidy and professional-looking.
For holiday variations, swap colors: red/green for Christmas, pastel shades for Easter, or add tiny festive embroidery for special occasions.
Common Mistakes & How to Fix Them
✗ Skipping stitch counts when changing colors can cause gaps or uneven shaping; count stitches at each round and mark the stitch where you change color to keep alignment.
✗ Forgetting to stuff gradually leads to lumps or a misshapen body; add small amounts of fiberfill as you go and shape with your fingers for an even finish.
✗ Pulling your yarn too tight when making increases or decreases will distort the round shape; keep a consistent, relaxed tension and practice decreases to keep the silhouette smooth.
✗ Not placing safety eyes at the correct round will make the face look off-center; measure between the rounds and stitches given in the pattern (for example rows 7 and 8, 4 stitches apart) before securing the eyes.