🧢 Beautiful ✨ Detailed πŸ’ Adorable

Santa Christmas Cat Amigurumi Pattern

Santa Christmas Cat Amigurumi Pattern
3.9β˜… Rating
5-7 Hours Time Needed
1.4K Made This
βœ‚οΈ

Intermediate Level

Ideal for those with basic crochet experience, featuring slightly more advanced stitches and techniques to expand your skills.

⏱️

Weekend Treat

Takes 5-7 hours, making it an enjoyable project to finish over a couple of days.

🧸

Cute Companion

An adorable friend to cherish, handcrafted with love to bring comfort and joy for years to come.

About This Santa Christmas Cat Amigurumi Pattern

This pattern creates a small Santa-themed amigurumi cat complete with hat, beard and a tiny sack. You will work the body, head, limbs, ears, tail, beard and accessories in joined rounds and flat pieces. The design uses sport/fine yarn and a 2.5mm hook for a neat, firm fabric.

Santa Christmas Cat Amigurumi Pattern crochet pattern - detailed view of completed project

Detailed round-by-round instructions are included for each piece, plus assembly notes and placement tips. Suitable for crocheters comfortable with increases, decreases and working in the round.

Why You'll Love This Santa Christmas Cat Amigurumi Pattern

I absolutely love this pattern because it combines whimsical character design with traditional amigurumi techniques that are so satisfying to complete. I enjoy the fluffy layered beard technique β€” it gives so much personality with simple stitches. The pattern is compact but full of detail, making it a great gift or decoration. I also appreciate how versatile it is: you can change colors, sizes, or add accessories to make each Santa Cat unique.

Santa Christmas Cat Amigurumi Pattern step 1 - construction progress Santa Christmas Cat Amigurumi Pattern step 2 - assembly progress Santa Christmas Cat Amigurumi Pattern step 3 - details and accessories Santa Christmas Cat Amigurumi Pattern step 4 - final assembly and finishing

Switch Things Up

I love how this Santa Cat pattern can be customized in so many ways; try swapping the red for green and make a little elf cat instead.

You can change yarn weight and hook size to create a mini keychain version or a larger cuddly plush; just remember stitch counts will change.

I often add embroidered eyelashes or different eye sizes to change the expression; using 10mm or 15mm eyes creates a big personality shift.

Make the beard in a fluffier yarn for extra texture or use a bobble stitch edge to create a different ruff around the face.

Try mixing colors for the sack and add tiny crocheted gifts inside for a playful finishing touch.

I sometimes add wire inside the tail for posability or leave it soft for safety if the toy is for children.

Swap the pompom color or add metallic thread to the hat trim for a festive sparkle effect.

You can create a set with multiple outfitsβ€”change the belt, add buttons or tiny scarves to personalize each cat.

For a secure finish, sew pieces with matching yarn tails and reinforce high-stress joins with extra back-and-forth stitches.

Don’t be afraid to experiment with facial placement; moving eyes or the mouth a stitch or two will give very different expressions.

Common Mistakes & How to Fix Them

βœ— Skipping stitch markers when joining rounds can cause misaligned seams and incorrect stitch counts; always place a marker at the start of each round to keep your rounds consistent. βœ— Forgetting to stuff pieces as you go results in lumps or emptiness; stuff gradually during shaping and add small amounts of fiberfill to maintain even firmness. βœ— Cutting yarn too short at finishing leaves you without enough tail for sewing pieces together; leave a generous long tail for sewing and weaving in ends securely. βœ— Not counting stitches after increases or decreases leads to uneven shaping and fit issues; count after every shaping round to confirm you have the correct stitch total.

Santa Christmas Cat Amigurumi Pattern

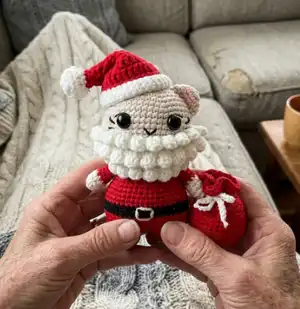
Make a charming Santa Cat amigurumi with this detailed crochet pattern. You will create a festive kitty dressed in Santa red with a fluffy beard, hat and a cute sack. Clear step-by-step rounds, photos, and assembly notes guide you through each piece so you can stitch a perfect holiday companion.

Intermediate 5-7 Hours

Materials Needed for Santa Christmas Cat Amigurumi Pattern

β€” Main Fabric

  • 01
    Sport weight yarn (Fine 2) - primary quantities as needed for small amigurumi (small skeins of each color)
  • 02
    White yarn - for beard, hat trim, pompom and details (small amount)
  • 03
    Beige yarn - for head and ears (small amount)
  • 04
    Brown yarn - for feet detail (small amount)
  • 05
    Red yarn - main body, hat, sack (small amount)
  • 06
    Pink yarn - inner ear accent (small amount)
  • 07
    Black yarn - belt stripe and facial embroidery (small amount)
  • 08
    Eyes: 12-15mm safety eyes (2 pieces)

β€” Tools Required

  • 01
    Crochet hook size 2.5mm (C)
  • 02
    Safety eyes 12-15mm (2 pieces)
  • 03
    Stitch marker
  • 04
    Sewing needle
  • 05
    Scissors
  • 06
    Hot gun glue (optional for non-play items)
  • 07
    Polyester stuffing (fiberfill)

Progress Tracker

0% Complete

β€” Arms :

Info :

Join the rounds with a slip stitch. Begin with white yarn.

Row 1 :

6SC in an MR (6)

Row 2 :

(SC, INC) 3 times (9)

Row 3-4 :

9SC (9)

Info :

Change to red yarn

Row 5-9 :

9SC (9)

Info :

Fasten off and cut the yarn and leave a long tail for sewing. Sew the two edges together.

β€” Legs :

Info :

Join the rounds with a slip stitch. Begin with brown yarn.

Row 1 :

6SC in an MR (6)

Row 2 :

6INC (12)

Row 3 :

(2SC, INC) 4 times (16)

Row 4 :

16SC (16)

Info :

Change to red yarn

Row 5-6 :

16SC (16)

Info :

Cut the yarn. Make one more leg until round 6 but DO NOT cut the yarn.

β€” Body :

Info :

Begin with RED yarn. Make chain 2: Seamless leg joint.

Row 1 :

16SC of the first leg, 2SC of the chain, 16SC of the second leg, 2SC on a back bump of the chains between 2 legs (36)

Row 2 :

(5SC, INC) 6 times (42)

Row 3 :

(6SC, INC) 6 times (48)

Row 4-5 :

48SC (48)

Info :

Change to black yarn

Row 6-7 :

48SC (48)

Info :

Change to red yarn

Row 8-9 :

48SC (48)

Row 10 :

(4SC, DEC) 8 times (40)

Row 11-12 :

40SC (40)

Row 13 :

(3SC, DEC) 8 times (32)

Row 14 :

32SC (32)

Row 15 :

(2SC, DEC) 8 times (24)

Row 16 :

24SC (24)

Info :

*Stuffing* Fasten off and cut the yarn.

β€” Tail :

Info :

Use beige yarn.

Row 1 :

6SC in an MR (6)

Row 2-15 :

6SC (6)

Info :

Fasten off and cut the yarn. Sew the tail in the body at R6-7.

β€” Head :

Info :

Use Beige yarn.

Row 1 :

8 SC in an MR (8)

Row 2 :

8 INC (16)

Row 3 :

(SC, INC) 8 times (24)

Row 4 :

(2 SC, INC) 8 times (32)

Row 5 :

32 SC (32)

Row 6 :

(7 SC, INC) 4 times (36)

Row 7 :

(5 SC, INC) 6 times (42)

Row 8 :

(6 SC, INC) 6 times (48)

Row 9-17 :

48 SC (48)

Row 18 :

(4 SC, DEC) 8 times (40)

Row 19 :

(3 SC, DEC) 8 times (32)

Row 20 :

(2 SC, DEC) 8 times (24)

Info :

*Stuffing* Fasten off and cut the yarn and leave a long tail for sewing.

Info :

Sew the arms to the head at R19. Attach the eyes at R11-12, 7st apart.

β€” Ears :

Info :

Begin with Beige yarn.

Row 1 :

6 SC in an MR (6)

Row 2 :

(SC, INC) 3 times (9)

Row 3 :

2 SC, INC, 2 SC, INC, 2 SC, INC (12)

Row 4 :

3 SC, INC, 3 SC, INC, 3 SC, INC (15)

Row 5 :

4 SC, INC, 4 SC, INC, 4 SC, INC (18)

Info :

Fasten off and cut the yarn. Sew the two edges together and attach the ears to the head at R4-9.

Info :

Sew the eyes then embroider the face as shown in photos.

β€” Beard :

Info :

Use white yarn.

Row 1 :

Make 23 chains, Start in the 3rd stitch from the hook: 21DC

Row 2 :

2CH, and turn, 21DC

Row 3 :

2CH, and turn, skip 1 stitch, SLST, (2CH, skip 1 stitch, SLST) 9 times

Row 4 :

(CH, and turn SC, 3DC, SC) in one st, (SC, 3DC, SC) 9 times, 2CH, SLST in row 2

Row 5 :

2CH, and turn, skip 1 stitch, SLST, (2CH, skip 1 stitch, SLST) 8 times

Row 6 :

(CH, and turn SC, 3DC, SC) in one st, (SC, 3DC, SC) 9 times, 2CH, SLST in row 1

Row 7 :

2CH, and turn, skip 1 stitch, SLST, (2CH, skip 1 stitch, SLST) 9 times

Row 8 :

(CH, and turn SC, 3DC, SC) in one st, (SC, 3DC, SC) 9 times, SLST

Info :

Fasten off and leave a long tail for sewing at R11.

β€” Santa's Sack :

Info :

Use red yarn. Join the rounds with a slip stitch.

Row 1 :

6SC in an MR (6)

Row 2 :

6 INC (12)

Row 3 :

(SC, INC) 6 times (18)

Row 4 :

(2SC, INC) 6 times (24)

Row 5 :

(3SC, INC) 6 times (30)

Row 6 :

30SC (30)

Row 7 :

(4SC, INC) 6 times (36)

Row 8 :

(5SC, INC) 6 times (42)

Row 9-11 :

42 SC (42)

Row 12 :

(5SC, DEC) 6 times (36)

Row 13-14 :

36SC (36)

Row 15 :

(4SC, DEC) 6 times (30)

Row 16-17 :

30SC (30)

Row 18 :

15DEC (15)

Row 19 :

(SC, CH, Skip 1 stitch) Repeat it at the end (15)

Row 20 :

2CH, (15HDC-INC) 6 times (30)

Row 21 :

2CH, 30HDC (30)

Info :

*Stuffing* Fasten off and cut the yarn. Make 20 chains with white yarn and cut it. Sew the Chains to the pocket in CH of R19.

β€” Santa's Hat :

Info :

Begin with RED yarn. Join the rounds with a slip stitch.

Row 1 :

6DC in an MR (6)

Row 2 :

2CH, 6DC (6)

Row 3 :

2CH, (2DC, INC) 2 times (8)

Row 4 :

2CH, (DC, INC) 4 times (12)

Row 5 :

2CH, (2DC, INC) 4 times (16)

Row 6 :

2CH, (DC, INC) 8 times (24)

Row 7 :

2CH, (2DC, INC) 8 times (32)

Row 8 :

2CH, (7DC, INC) 4 times (36)

Info :

Cut the RED yarn and change it to WHITE yarn.

Row 9-12 :

CH, 36SC (36)

Info :

Fasten off and leave a long tail for sewing. Attach pompom ball: 10-15mm (white) to the hat. Sew the hat to the head at R16-19. Sew the face as a photo.

Assembly Instructions

  • Attach head to body by sewing through the long tail left from the head rounds and align head so the neck sits flush on top of the body; sew securely with whipstitch.
  • Position and sew the ears to the head between rounds 4-9, spacing them symmetrically and sewing the two edges of each ear together before attaching.
  • Attach arms to the sides of the body at head R19 position as noted, using the long tails and whipstitch to secure them firmly.
  • Sew the tail into the body at body rounds 6-7 on the back, shaping it to curve slightly and secure with several stitches.
  • Attach the beard to the lower front of the head aligning to R11 area and sew firmly with the long tail. Add the hat over the top and sew the pompom to the hat.
  • Sew the sack to the side of the body or place it beside the figure; attach the white chain drawstring to the sack pocket at CH of R19 as instructed.

Important Notes

  • πŸ’‘Use stitch markers to keep track of your rounds and the start of each round, especially when joining with slip stitch.
  • πŸ’‘Stuff pieces evenly and gradually during shaping; overstuffing can distort the amigurumi shape and under-stuffing can create floppy parts.
  • πŸ’‘Weave in ends and leave long sewing tails where indicated to make assembly easier and neater.

This adorable Santa Cat pattern brings a cute festive friend to life with a fluffy beard, tiny sack and cozy hat. Perfect for holiday gifts, tree decorations, or a whimsical shelf sitter. Enjoy making this handcrafted companion and share the joy of handmade holidays. πŸŽ„πŸ§Ά

You ask,

we answer.

FAQs

What size will the finished piece be?

The finished amigurumi measures approximately 10-15 cm tall when using sport weight yarn and a 2.5mm hook; exact size will vary with tension and yarn.

Can I use different yarn weights for this pattern?

Yes, you can use different yarn weights, but the final size and stitch counts will change; choose an appropriate hook for your yarn and adjust stitch counts if needed.

Do I need prior crochet experience for this pattern?

This pattern is rated intermediate, so basic knowledge of single crochet, increases, decreases, working in the round, and simple chains is recommended.

How long does this project typically take to complete?

Most crocheters complete this project in 5-7 hours depending on experience, assembly time, and how many details you add.