🧢 Beautiful ✨ Detailed πŸ’ Adorable

Jellyfish Crochet Pattern

Jellyfish Crochet Pattern
4.0β˜… Rating
5-7 Hours Time Needed
3.2K Made This
βœ‚οΈ

Intermediate Level

Ideal for those with basic crochet experience, featuring slightly more advanced stitches and techniques to expand your skills.

⏱️

Weekend Treat

Takes 5-7 hours, making it an enjoyable project to finish over a couple of days.

🧸

Cute Companion

An adorable friend to cherish, handcrafted with love to bring comfort and joy for years to come.

About This Jellyfish Crochet Pattern

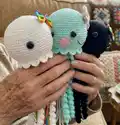
This pattern creates a delightful amigurumi jellyfish with a rounded head and two types of tentacles: curly and chain. It includes full round-by-round instructions for the head, a decorative ridge, cheek details, and tentacles for a playful, textured finish. The pattern is written in continuous rounds and uses worsted weight yarn and a 3.25 mm hook for a firm, huggable result.

Jellyfish Crochet Pattern crochet pattern - detailed view of completed project

Includes assembly and placement guidance for eyes, cheeks, and tentacles so you can finish your jellyfish professionally. Photographic cues are referenced to help with shaping and sewing details.

Why You'll Love This Jellyfish Crochet Pattern

I absolutely love this pattern because it blends simple amigurumi shaping with fun, textured tentacles that really bring the jellyfish to life. I enjoy how quickly the head takes shape and how satisfying it is to watch the curly tentacles form as you work. The ridge and cheek accents add personality with very little extra work, which I find delightful. Making this pattern always sparks creativity in color choice and small decorative details that make each jellyfish unique.

Jellyfish Crochet Pattern step 1 - construction progress Jellyfish Crochet Pattern step 2 - assembly progress Jellyfish Crochet Pattern step 3 - details and accessories Jellyfish Crochet Pattern step 4 - final assembly and finishing

Switch Things Up

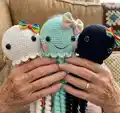
I love experimenting with color for this pattern: try pastel gradients for a soft nursery look or bright neons for a playful toy; switching Color A and Color B creates a whole new vibe.

To make a smaller or larger version I change yarn weight and hook size; a DK yarn with a 2.5mm hook makes a mini, while bulky yarn with a larger hook gives a chunky cuddly version.

I sometimes add felt or embroidered eyelids to change the expression and personality of the jellyfish; try different eye placements for a sleepy or surprised look.

Swap out safety eyes for embroidered eyes if the toy is for a baby or needs to be machine washable; embroidered features also let you custom-shape the smile with more subtle curves.

Make all tentacles the same color for a coordinated look or mix many accent colors for a rainbow cascade β€” use leftover scraps to make pretty multicolor tentacles.

For a whimsical texture change, try using boucle or textured yarn for the curly tentacles so they feel extra squishy and unique.

I sometimes add a tiny loop or ribbon on top so the jellyfish can hang as an ornament or mobile; add a small bell or rattle inside the head for a baby toy (securely enclosed).

If you like posing, insert light craft wire into a few tentacles to create adjustable, posable curls and shapes that hold their form.

Try making matching sets in different sizes and colors to create an underwater family β€” they make great gifts and nursery decor.

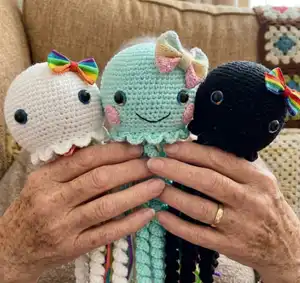
Don’t be afraid to combine techniques: crocheted flowers instead of cheeks or tiny bows attached to the top add personality and character to every finished jellyfish.

Common Mistakes & How to Fix Them

βœ— Skipping the stitch marker when working in continuous rounds will cause you to lose track of the beginning of the round; place a marker at the first stitch and move it each round for accuracy. βœ— Stuffing too loosely will leave the head floppy and undefined; stuff gradually and firmly as you progress to maintain the shape and avoid lumps. βœ— Not placing the safety eyes at the correct rounds will result in an awkward facial placement; follow the instruction to place eyes between rounds 17 and 18 with 11 holes between them. βœ— Forgetting to work BLO for round 26 when instructed will change the ridge effect and shaping; carefully switch to back loops only exactly on round 26 to get the correct shape. βœ— Cutting tentacle tail ends too short can make sewing difficult and lead to visible knots; leave a long tail for sewing and weave ends securely for a clean finish.

Jellyfish Crochet Pattern

Make a whimsical hand-crocheted jellyfish with curly and chain tentacles β€” a sweet, cuddly amigurumi perfect for gifts and nursery decor. This intermediate-level pattern walks you through a sculpted head, decorative ridge, and two styles of tentacles for a playful finish. You will enjoy creating charming facial details and adding your own color choices for a truly unique sea friend.

Intermediate 5-7 Hours

Materials Needed for Jellyfish Crochet Pattern

β€” Main Fabric

  • 01
    Worsted weight yarn (#4), approximately 100g of main color (Color A)
  • 02
    Accent colors: 50-75g total for tentacles and details (Color B tentacle color, Color C pink for cheeks)
  • 03
    Small amounts of additional colors for chain tentacles and decorative accents

β€” Tools Required

  • 01
    Crochet hook size D (3.25 mm)
  • 02
    18 mm safety eyes (2 pieces)
  • 03
    Scissors
  • 04
    Sewing needle / yarn needle for sewing and weaving ends
  • 05
    Stitch markers
  • 06
    Polyfill fiberfill stuffing
  • 07
    Black embroidery thread for smile
  • 08
    Pins for assembly and placement

Progress Tracker

0% Complete

β€” Head :

Info :

Crocheted from top of head to bottom. With Color A:

Round 1 :

Make 6 sc into a magic ring = 6

Round 2 :

Increase in each st around = 12

Round 3 :

(sc, inc) x 6 = 18

Round 4 :

(2 sc, inc) x 6 = 24

Round 5 :

(3 sc, inc) x 6 = 30

Round 6 :

(4 sc, inc) x 6 = 36

Round 7 :

(5 sc, inc) x 6 = 42

Round 8 :

(6 sc, inc) x 6 = 48

Round 9 :

(7 sc, inc) x 6 = 54

Round 10 :

(8 sc, inc) x 6 = 60

Round 11-21 :

sc in each st around

Info :

Place the eyes between rounds 17 and 18, leaving 11 holes in between them.

Round 22 :

(8 sc, dec) x 6 = 54

Round 23 :

(7 sc, dec) x 6 = 48

Round 24 :

(6 sc, dec) x 6 = 42

Round 25 :

(5 sc, dec) x 6 = 36

Round 26 :

BLO (4 sc, dec) x 6 = 30

Info :

Start stuffing the head

Round 27 :

(3 sc, dec) x 6 = 24

Round 28 :

(2 sc, dec) x 6 = 18

Round 29 :

(sc, dec) x 6 = 12

Round 30 :

dec x 6 = 6

Info :

F/O and sew the hole closed

β€” Ridge on Head :

Info :

With Color A: Attach the yarn to round 26 of the head. Follow pictures below for help.

Round 1 :

* (hdc, dc, tr, dc, hdc) in one st, sl st in the 2 stitches *

Round 2 :

Repeat from * to * around the head

Info :

F/O and weave in the tail ends

β€” Curly Tentacles (Make 7) :

Info :

With Color A: CH 71

Round 1 :

sc in 2nd ch from hook, inc in next st, (sc, inc) across the chain

Info :

F/O and leave a long tail for sewing

β€” Chain Tentacles (Make 5) :

Info :

With Color of Choice: CH 75

Round 1 :

Sl st in 2nd ch from hook and across

Info :

F/O and leave a long tail for sewing

β€” Cheeks (Make 2) :

Round 1 :

With Color C: Make 6 sc into a magic ring = 6

Round 2 :

Increase in each st around = 12

Info :

F/O and leave a long tail for sewing

β€” Assembly :

Item Name (Head and Body) :

1. Mark 2 spots on the head with pins approximately between rounds 21 and 22. Cut a long strand of black embroidery thread. Thread your needle and insert the needle into a hole on the side of the head. Bring your needle up to the first pin and then bring the needle to the 2nd pin. Make a line and be easy and wrap the thread around the middle of the smile to hold it in place. Weave in the tail ends. 2. Pin the cheeks next to the eyes and sew into place.

Item Name (Chain Tentacles) :

1. Pin the chain tentacles in the middle of the jellyfish in a circle. 2. Sew them onto the jellyfish.

Item Name (Curly Tentacles) :

1. Pin the curly tentacles around the chain tentacles. 2. Sew the curly tentacles onto the jellyfish.

Info :

You now have your finished jellyfish!

Assembly Instructions

  • Mark two spots on the head between rounds 21 and 22 for the smile, thread a long strand of black embroidery thread and sew a gentle smile by bringing the needle up at the first pin and down at the second, wrap and secure in the center, then weave in ends.
  • Pin the cheeks next to the eyes and sew them into place using the long tail left when making the cheeks so they sit symmetrically beside the safety eyes.
  • Arrange the chain tentacles in the center of the underside of the jellyfish in a circle, pin them evenly and sew each tentacle securely using the long tail left from fastening off.
  • Pin the curly tentacles around the previously attached chain tentacles, spacing them evenly, and sew them down so the curly tentacles cascade around and conceal the attachment points.
  • Weave in all loose ends and secure knots, then give the jellyfish a final shaping and adjustment of tentacles so the appearance is balanced and tidy.

Important Notes

  • πŸ’‘Do not join rounds unless stated; work in a continuous spiral for smooth amigurumi shaping.
  • πŸ’‘Use a stitch marker to mark the beginning of each round so you do not lose your place during shaping and decreases.
  • πŸ’‘All stitches are worked in both loops unless stated otherwise in the pattern; switch to BLO only where indicated to create the ridge.
  • πŸ’‘Start stuffing the head at round 26 and stuff firmly but not overstuffed to keep a smooth shape and avoid lumps.
  • πŸ’‘Leave long tails on tentacles and cheeks after F/O to make sewing and placement easier and neater.

Thank you for choosing this Jellyfish Crochet Pattern β€” I hope it brings a splash of handmade joy to your day! Dive into creative color combos and playful tentacles to make each jellyfish uniquely yours. Share your finished buddies with me β€” I love seeing your versions and color choices! 🧢✨

You ask,

we answer.

FAQs

What size will the finished piece be?

The finished jellyfish measures approximately 16 inches from the top of the head to the bottom of the tentacle when using worsted weight yarn and a 3.25 mm hook.

Can I use different yarn weights for this pattern?

Yes, you can use different yarn weights but this will affect the final size; use an appropriate hook size for your yarn and be prepared to adjust eye placement and tentacle lengths.

Do I need prior crochet experience for this pattern?

This pattern is rated intermediate and is suitable for crocheters who know basic amigurumi techniques and are comfortable working in continuous rounds, increases, and decreases.

How long does this project typically take to complete?

Most crocheters complete this project in 5-7 hours, depending on experience and the time spent on assembly and tentacle placement.

What size safety eyes are recommended?

The pattern uses 18 mm safety eyes; you can experiment with different sizes but you may need to adjust placement if you change to smaller or larger eyes.