🧶 Beautiful ✨ Detailed 💝 Adorable

Jack Skellington Amigurumi Pattern

Jack Skellington Amigurumi Pattern
4.4★ Rating
5-7 Hours Time Needed
3.4K Made This
✂️

Intermediate Level

Ideal for those with basic crochet experience, featuring slightly more advanced stitches and techniques to expand your skills.

⏱️

Weekend Treat

Takes 5-7 hours, making it an enjoyable project to finish over a couple of days.

🧸

Cute Companion

An adorable friend to cherish, handcrafted with love to bring comfort and joy for years to come.

About This Jack Skellington Amigurumi Pattern

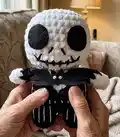
This pattern guides you to crochet a Jack Skellington amigurumi, complete with the iconic striped suit and bat-style bow tie. It uses chenille for a soft plush look and cotton/acrylic for suit details. You will work color changes, back-loop stitches and simple assembly to bring the character to life.

Jack Skellington Amigurumi Pattern crochet pattern - detailed view of completed project

Detailed round-by-round instructions are included for head, body, arms and jacket details. Photos and sewing notes are provided to help with placement and finishing.

Why You'll Love This Jack Skellington Amigurumi Pattern

I absolutely love this pattern because it captures Jack Skellington's personality with simple shapes and clever details. I enjoyed combining chenille yarn for a cuddly texture with cotton yarn for crisp suit stripes. I love how the small felt eyes and stitched mouth give a lot of expression with minimal effort. As a maker, seeing the character emerge from a few rounds of crochet always feels like magic and brings me joy.

Jack Skellington Amigurumi Pattern step 1 - construction progress Jack Skellington Amigurumi Pattern step 2 - assembly progress Jack Skellington Amigurumi Pattern step 3 - details and accessories Jack Skellington Amigurumi Pattern step 4 - final assembly and finishing

Switch Things Up

I love customizing this pattern by changing yarn colors to create mini collections; switching chenille for soft acrylic changes the texture dramatically.

I often make a tiny version by using fingering yarn and a smaller hook to create keychain-sized Jack figures.

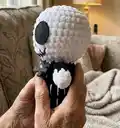
Try different eyes: cut felt as shown or embroider the eyes for a stitched look, which can soften the character.

I also experiment with the bow tie shape and size—adding small beads or felt dots can create a different expression.

To make a sturdier figure, I use a slightly smaller hook with the same yarn to tighten stitches and reduce stuffing show-through.

If I want a posable toy, I insert thin wire into the arms before stuffing to allow gentle posing.

For a more classic look, I switch chenille for a fuzzy worsted yarn and embroider the mouth instead of using heavy stitches.

I sometimes add a little weight in the base with poly pellets so the amigurumi stands more reliably on display.

To make matching sets, I change the stripe pattern and colors but keep the head instructions the same for quick, cohesive dolls.

I recommend testing color contrasts on a scrap swatch before committing, since black and white are high contrast and can highlight uneven tension.

Common Mistakes & How to Fix Them

✗ Not stuffing the head enough will make it look flat and lose its round shape; stuff firmly and gradually, adding more fiber until you achieve a rounded head. ✗ Changing colors without securing tails can leave loose ends that show through; weave in ends or carry the yarn neatly and hide color joins inside stitches. ✗ Skipping stitch counts after increases or decreases leads to uneven shaping; count your stitches after each round and correct mistakes immediately. ✗ Crocheting with inconsistent tension causes mismatched piece sizes; maintain even tension and use the recommended hook size to keep proportions consistent.

Jack Skellington Amigurumi Pattern

Create a spooky-cute Jack Skellington amigurumi with this step-by-step crochet pattern. You will make a plush head, striped suit, tiny arms and the iconic bat bow using chenille and cotton yarn. The pattern includes clear rounds, color change notes and finishing instructions so you can sew and decorate confidently. Perfect for Halloween decor or a unique handmade gift.

Intermediate 5-7 Hours

Materials Needed for Jack Skellington Amigurumi Pattern

— Main Fabric

  • 01
    Black chenille size 4 medium
  • 02
    White chenille size 4 medium
  • 03
    Black cotton/acrylic yarn (for suit details and stripes)
  • 04
    White cotton/acrylic yarn (for suit stripes and details)
  • 05
    Black felt (for eyes and papillon/bow tie)
  • 06
    White felt (for small details on bow tie)

— Tools Required

  • 01
    Crochet hook size 5mm
  • 02
    Tapestry needle
  • 03
    Stitch markers
  • 04
    Scissors
  • 05
    Hot/super glue
  • 06
    Polyester stuffing (fiber fill)
  • 07
    Black felt and white felt for details

Progress Tracker

0% Complete

— Head :

Info :

Use white yarn

Round 1 :

8sc in a mr (8)

Round 2 :

8inc (16)

Round 3 :

(sc, inc)x8 (24)

Round 4 :

(3sc, inc)x6 (30)

Round 5 :

(2sc, inc, 2sc)x6 (36)

Round 6-10 :

36sc (36) - 5 rounds

Round 11 :

(4sc, dec)x6 (30)

Round 12 :

(3sc, dec)x6 (24)

Round 13 :

(4sc, dec)x4 (20)

Info :

Cut yarn, FO with invisible join. Add fiber fill (stuff a lot to get rounded shape).

— Body :

Item Name (P1) :

Start with black yarn

Round 1 :

5sc in a mr (5)

Round 2 :

5inc (10)

Round 3 :

BLO 10sc (10)

Round 4-5 :

10sc (10) – 2 rounds

Info :

Cut yarn and FO with an invisible join. Make another leg but this time don’t cut yarn and ch2 (pic 1).

Round 6 :

Insert the hook in any of the first leg st (pic 2) and make 10sc, 2sc in the 2ch, 10sc, 2sc in the 2ch (24)

Item Name (P2) :

Body pt.2

Round 7 :

(3sc, inc)x2, 6sc, inc, 3sc, inc, 5sc (28)

Round 8 :

BLO 28sc (28)

Round 9 :

28sc (28)

Round 10 :

13sc, cc to white 2sc, cc to black 13sc (28)

Round 11 :

12sc, cc to white 4sc, cc to black 12sc (28)

Round 12 :

(3sc, dec)x2, sc, cc to white 2sc, dec, 2sc, cc to black, sc, dec, 3sc, dec, 3sc (23)

Info :

Start stuffing as you go, when you stuff the feet remember to keep them flat

Round 13 :

4sc, dec, 3sc, cc to white sc, dec, 2sc, cc to black 2sc, dec, 5sc (20)

Info :

Finish stuffing. Cut yarn leaving a long tail for sewing (pic 3).

— Arms :

Info :

Arms (x2)

Info :

Start using white yarn

Round 1 :

4sc in a mr (4)

Round 2 :

4inc (8)

Round 3-5 :

cc to black 8sc (8) – 3 rounds

Round 6 :

Fold the arm and close it making 4sc (4) Cut yarn leaving a long tail (pic 4).

— jacket’s front hem :

Info :

Start using black yarn

Round 1 :

slip knot, ch6, starting from the 2nd ch from the hook make: 1sc, 1hdc, ch 2, in the back of the 2nd ch from the hook make 1sc (pics 6-8), sc in the next 3sts.

Info :

Cut yarn leaving a ling tail for sewing (pic 5).

— jacket’s back hem :

Info :

Count 8 BLO sts (made in R8) in the back of the body (you can mark the first and last sts with a stitch marker).

Round 1 :

Insert hook in the BLO st of R8 and ch5 (the first ch doesn’t count as a st), sl st in the 2nd ch from the hook and make 2sc in the next 2sts.

Round 2 :

sl st in the next st, ch5, sl st in the 2nd ch from the hook and make 3sc in the next 3sts

Round 3 :

sl st in the next st, ch4, sl st in the 2nd ch from the hook and make 2sc in the next 2sts

Info :

Repeat R2 and R3 until you have 7 spikes (you should end with a short one of R3). Cut yarn and FO (pic 9).

— Sewing :

Info :

Sew the head to the body, add fiber fill while Sewing if needed.

Info :

Sew the arms to the body at R12-13.

Info :

Cut 2 black felt circles using pic 10 as reference and glue them on R7-9.

— Body details :

Info :

Sew the jacket’s front hem following the outline of the white Stitches.

Info :

With white cotton/acrylic yarn sew the suit’s stripes: sew the legs’ part and the upper part separately.

Info :

Cut black and white felt to make the papillon like pic.

Assembly Instructions

  • Sew the head to the body and add fiber fill while sewing to shape the neck securely and keep the head rounded.
  • Attach the arms to the body between rounds R12-R13, positioning them symmetrically and sewing through the long tail left from the arm closure.
  • Glue or sew two black felt circles (approx. 2.5cm) onto the head between R7-R9 as eyes, using pic 10 as a size reference.
  • Sew the jacket’s front hem onto the body following the white stitches outline, then sew white cotton yarn stripes onto legs and upper body separately.
  • Attach the papillon/bow tie (cut from black and white felt) to the chest center and secure with glue or whipstitch.

Important Notes

  • 💡Use a stitch marker to mark the beginning of each round to avoid losing track and maintain consistent round counts.
  • 💡When changing color (cc), secure yarn tails and weave them in neatly to prevent gaps or visible ends on the outside.
  • 💡Stuff firmly but gradually, especially the head; overstuffing can distort shaping while under stuffing makes pieces floppy.
  • 💡Work the feet flat by stuffing carefully before closing to ensure the toy stands and the proportions look correct.

You did it — Jack Skellington is complete and full of spooky charm! 🖤🧶 This plush combines soft chenille with crisp suit details for a delightful collectible. 👻 Display him as a Halloween decor piece or gift him to a fellow fan — he brings character and handmade magic! ✨

You ask,

we answer.

FAQs

What size will the finished piece be?

The finished amigurumi size may vary by yarn and tension, but using the recommended chenille and 5mm hook produces a small plush approximately 18-22 cm tall.

Can I use different yarn weights for this pattern?

Yes, but changing yarn weight will affect the final size; use an appropriate hook and be prepared to adjust stuffing and felt eye size accordingly.

Do I need prior crochet experience for this pattern?

This pattern is rated intermediate, so basic knowledge of single crochet, increases, decreases, back-loop work and color changes is recommended.

How long does this project typically take to complete?

Most crocheters complete this project in 5-7 hours, depending on experience, speed and time spent on sewing and detailing.

How do I make the suit stripes neat?

Sew the white cotton/acrylic yarn stripes onto the legs and upper body after assembling the jacket; work slowly and use photos as a guide for spacing.