🧢 Beautiful ✨ Detailed πŸ’ Adorable

Fried Egg Amigurumi Pattern

Fried Egg Amigurumi Pattern
4.0β˜… Rating
1-2 Hours Time Needed
1.5K Made This
βœ‚οΈ

Beginner Friendly Level

Perfect for those just starting their crochet journey, with clear instructions and simple techniques

⏱️

Quick Make

Complete in under 2 hoursβ€”lightning fast fun for instant gratification and quick gifts.

🎁

Tiny Treasure

Small, sweet, and gift-worthy creations that fit perfectly in the palm of your hand with detailed charm.

About This Fried Egg Amigurumi Pattern

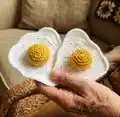
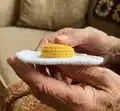
This pattern creates a cute fried egg made of two pieces β€” an egg white and a small stuffed yolk β€” worked in spiral from a magic ring. It uses basic stitches and shaping to produce a realistic, textured look that is quick to make. Perfect as a tiny gift, kitchen decoration, or playful amigurumi accessory.

Fried Egg Amigurumi Pattern crochet pattern - detailed view of completed project

Both pieces are crocheted without joining rounds (no slip stitch joins) and then sewn together. The yolk is lightly stuffed before sewing for a plump, realistic effect.

Why You'll Love This Fried Egg Amigurumi Pattern

I absolutely love this pattern because it transforms simple stitches into a playful and realistic kitchen-themed amigurumi. I enjoy how fast it works up β€” you can make one in an afternoon and have a delightful handmade gift ready. The stuffed yolk gives it a charming dimensional look that always makes me smile. I also appreciate how versatile it is: change colors or sizes and you have a whole set of breakfast friends.

Fried Egg Amigurumi Pattern step 1 - construction progress Fried Egg Amigurumi Pattern step 2 - assembly progress Fried Egg Amigurumi Pattern step 3 - details and accessories Fried Egg Amigurumi Pattern step 4 - final assembly and finishing

Switch Things Up

I love how easy it is to customize this fried egg by changing yarn colors; try cream or off-white for a different look.

If you want a flatter yolk, use less stuffing or skip the stuffing entirely for a subtle applique instead of a 3D yolk.

I often make tiny keychains by attaching a small loop and a keyring to the top of the egg white before sewing the yolk in place.

To make a larger version, use a heavier weight yarn and an appropriately larger hook; this makes a chunky, decorative piece for the kitchen.

I like to embroider a tiny smiley face on the yolk for a whimsical character β€” try different expressions to create a set of personalities.

Combine this egg with a crocheted bacon strip or toast slice for a full breakfast set that makes a delightful gift set.

Try using textured or variegated cotton for the white to achieve a more rustic, handmade look.

For a more durable toy, sew the yolk and white together with a few extra secure stitches and use tightly packed stuffing.

I sometimes add a little felt under the egg to create a non-slip base for display on shelves or plates.

Use metallic or sparkly yarn for novelty eggs that you can hang as playful decorations in a childs room or kitchen.

Experiment with placement of the yolk β€” off-center positioning makes each egg feel unique and organic.

Common Mistakes & How to Fix Them

βœ— Skipping stitch markers during the spiral makes it hard to find the start of rounds; place a marker at the first stitch and move it each round to stay oriented. βœ— Overstuffing the yolk causes the seam to puck and distort the egg white; stuff gradually and add small amounts until you reach the desired shape. βœ— Joining the rounds with a slip stitch will create a visible seam and change the stitch count; crochet continuously in a spiral as instructed to keep the shape smooth. βœ— Not counting stitches after complex rounds leads to mismatched shaping later; count your stitches at the end of each round, especially after increases. βœ— Using a much larger hook than recommended results in a floppy egg that won’t hold form; use the suggested 3 mm hook and maintain consistent tension for best results.

Fried Egg Amigurumi Pattern

Make a charming fried egg amigurumi with simple rounds and a tiny stuffed yolk. This pattern is quick, fun, and perfect for gifting or kitchen decor. You will work both pieces in a spiral from a magic ring and sew them together for a realistic finish. Clear rounds and assembly tips make this project enjoyable for crocheters.

Beginner Friendly 1-2 Hours

Materials Needed for Fried Egg Amigurumi Pattern

β€” Main Fabric

  • 01
    DMC Natura Just Cotton - White (Color 1 Ibiza) - small amount (approx 10-25 g)
  • 02
    DMC Natura Just Cotton - Yellow (Color 16 Tournesol) - small amount (approx 10-25 g)

β€” Tools Required

  • 01
    Crochet hook size 3 mm
  • 02
    Toy stuffing (small amount) for the yolk
  • 03
    2 stitch markers
  • 04
    Scissors
  • 05
    Yarn needle for sewing and weaving ends

Progress Tracker

0% Complete

β€” Pattern Notes :

Infos :

Note: This cute fried egg is made of two parts, which are sewn together. The yolk is additionally stuffed with some toy filling, for more realistic look. Both pieces require starting with a magic ring and crocheting in a spiral (without joining the separate rounds with a slip stitch). The finished piece measures approximately 4 inches and it takes about 1.5 hours to make. The pattern is written in US terms.

Info :

Gauge : 2'' = 12 sts x 13 rows in sc

β€” Egg white :

Round 1 :

6 sc in MR (6)

Round 2 :

inc x 6 (12)

Round 3 :

(sc, inc) x 6 (18)

Round 4 :

(2 sc, inc) x 6 (24)

Round 5 :

(3 sc, inc) x 6 (30)

Round 6 :

(4 sc, inc) x 6 (36)

Round 7 :

(5 sc, inc) x 6 (42)

Round 8 :

(6 sc, inc) x 6 (48)

Round 9 :

4 sc, 2 hdc, 3 dc inc, hdc, 3 sc, 3 hdc, 4 sc, hdc, dc inc, dc, hdc, 11 sc, hdc, dc inc, dc, dc inc, hdc, 7 sc (54)

Round 10 :

3 sc, 3 hdc, dc, 3 dc inc, dc, hdc, 28 sc, hdc, dc, 3 dc inc, dc, 3 hdc, 5 sc (60)

Round 11 :

5 sl st, 11 sc, 3 sl st, 5 sc, 2 sl st, 4 sc, inc, 3 sc, 3 sl st, 8 sc, hdc, dc, 3 dc inc, dc, hdc, 3 sc, 5 sl st (64)

Info :

Fo and weave in the ends.

β€” Yolk :

Round 1 :

6 sc in MR (6)

Round 2 :

inc x 6 (12)

Round 3 :

(sc, inc) x 6 (18)

Round 4 :

(2 sc, inc) x 6 (24)

Round 5-7 :

sc around (24)

Round 8 :

sl st around (24)

Info :

Fo and weave in the ends.

β€” Assembly :

Info :

Choose the right spot for the yolk and sew it to the egg white. Ideally do it with your white yarn, using some hidden seam. Stuff it just before finishing the seam. Well done! You have just made your perfect fried egg :) What are you going to cook crochet next?

Assembly Instructions

  • Choose the right spot for the yolk and sew it to the egg white using a hidden seam so stitches are not visible.
  • Use your white yarn to stitch the yolk in place, securing evenly around the edge to avoid gaps between pieces.
  • Lightly stuff the yolk with toy filling before finishing the seam so the yolk sits plump and natural on the egg white.
  • Weave in all ends neatly on the wrong side and trim excess yarn to keep the finished egg tidy and secure.

Important Notes

  • πŸ’‘Work both pieces in a spiral without slip stitch joins for a smooth, seamless appearance.
  • πŸ’‘Place stitch markers at the beginning of rounds to help keep track when working continuously.
  • πŸ’‘Weave in ends and secure stitching on the seam to prevent the yolk from shifting or coming loose.

This cheerful Fried Egg pattern is a tiny, playful addition to your handmade collection and makes a lovely quick gift. 🍳🧢 The pattern is simple, fun, and great for practicing spiral crochet and shaping with increases. 🧡✨ Enjoy making breakfast-themed amigurumi and share your finished pieces to brighten someones day!

You ask,

we answer.

FAQs

What size will the finished piece be?

The finished amigurumi measures approximately 4 inches across when using the recommended DMC Natura Just Cotton and 3 mm hook.

Can I use different yarn weights for this pattern?

Yes, you can use different yarn weights but this will affect the final size; choose an appropriate hook for your yarn and expect changes in dimensions.

Do I need prior crochet experience for this pattern?

This pattern is beginner friendly, but you should be comfortable with magic ring, single crochet, and basic increases to follow the rounds easily.

How long does this project typically take to complete?

Most crocheters complete this project in 1-2 hours, depending on experience and how quickly you sew the pieces together.