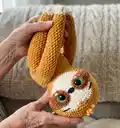
🧢 Beautiful ✨ Detailed πŸ’ Adorable

Samantha the Sloth Amigurumi Pattern

Samantha the Sloth Amigurumi Pattern
4.1β˜… Rating
5-7 Hours Time Needed
4.1K Made This
βœ‚οΈ

Beginner Friendly Level

Perfect for those just starting their crochet journey, with clear instructions and simple techniques

⏱️

Weekend Treat

Takes 5-7 hours, making it an enjoyable project to finish over a couple of days.

🧸

Cute Companion

An adorable friend to cherish, handcrafted with love to bring comfort and joy for years to come.

About This Samantha the Sloth Amigurumi Pattern

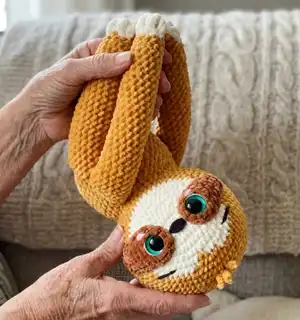
This pattern creates a sweet plush sloth amigurumi named Samantha using chunky velvet yarn and a 5.00mm hook. It includes full instructions for the head, eye patches, body, arms, fingers, legs and final assembly. The design uses simple stitches worked in spiral and includes detailed tips for finishing and embroidering the face.

Samantha the Sloth Amigurumi Pattern crochet pattern - detailed view of completed project

Clear step-by-step rounds and photo guides are included to help you through shaping and assembly. Small accessories like safety eyes and optional velcro make this sloth ready to hug or hang.

Why You'll Love This Samantha the Sloth Amigurumi Pattern

I absolutely love this pattern because it takes simple stitches and turns them into a charming, expressive sloth that really feels handmade. I enjoyed designing the face so it looks sweet and sleepy while still being quick to crochet. The pattern is forgiving and great for practicing consistent tension and finishing techniques. Sewing the pieces together and adding the tiny embroidered details is the most rewarding part for me β€” it brings the sloth to life.

Samantha the Sloth Amigurumi Pattern step 1 - construction progress Samantha the Sloth Amigurumi Pattern step 2 - assembly progress Samantha the Sloth Amigurumi Pattern step 3 - details and accessories Samantha the Sloth Amigurumi Pattern step 4 - final assembly and finishing

Switch Things Up

I love how easy it is to customize Samantha by changing colors β€” try pastel shades for a softer, nursery-friendly sloth or bold brights for a whimsical look.

Want a mini or giant version? Change the yarn weight and hook size; a bulky yarn with a large hook makes a chunky cuddly sloth while a thinner yarn and smaller hook creates a tiny keychain friend.

I often swap safety eyes for embroidered or felt eyes for baby-safe toys β€” this changes the personality entirely and keeps the toy toddler-friendly.

Try adding tiny crocheted props like a leaf or a tiny crochet cup to give your sloth a theme, or embroider different smiles to alter expressions.

For posability, insert thin wire or pipe cleaners into arms and legs (careful with sharp ends) so you can wrap the sloth around branches or hold it in different poses.

Mix yarn textures: use plush yarn for the body and a smooth cotton for patches to create contrast and tactile interest.

I sometimes add tiny outfits or scarves β€” practice small color changes and simple seams to make removable accessories.

Experiment with stitch tension: tighter tension gives a firmer toy while looser tension produces a softer, floppy sloth.

Personalize with initials or a small embroidered heart on the belly to turn the sloth into a special gift for somebody dear.

If you like, make a family of sloths in coordinating colors using the same pattern but different colorways to create a cohesive set.

Common Mistakes & How to Fix Them

βœ— Skipping the stitch marker at the start of each round can cause you to lose your place; place and move a marker after each round to stay on track. βœ— Forgetting to switch colors exactly where instructed will show a visible seam; follow the color-change rounds carefully and hide the tail under the eye patch if needed. βœ— Overstuffing the head and body will distort the shape and make seams hard to close; stuff gradually and check shape often while continuing to crochet. βœ— Not counting stitches during increases and decreases causes uneven shaping; count your stitches at the end of each round, especially after increases or decreases. βœ— Pulling yarn too tightly when working Yarn Under creates a very stiff fabric; maintain a relaxed, consistent tension with the Yarn Under technique to keep fabric plush.

Samantha the Sloth Amigurumi Pattern

Make your own cuddly Samantha the Sloth with this friendly crochet pattern. You will follow clear, picture-backed steps to crochet a soft, poseable sloth using chunky velvet yarn. The pattern includes full head, body, limbs, eye patches, embroidery and assembly instructions so you can finish a charming handmade gift. Perfect for gifting or decorating a cozy shelf.

Beginner Friendly 5-7 Hours

Materials Needed for Samantha the Sloth Amigurumi Pattern

β€” Main Fabric

  • 01
    Premier Yarns - Parfait Chunky (main velvet/chunky plush yarn), approximately 100-200g depending on size (Main color: 2 skeins suggested for standard size Samantha - Mustard shown)
  • 02
    Cream yarn (face and fingers) - less than a skein
  • 03
    Teddy Bear / darker brown yarn for eye patches - less than a skein
  • 04
    Leftover yarn in white, pink and black for eyes, cheeks, nose and mouth details
  • 05
    Optional: Toffee or alternate main colors for other versions

β€” Tools Required

  • 01
    Crochet hook size 5.00mm (H)
  • 02
    Safety eyes 23mm (2 pieces) for Samantha (or 14mm for smaller Pierre version)
  • 03
    Polyester fiberfill for stuffing
  • 04
    Yarn needle for sewing and embroidery
  • 05
    Scissors
  • 06
    Stitch markers or a piece of scrap yarn
  • 07
    Optional: Velcro pieces to attach limbs, optional pipe cleaners for posability

Progress Tracker

0% Complete

β€” Head :

Info :

Start with Cream yarn. You will be working around the foundation chain for the face.

Round 1 :

ch 10, inc in the 2nd ch from the hook, sc 7, sc 4 in the last ch. Working on the other side of the ch : sc 7, inc. (22)

Round 2 :

inc x2, sc 7, inc x4, sc 7, inc x2 (30)

Round 3 :

(sc 4, inc) x6 (36)

Round 4 :

sc 2, inc (sc 5, inc) x5, sc 3 (42)

Round 5 :

sc 6, inc, sc 3 | *change for main color: sc 2 | *go back to cream color: sc, inc, (sc 6, inc) x4 (48)

Round 6 :

sc 3, inc, sc 5 | *main color: sc 2, inc, sc 3 | *cream color: sc 4, (inc, sc 7) x3, inc, sc 4 (54)

Info :

Cut the cream yarn and continue with main color (do not worry about the color change, it will be hidden by the eye patch!).

Round 7 :

(sc 8, inc) x6 (60)

Round 8 :

sc 4, inc, (sc 9, inc) x5, sc 5 (66)

Round 9-20 :

sc around (12 rounds total) (66)

Round 21 :

sc 4, dec, (sc 9, dec) x5, sc 5 (60)

Round 22 :

(sc 8, dec) x6 (54)

Round 23 :

sc 3, dec, (sc 7, dec) x5, sc 4 (48)

Round 24 :

(sc 6, dec) x6 (42)

Round 25 :

sc 2, dec, (sc 5, dec) x5, sc 3 (36)

Round 26 :

(sc 4, dec) x6 (30)

Info :

Start stuffing and continue as you go.

Round 27 :

sc, dec, (sc 3, dec) x5, sc 2 (24)

Round 28 :

(sc 2, dec) x6 (18)

Round 29 :

(dec, sc) x6 (12)

Round 30 :

dec x6 (6)

Info :

Finish stuffing. Do not close the opening just yet and continue to the Eye Patch section.

β€” Eye Patch (x2) :

Info :

You will be working around the foundation chain for the face. With the darker color (eye patch color).

Round 1 :

Ch 9, starting in the 3rd ch from the hook: dc-inc, dc-inc, dc, hdc 3, sc 4 in the last ch. Working on the other side of the ch: sc 4, hdc, hdc-inc. (19)

Round 2 :

dc-inc, hdc-inc, hdc 4, sc, sl st 3 (end of the round here) (12)

Info :

Place one eye patch with the right side of the stitches facing and the other eye patch with the wrong side facing. Secure the eyes into the last chain (where you made 4 sc) and secure them. Embroider the cheeks under the eyes with pink yarn and tie a knot to secure it. Embroider a white line to the outer side of the eyes and tie a knot to secure it.

Info :

Face shaping (with a strand of worsted weight yarn of a similar color) - only if you are using safety eyes, skip this step if you are embroidering the eyes or using felt eyes: Insert the needle and bring it out between rounds 1-2 on one side; insert the needle one st to the side and repeat on the other side; bring the needle at the back, pull on the strands and tie 2-3 knots to deepen the sts.

Info :

Embroider the nose with dark grey or black yarn: insert two sewing pins on both sides of the magic ring to mark the sides of the nose, insert the needle and push it out through one pin, insert the needle through the other pin and push it out through the first point; repeat about 3-5 times or until you are happy with the look. Bring the needle to the back.

β€” Body :

Info :

With main color.

Round 1 :

mr of 8 sc (8)

Round 2 :

inc x8 (16)

Round 3 :

(sc, inc) x8 (24)

Round 4 :

(sc 3, inc) x6 (30)

Round 5 :

sc, inc, (sc 4, inc) x5, sc 3 (36)

Round 6 :

(sc 5, inc) x6 (42)

Round 7 :

sc 2, inc, (sc 6, inc) x5, sc 4 (48)

Round 8-16 :

sc around (9 rounds total) (48)

Round 17 :

sc 2, dec, (sc 6, dec) x5, sc 4 (42)

Round 18 :

(sc 5, dec) x6 (36)

Info :

Stuff the body and make an invisible fasten off (see 'Tips' section). Sew the body to the head.

β€” Arms (x2) :

Info :

With main color. Read the tip at the bottom of the page about length. You can adjust rounds to make arms longer or shorter.

Round 1 :

mr of 6 sc (6)

Round 2 :

(inc, sc) x3 (9)

Round 3 :

(sc 2, inc) x3 (12)

Round 4-5 :

sc around (2 rounds) (12)

Round 6 :

(sc 3, inc) x3 (15)

Round 7-30 :

sc around (15)

Info :

You can make the arms as long as you want by making more or less rounds of 15 stitches. For my Mustard sloth I made a total of 24 rounds of 15 stitches and for my Toffee sloth I made them longer with a total of 36 rounds of 15 stitches. Once you've reached the desired length, go to the next round. Start stuffing when the arms are becoming too long for you to reach the tip. Lightly stuff it, just enough so it keeps its shape, but still very soft.

Round 31 :

(sc 3, dec) x3 (12)

Info :

Do not cut the yarn for now and make the fingers (version A) or finish as noted in Version B tip.

β€” Fingers (Version A) :

Item Name (Fingers) :

Make sure that the last st of the arm is on one side, not in the middle. Insert your hook between rounds 4-5 and join cream yarn. Ch 6, starting in the 2nd ch from the hook: sl st 5 (first finger). Sl st in the next st of the arm. Repeat to make 2 more fingers. Cut the yarn and leave a yarn tail of about 6" (15 cm). Using the yarn tail, insert the needle through the last st (where you sl st) and push it out through the middle of the magic ring. Insert the needle at the tip of one outer finger, then at the tip of the outer finger and finally at the tip of the middle finger. Insert the needle through the middle of the magic ring and push it out in the arm. Bring the other yarn tail through the same st, tie 2 knots and hide the yarn tails.

Info :

Stuff the arm if it was not already, and close the opening by making 6 sc through both sides (see 'Tips' section). Sew the first arm to the body (wait for the second arm): in line with the eye closer to the back (white line), the top of the arm should be 1 round lower than the neck. If you want the arms to stay straight when you lift the sloth, sew following the black dotted line.

β€” Legs (x2) :

Info :

Possible to make Version A or B. With main color.

Round 1 :

mr of 6 sc (6)

Round 2 :

inc x6 (12)

Round 3 :

(sc 3, inc) x3 (15)

Round 4-5 :

sc around (2 rounds) (15)

Round 6 :

(sc 4, inc) x3 (18)

Round 7-26 :

sc around (18)

Round 27 :

(sc 4, dec) x3 (15)

Info :

Do not cut the yarn for now and make the fingers (for Version A). Stuff the leg and close the opening with 7 sc.

β€” Assembly & Final Notes :

Info :

Sew the eye patches to the face: the inner part as close as possible to the nose and the outer part between rounds 9-10 on the head (do not forget to hide the color change). Embroider the cheeks and small white highlights as pictured. Sew the eye patch inner and outer parts in place, then secure safety eyes if used. Embroider eyebrows slightly above the eye patch (push needle out between rounds 5-6, then for the other eyebrow insert between rounds 6-7 slightly lower). Close the opening at the back of the head using the invisible fasten off method.

Info :

Add some hair with 3 strands of main color of 6" (15cm) each (insert hook between rounds 8-9 and add strand; repeat for a total of 3 strands and cut yarn short enough so it stays upright).

Info :

Sew the body to the head. Sew the limbs: sew the first leg 1 round lower than the arm. Sew the other arm and leg to the back of the body, in line with the back of the head (white line). Optional: sew pieces of Velcro to the tip of the limbs or sew the limbs together for hanging arms/legs.

Info :

Congratulations! Your sloth is complete.

Assembly Instructions

  • Sew the body to the head, aligning the body top with the base of the head and using an invisible whipstitch for a seamless join.
  • Position and sew the eye patches: inner piece as close as possible to the nose and the outer piece between rounds 9-10 of the head, hiding the color change under the patch.
  • Attach arms to the sides of the body in line with the eyes; the top of the arm should sit one round lower than the neck so the sloth holds its arms naturally.
  • Sew legs to the bottom of the body; place the first leg one round lower than the arm for correct balance and symmetry.
  • Add fingers by inserting yarn tails through the arm tips and securing in the middle of the magic ring; tie multiple knots and hide tails inside the arm.
  • Close openings with invisible fasten off or single crochet closures: use the 'closing an opening' method from the Tips section to make neat edges.

Important Notes

  • πŸ’‘Use a stitch marker to mark the beginning of each round and move it up after completing every round to keep track of spiral rounds.
  • πŸ’‘Work in a continuous spiral and do not join rounds unless the pattern explicitly instructs you to do so.
  • πŸ’‘Use the Yarn Under technique if you want tighter, neater stitches with this plush yarn, following the Tips section visuals.
  • πŸ’‘Stuff firmly but gradually β€” stuffing too much will distort the shape, too little will make the toy floppy.
  • πŸ’‘Pin parts in place before sewing to ensure correct alignment and symmetry, especially for face features.

This Samantha the Sloth pattern brings a cuddly little friend into your hands with chunky plush yarn and simple stitches. It combines easy-to-follow rounds with photo tips and clear finishing techniques to make sewing and embroidery a breeze. Perfect for gifting or keeping β€” small, soft, and full of personality. 🧢🐾😊

You ask,

we answer.

FAQs

What size will the finished piece be?

The finished amigurumi measures about 10" (25 cm) tall when using Parfait Chunky yarn and a 5.00mm (H) hook as indicated in the pattern.

Can I use different yarn weights for this pattern?

Yes, you can use different yarn weights but this will affect the final size; use an appropriate hook for your chosen yarn and expect size variations.

Do I need prior crochet experience for this pattern?

This pattern is beginner friendly, but you should be comfortable with basic stitches (sc, inc, dec) and working in a spiral for the best results.

How long does this project typically take to complete?

Most crocheters complete this project in 5-7 hours, depending on experience and the level of detail added like embroidery and hair.