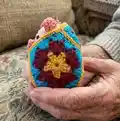
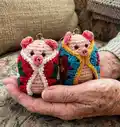
Make a tiny, adorable pig wrapped in a colorful granny square blanket. This sweet amigurumi is perfect as a gift or a festive ornament and uses small amounts of yarn. Follow the clear, step-by-step instructions to crochet the body, ears, snout and granny square blanket, then assemble for a delightful finished piece.
Progress Tracker
0% Complete
— Body :
Info :
Worked in continuous rounds from the top down. Mark the beginning of each round and move your marker up as you start each round
Round 1 :
Using 3mm hook and MC EITHER, ch 2 and then work 6 sc into 2nd ch from hook OR work 6 sc into a magic ring and then tighten (6)
Round 2 :
2sc in each stitch around (12)
Round 3 :
*1sc in next stitch, 2sc in next stitch* repeat from *to*, around (18)
Round 4 :
*1 sc in next 2 stitches, 2sc in next stitch* repeat from * to* around (24)
Round 5 :
Sc in every stitch (24)
Round 6 :
Sc in every stitch (24)
Round 7 :
Sc in every stitch (24)
Round 8 :
Sc in every stitch (24)
Round 9 :
*Sc in next 3 stitches, 2sc in next stitch* repeat from * to* around (30)
Round 10 :
Sc in every stitch (30)
Round 11 :
Sc in every stitch (30)
Round 12 :
Sc in every stitch (30)
Info :
Place eyes, (either safety eyes or french knots) now, between rows 6 and 7, positioning them 2 to 3 stitches apart
Round 13 :
Sc in every stitch (30)
Round 14 :
Sc in every stitch (30)
Round 15 :
Sc in every stitch (30)
Round 16 :
Sc in every stitch (30)
Round 17 :
Sc in every stitch (30)
Round 18 :
*Sc in next 3 stitches, sc2tog* , repeat from * to * (24)
Round 19 :
*Sc in next 2 stitches, sc2tog* repeat from *to* (18)
Info :
Stuff most of the body at this point, topping up as needed after the next row.
Round 20 :
*Sc in next stitch, sc2tog* repeat from * to * (12)
Round 21 :
*Sc2tog* , repeat from * to * (6)
Round 22 :
Fasten off and pass yarn tail through remaining stitches, pull up tightly and sew in end.
— Ears :
Row 1 :
Using 1.5mm hook and SCL and leaving a long tail for sewing up. Chain 10, turn
Rnd 2 :
Skip first stitch, sc in next 9 chains, ch 1, turn
Row 3 :
Skip first stitch, sc in next 8 stitches, ch 1, turn
Row 4 :
Skip first stitch, sc in next 7 stitches, ch 1, turn
Row 5 :
Skip first stitch, sc in next 6 stitches, ch 1, turn.
Row 6 :
Skip first stitch, sc in next 5 stitches, ch 1, turn
Row 7 :
Skip first stitch, sc in next 4 stitches, ch 1, turn
Row 8 :
Skip first stitch, sc in next 3 stitches, ch 1, turn
Row 9 :
Skip first stitch, sc in next 2 stitches, ch 1, turn
Row 10 :
Skip first stitch, sc in next stitch, cut yarn (leaving a long end for sewing up and pull through loop to finish off and create point of triangle
— Snout :
Info :
Worked in the round.
Rnd 1 :
Using 1.5mm hook and SCL , Work 6 sc into a magic ring, tighten ring (6)
Rnd 2 :
2 sc in each stitch around (12)
Rnd 3 :
Working in back loops, sc in each stitch (12)
Rnd 4 :
Sc in each stitch (12)
Info :
Fasten off but leave ends for sewing up. With black/dark brown yarn make 2 small stitches at either side of the front of the snout to create nostrils
— Blanket :
Info :
Using 2.5mm hook and C1, chain 25
Round 1 :
2 dc in 4th ch from hook, *skip 2chains, in next chain work 3 dc* repeat from * to * until there are 3 ch left (6 dc3 clusters) skip 2 chains, in last chain work 3dc, ch2, 3dc, ch 2, 3dc. Continue working along opposite side of the initial chain *skip 2chains, dc 3 in next chain* repeat from * to * last 2 unworked chains. Skip these 2 chains and in final chain work 3 dc, ch 2, 3dc, ch2. Join with a slip stitch to initial chain to close the round.
Round 2 :
With right side facing, join C2 between any 2 3dc clusters on long side. Ch3 (counts as 1st dc), 2dc in same space. Work 3dc in every space between clusters. In each corner chain 2 space, work 3dc ch 2 3dc. Slip stitch to top of chain 3 to close the round.
Round 3 :
In C3 repeat round 2.
Round 4 :
With right side facing, join C1 in any stitch along either long side, ch1 and then work 1sc in each stitch around. In each corner ch 2 space, work1sc, ch 2 1sc.
Info :
Fasten off and neaten ends.
— Assembly :
Step 1 :
Fold point of ear down to either corner and secure with a stitch, this makes the fold in the pigs ear. Repeat with the other ear but fold to the opposite corner. You should have 2 symmetrical folded ears. Stitch the ears to either side of the top of the head positioning them between rows 2 and 5 (approx)
Step 2 :
Add a tiny bit of stuffing if desired and stitch the snout to the front of the head in between and one row down from the eyes.
Step 3 :
Wrap the blanket around your pig securing with pins if necessary and once you’re happy with the position stitch in place along the top edge and the 2 top corners. I find invisible sewing thread ideal for this.
This tiny pig in a granny square blanket is a joyful, colourful make that fits in the palm of your hand. 🐷🧶
Perfect as a quick gift or a festive ornament, it uses small yarn scraps and simple stitches to make a big impression. ✨
Happy crocheting and enjoy personalising each little pig with your favourite colour combinations! 🎀