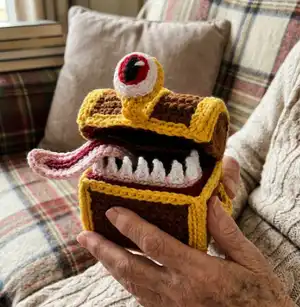
This playful Mimic chest amigurumi pattern teaches you how to crochet a tiny treasure with a hinged, toothy mouth, keyhole and eyeball. You will build the chest panels, trim, tongue, teeth, and assemble using clear step-by-step instructions. The pattern uses worsted weight yarn and simple shaping to create a charming, poseable miniature mimic for games or display. Ideal for crocheters who enjoy small sewn assemblies and fun finishing details.
Progress Tracker
0% Complete
— Color Palette :
Info :
Chest: Brown 50 yd. Trim: Gold 40 yd. Mouth: Dark Red 62 yd. Tongue: Pink 11 yd. Teeth: White. Scrap amount of black and white for eye/teeth.
— Materials :
Info :
3.75mm (F) hook. Worsted Weight (4) yarn. Pinch of stuffing. Optional: 7-count plastic canvas (1 sheet). Sewing thread (any color). Small buttons or 10~14g wire.
— Stitches Used (US Terms) :
Info :
magic ring. slst: slip stitch. sc: single crochet. inc: single crochet increase. dec: single crochet decrease. dec: single crochet decrease. Picot: Ch2, slst in first ch made. BLO: Back loops only. FLO: Front loops only. hdc: half double crochet. dc: double crochet.
— Example (F) :
Round r1 :
sc 6 in magic ring (6)
Round r3 :
*1sc, inc* (18)
Round r4 :
*2sc, inc* (24)
Round r5 :
*3sc, inc* (30)
Round r7a :
slst around (30)
Round r7b :
sc around (30)
Round r8 :
2sc, inc, *4sc, inc* x5, 2sc (36)
Round r9 :
5sc, {sc, hdc, sc}, 30sc (38)
Info :
Repeat directions *in asterisks* to the end of the round. When working in multiples of 6, it will be repeated 6 times. Stitches grouped in brackets all go into the same space. Cleanly changing to a new color takes two rounds (A then B) so rounds still count easily.
— Short Side x2 :
Round r1 :
Ch10. sc across (9)
Round r2-8 :
Ch1, turn. sc across (9)
Info :
Finish off, turn, reattach at corner with Trim. (BLO). Insert hook, pull up loop, ch1 to start. (ch1 counts as the first slst of r9a). Ch2 at the corners count as one space. (Increases land in these)
Round r9a :
BLO: slst around, ch2 at corners (38)
Round r9b :
BLO: sc around, inc in ch2 spaces (42)
Info :
Finish off, leave a Trim tail for sewing.
— Tips for clean borders :
Infos :
The border takes two rounds: Prep round A (slst around, ch2 at corners), Border round B (sc around, inc in the ch2 spaces). Keep your slst's loose or it will drawstring and warp rectangles. When working the A round: Catch a single loop to slst in. Don’t work too deeply into the fabric. The number of slst’s along the unfinished side will match the number of rows in the shape. Ch2 at each corner.
Info :
When working the B round: Work in the BLO of Trim, plus the single loop of Chest. (The inc's go into the ch2 space, so BLO doesn’t apply to them.) Finish off with an invisible finish for best results. We’re going to border every piece like this; refer back if you need to.
— Long Side x2 :
Round r1 :
Ch13. sc across (12)
Round r2-8 :
Ch1, turn. sc across (12)
Round r9a :
BLO: slst around, ch2 at corners (44)
Round r9b :
BLO: sc around, inc in ch2 spaces (48)
Info :
Finish off, leave a tail for sewing.
— Bottom x1 :
Round r1 :
Ch13. sc across (12)
Round r2-9 :
Ch1, turn. sc across (12)
Round r10a :
BLO: slst around, ch2 at corners (46)
Round r10b :
BLO: sc around, inc in ch2 spaces (50)
Info :
Finish off, leave a tail for sewing. Mark this piece so you remember it’s the bottom (it’s very similar to the long sides).
— Top x1 :
Round r1 :
Ch13. sc across (12)
Round r2-16 :
Ch1, turn. sc across (12)
Round r17a :
BLO: slst around, ch2 at corners (60)
Round r17b :
BLO: sc around, inc in ch2 spaces (64)
Info :
Finish off, leave a tail for sewing.
— Top Side x2 :
Round r1 :
3sc in magic ring (3)
Round r4 :
*2sc, inc* (12)
Round r5 :
*3sc, inc* (15)
Info :
Turn, reattach with Trim. Use a long starter tail to do r6a. Then, use the master strand to do r6b without turning.
Round r6a :
BLO slst across (15)
Round r6b :
BLO *4sc, inc* (18)
Info :
Finish off, leave a tail for sewing.
— Handles x2 :
Round r1 :
Ch 8. Start in second ch from hook: 2sc, inc, inc, inc, 2sc (10)
Info :
Finish off, leave a tail for sewing.
— Mouth Top :
Round r1 :
Ch14. sc across (13)
Round r2-15 :
sc across (13)
Info :
Finish off. Reattach and work along raw edge. (There’s no row of slst’s, and you don’t have to keep it clean because it’s the same color.)
Round r1 :
Sc across (15). ch1, turn
Round r2 :
Dec, dec, dec, 3sc, dec, dec, dec (9)
Round r3 :
Dec, dec, 1sc, dec, dec (5)
Round r4 :
Dec, 1sc, dec (3)
Info :
Finish off. Repeat Sides r1-4 on the other raw edge. The shape will curl like a boat, to fit inside the top. Leave one tail for sewing.
— Long Brace :
Round r1 :
Ch32. Start in second ch from hook: 30sc, {1sc, ch1, 1sc, ch1, 1sc} in last ch. Continue along other side of chain: 30sc
Info :
Finish off, leave a tail for sewing. Optional: If you want to use wire to flip the eye up (instead of a button), cut a short piece of wire and bend it to fit the shape. On r1, start sc’ing around wire at about 18 sc in. Continue sc’ing around the wire to the same spot on the other side. Bend two short prongs out at 90° to plug into the top. Trim excess.
— Mouth Bottom :
Round r1 :
Ch5. Start in third chain from hook: 2sc, {3sc} in last ch, continue around other side of ch 2sc, {3sc} in ch2 space (10)
Round r2 :
2sc, inc, inc, inc, 2sc, inc, inc, inc (16)
Round r3 :
3sc, inc, inc, 1sc, inc, inc, 3sc, inc, inc, 1sc, inc, inc (24)
Round r4 :
4sc, inc, inc, 3sc, inc, inc, inc, 5sc, inc, inc, 3sc, inc, inc, 1sc (32)
Round r5 :
5sc, inc, inc, 5sc, inc, inc, inc, 7sc, inc, inc, inc, 5sc, inc, inc, 2sc (40)
Round r6-9 :
sc around (40)
Round r10 :
6sc, inc, inc, 7sc, inc, inc, 9sc, inc, inc, inc, 7sc, inc, inc, inc, 3sc (48)
Round r11-15 :
sc around (48)
Round r16 :
BLO: 11hdc, {1hdc, ch1, 1hdc}, 9hdc, {1hdc, ch1, 1hdc}, 13hdc, {1hdc, ch1, 1hdc}, 9hdc, {1hdc, ch1, 1hdc}, 2hdc
Info :
The ch1’s of r16 are the corners. Finish off, leave a tail for sewing. This piece is wrong-side-out so inside you see the right side.
— Keyhole :
Round r1 :
6sc in magic ring (6)
Round r3 :
*1sc, inc* (18)
Info :
Finish off, leave a tail for sewing. Optional: If you want a button flip, make a small secure loop when weaving tails. With black, embroider a keyhole (messy back is okay).
— Eyeball :
Round r1 :
5sc in magic ring (5)
Info :
Cut yarn, pull tail through, do an invisible finish. Change to white, leave a starting tail to embroider shine.
Round r3a :
BLO slst around (10)
Round r3b :
*1sc, inc* - work through BLO of both colors (15)
Info :
Finish off, leave a tail to sew to keyhole. With a strand of black, embroider a slit pupil with 3 passes. Use white tail to embroider a shine (1 pass). Knot and trim tails. Sew to back of Keyhole through BLO of White into back bars of Trim. Stuff before closing. (This is the only piece with stuffing.)
— Invisible Finish :
Infos :
Skip first stitch. Insert hook under both loops from the back. Pull tail through. Insert hook under BLO of last stitch of the round from the back. Pull tail through. Adjust tension as needed for a seamless finish.
— Teeth :
Round r1 :
Ch 22. Start in second ch from hook. slst, *[ch3, slst, 1sc], slst in next, slst in next*
Info :
Finish off. Change to Tongue. Work r2 across other side as shown. Pull up a loop here to start.
Round r2 :
*BLO slst, slst, sc*, slst, slst, slst (22)
Info :
The sc’s here are worked around the entire piece, going between the teeth. They do not occupy a loop of the starting chain. Finish off, leave a tail for sewing. Pin and sew the tongue to the back of the mouth. Pin and sew teeth strip along the mouth/head seam. Sew through BLO of the gums.
— Tongue :
Round r1 :
Ch32. Start in second ch from hook: 30sc, {1sc, ch2, 1sc} in last ch. Continue along other side of chain: 30sc. ch1, turn.
Round r2 :
31sc, {4sc} in ch2 space. Continue along other side of chain: 31sc
Info :
Finish off, leave a Tongue tail for sewing. With Mouth, reattach in center at bottom. Slst going through the tongue. Work up to the tip. Finish off.
— Bottom Assembly :
Infos :
For a strong structure, use 7-count plastic canvas on the back of every chest piece (optional - without it the chest will be squishy). It comes in stiff and flexible versions; flexible is better for curved top. Trace canvas to fit within back bars of stitches for seam allowance. Measurements (holes length x height) used: Short sides x2: 20 x 16. Long sides x2: 25 x 16. Bottom x1: 25 x 18. Sewing thread is easier for attaching canvas. Lay pieces out in formation, use safety pins or stitch markers to hold them while sewing. Sew BLO to BLO with a whip stitch.
— Top Assembly :
Infos :
Continue with the plastic canvas sewing. Measurements used: Top sides x2: a semi circle 17 wide and 8 tall. Top x1: 25 x 26. The top is made differently to curve; the plastic piece will appear short when laid flat. Start by sewing down one short edge. Use a hair tie or yarn to hold the shape in a bend while you sew the rest. Safety pin the sides to the top. Sew BLO to BLO with a whip stitch. Pin the mouth boat into the top of the chest. Sew together BLO to back bars or BLO to plastic canvas.
— Mouth Assembly :
Infos :
Center the teeth and pin them in place. Sew them to the mouth bucket through the BLO of the gums to the BLO of the mouth. Mark the back center of the mouth, then pull it out to sew the tongue in. Push back inside. Sit the mouth inside the box; mush and flatten the bottom pressing it into the box. Sew up the sides going through BLO to BLO.
— Chest Assembly :
Infos :
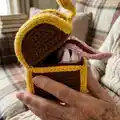
Use safety pins or round markers to line the top up with a long side. Sew BLO to BLO on the one hinged side. Pin the long brace over the chest and sew through the back bars onto the chest. If using wire in your brace plug the bent ends into the chest between the fabric and the plastic and internally bend them. Sew the Keyhole/Eyeball to the end of the Brace so the Keyhole flips up to reveal the Eyeball. If using buttons: flip the Eyeball up and mark where the loop lands. Sew a button here and 4-6 more buttons along the brace for decorative camouflage. Finish off and weave in ends.
This playful Mimic chest is a tiny, whimsical companion perfect for gamers and makers alike. The hinged mouth, teeth, tongue and flip-up eyeball add personality and charm to any shelf or game table. Make it as a gift or to store dice and small treasures — it’s sure to spark smiles and curiosity. 🧶🧵