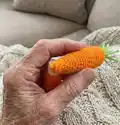
About This Carrot Lip Balm & Gift Holder Pattern
This pattern creates a small carrot-shaped lip balm holder that fits a standard lip balm tube and works as a rolled-bill gift holder. The project uses continuous rounds, simple single crochet stitches, and easy finishing to make a neat pointed carrot and a removable lid. The pattern includes clear rounds, assembly steps, and instructions for attaching green yarn strands for the carrot top.
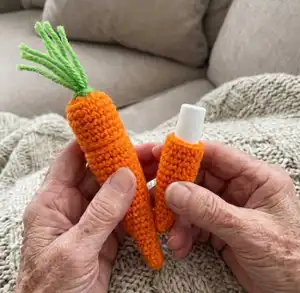
Designed for quick makes and gifts, this pattern is ideal for beginners who know basic crochet stitches. You will get finished measurements, gauge info, tools list, and complete rounds for both the main carrot body and the top.
Why You'll Love This Carrot Lip Balm & Gift Holder Pattern
I absolutely love this pattern because it turns a tiny, everyday item into a playful handmade gift that anyone will smile at. I enjoy the small, satisfying rounds of single crochet that quickly build a polished shape. The removable top and the simple green strands let me add little finishing touches that make each carrot unique. I also love giving these as quick gifts — they are adorable, practical, and fast to make.
Switch Things Up
I love customizing this carrot by changing yarn colors to make different seasonal variations; try pastels for Easter or deep oranges for fall.
I often make a keychain version by adding a small metal ring to the top; simply attach a split ring to the green strands or sew a loop into the top before finishing.
To make a tiny version for a keyring, switch to a sport or fingering weight yarn and a smaller hook; conversely, use bulky yarn for an oversized, plush carrot.
I sometimes add embroidered details like small ridges or a stitched smile to give each carrot personality and character.
Swap the green strands for a crocheted pom pom or small leaves worked separately and sewn to the top for a different look.
I recommend lining the inside with a small piece of felt if you plan to put cash or delicate items inside to protect the yarn from wear.
Try adding a tiny ribbon or small charm around the base of the green strands to make it gift-ready instantly.
For stability, you can lightly stuff the bottom section if you prefer a firmer shape; use small amounts of stuffing near the closed pointed tip only.
I sometimes make matching sets with different colored tops or add a small stitched initial on each one to personalize for recipients.
Remember to experiment with hook size and tension until you get the exact fit for your lip balm tube — I always test-fit as I go to ensure a snug, removable lid.
Common Mistakes & How to Fix Them
✗ Skipping the instruction to work in continuous rounds; this will create visible joins and uneven spiral shaping; instead work in continuous rounds and use a stitch marker to mark the beginning of each round.
✗ Forgetting to close and secure the magic ring at the beginning; this leaves a large hole on the pointed tip and the top; weave in and pull the magic ring closed immediately and secure the tail with a tapestry needle.
✗ Not counting stitches after increases; this can produce incorrect shaping and an uneven circumference; count stitches at the end of each increase round to ensure the correct stitch total.
✗ Attaching the green strands incorrectly or unevenly; this makes the carrot top look messy and lopsided; fold the strands evenly, insert under the closed magic ring and pull tightly so the fold sits flush at the top.
✗ Not weaving in the starting tail at the beginning; as the piece narrows it becomes hard to reach the tail later; weave in and secure the beginning tail right after closing the magic ring to avoid problems later.