🧢 Beautiful ✨ Detailed πŸ’ Adorable

Reversible Muffin Toy Amigurumi Pattern

Reversible Muffin Toy Amigurumi Pattern
4.8β˜… Rating
5-7 Hours Time Needed
3.0K Made This
βœ‚οΈ

Intermediate Level

Ideal for those with basic crochet experience, featuring slightly more advanced stitches and techniques to expand your skills.

⏱️

Weekend Treat

Takes 5-7 hours, making it an enjoyable project to finish over a couple of days.

🧸

Cute Companion

An adorable friend to cherish, handcrafted with love to bring comfort and joy for years to come.

About This Reversible Muffin Toy Amigurumi Pattern

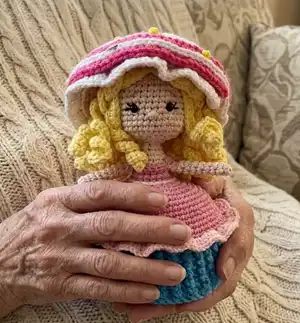
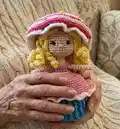
This pattern creates a reversible muffin toy that becomes either a cupcake or a little dress-wearing doll. It includes full instructions for body, head, hair, underskirt, hat, cherry and small accessories. The design uses sport-weight cotton and small hook sizes to create firm stitches and crisp details.

Reversible Muffin Toy Amigurumi Pattern crochet pattern - detailed view of completed project

Step-by-step rounds and clear photos guide every stage, from magic rings to post stitches and ruffles. The reversible construction is playful and makes a sweet gift or collectible.

Why You'll Love This Reversible Muffin Toy Amigurumi Pattern

I absolutely love this pattern because it combines a toy and a decorative cupcake in one clever reversible design. I enjoy the mix of shaping techniques β€” magic rings, increases, decreases and front/back post work β€” that produce such charming texture. The hair curls and the tiny cherry are some of my favorite little details to stitch. Making this pattern always feels rewarding because the finished doll is both playful and elegant, a small handmade keepsake I am proud to gift.

Reversible Muffin Toy Amigurumi Pattern step 1 - construction progress Reversible Muffin Toy Amigurumi Pattern step 2 - assembly progress Reversible Muffin Toy Amigurumi Pattern step 3 - details and accessories Reversible Muffin Toy Amigurumi Pattern step 4 - final assembly and finishing

Switch Things Up

I love how many ways you can customize this reversible muffin-doll, and I often change colors to fit seasons or gifts.

I sometimes swap the sport-weight cotton for a slightly thicker cotton to make a sturdier, chunkier version that is more cuddly.

I like to experiment with pastel palettes for a softer, nursery-friendly look or neon accents for a playful modern cupcake.

I often replace beads and sequins with embroidered dots if the toy is for a very young child for safer play.

I add wire inside the arms if I want posable limbs, or skip the wire to keep the doll completely soft.

I enjoy making a set of matching cupcakes in different sizes by changing yarn weight and hook size to create a nested display.

Try stitching different facial expressions by moving the eye placement or changing eyebrow shapes with brown floss to give each doll its own personality.

Want a keychain? Make a miniature version with thinner yarn and a smaller hook, then attach a small split ring to the top of the hat.

For a winter theme, swap the hat colors to white and silver and add tiny embroidered snowflakes on top instead of beads.

I sometimes add small crocheted accessories β€” a tiny purse or flower β€” to personalize each doll as a unique gift.

Common Mistakes & How to Fix Them

βœ— Skipping stitch markers when working in continuous rounds causes you to lose the start of the round; place a marker at the first stitch and move it each round to stay on track. βœ— Stuffing too late or too firmly makes shaping difficult and can distort the head or body; stuff gradually and firmly where needed, especially before closing decreases. βœ— Changing color without securing tails can cause messy joins and loose ends; carry yarn neatly, weave in ends as you change colors, or hide tails between rounds. βœ— Forgetting to count after increases or decreases results in uneven shaping and misaligned features; count your stitches after each shaping round to ensure correct totals.

Reversible Muffin Toy Amigurumi Pattern

Make a charming reversible muffin-doll that flips from a cupcake hat to a sweet little dress doll. This pattern guides you step-by-step through crocheting the base, hat, cherry, head, hair, arms and finishing details. You will enjoy the playful, reversible design and the detailed photos that help you assemble each piece.

Intermediate 5-7 Hours

Materials Needed for Reversible Muffin Toy Amigurumi Pattern

β€” Main Fabric

  • 01
    YarnArt Jeans (2-Fine Sport) 1.75 oz / 175 yds - #01 white (small amounts for hat and details)
  • 02
    YarnArt Jeans (2-Fine Sport) 1.75 oz / 175 yds - #18 lilac (optional details)
  • 03
    YarnArt Jeans (2-Fine Sport) 1.75 oz / 175 yds - #20 pink (dress)
  • 04
    YarnArt Jeans (2-Fine Sport) 1.75 oz / 175 yds - #59 pink neon (hat stripes)
  • 05
    YarnArt Jeans (2-Fine Sport) 1.75 oz / 175 yds - #88 light yellow (hair curls)
  • 06
    YarnArt Jeans (2-Fine Sport) 1.75 oz / 175 yds - #26 red (cherry)
  • 07
    Alize Cotton Gold 3.5 oz / 361 yds - #458 stone (skin/stone color for head, hands)
  • 08
    Alize Cotton Gold 3.5 oz / 361 yds - #287 turquoise (underskirt/base)

β€” Tools Required

  • 01
    Crochet hook 2.0 mm
  • 02
    Embroidery floss - black, white and brown
  • 03
    Filler - hollowfiber
  • 04
    Black 5 mm safety eyes – 2 pieces
  • 05
    Dry pastel or blush for cheeks
  • 06
    Blunt sewing needle
  • 07
    Pins for assembly
  • 08
    Stitch markers
  • 09
    Scissors
  • 10
    Elastic band (to fasten hat to head) - optional
  • 11
    Beads and sequins for hat decoration (optional)

Progress Tracker

0% Complete

β€” Materials :

Info :

Any 2-Fine (Sport) weight cotton blend yarn. I used YarnArt Jeans 1.75 oz / 175 yds (#01 white, #18 lilac, #20 pink, #59 pink neon, #88 light yellow, #26 red) and Alize Cotton Gold 3.5 oz / 361 yds (#458 stone, #287 turquoise). Embroidery floss colors: black, white, brown. Crochet hook 2.0 mm. Filler: hollowfiber. Black 5 mm safety eyes – 2 pairs. Dry pastel or blush. Blunt sewing needle, pins, stitch markers, scissors.

β€” Symbols :

Info :

(x) – number in brackets means number of stitches in the row. *...* x times – repeat pattern in the asterisks x number of times.

β€” Hands :

Round 1 :

Row 1 - 5 sc in mr

Round 2 :

Rows 2-9 - 5 sc (8 rows)

Round 3 :

Row 10 - fold edges in a half, work 2 sc

Info :

Cut a thread, leave a long tail for sewing.

β€” Hair :

Round 1 :

Row 1 - 6 sc in mr

Round 2 :

Row 2 – 6 (12)

Round 3 :

Row 3 - *1 sc, 1 inc* 6 times (18)

Round 4 :

Row 4 - *2 sc, 1 inc* 6 times (24)

Round 5 :

Row 5 - *3 sc, 1 inc* 6 times (30)

Round 6 :

Row 6 – 10 times β€œcurs #1”, 10 times β€œcurls #2”

Item Name (Curl #1) :

Curl #1 - 30 ch, from 2nd ch from the hook *1 sc, 1 inc* 10 times, 9 sc, 1 sc in the next stitch of 5th row

Item Name (Curl #2) :

Curl #2 - 30 ch, from 2nd ch from the hook *1 sc, 1 inc* 10 times, 9 sc, skip 1 stitch of 5th row, 1 sc in 5th row stitch

Info :

Join the first and the last curls with 1 ss. Leave a long tail for sewing.

β€” Head and Body :

Info :

Head and body are crochet in continuous rounds / spirals. To crochet head take 2-Fine (Sport) weight cotton blend yarn (stone, light pink and pink colors) and 2 mm crochet hook. Start with stone color yarn, then we’ll switch to the pink one.

Round 1 :

Row 1 (stone) - 6 sc in mr

Round 2 :

Row 2 - 6 inc (12)

Round 3 :

Row 3 - *1 sc, 1 inc* 6 times (18)

Round 4 :

Row 4 - 1 sc, 1 inc, *2 sc, 1 inc* 5 times, 1 sc (24)

Round 5 :

Row 5 - *3 sc, 1 inc* 6 times (30)

Round 6 :

Row 6 - 2 sc, 1 inc, *4 sc, 1 inc* 5 times, 2 sc (36)

Round 7-15 :

Rows 7-15 - 36 sc (9 rows)

Info :

Here we are going to shape the face. Use black floss to embroider the eyelashes, brown floss to embroider the eyebrows. Embroider the nose with cotton blend stone color yarn. Insert safety eyes between 11th and 12th rows. There should be 6 sc between eyes. Use white floss to make the eyes brighter.

Round 16 :

Row 16 - *2 sc, 1 dec* 9 times (27)

Round 17 :

Row 17 - *1 sc, 1 dec* 9 times (18)

Info :

Tightly fill the head with hollowfiber

Round 18 :

Row 18 - 9 dec

Round 19-20 :

Rows 19-20 - 9 sc (2 rows)

Round 21 :

Row 21 - *2 sc, 1 inc* 3 times (12)

Round 22 :

Row 22 - *1 sc, 1 inc* 6 times (18)

Round 23 :

Row 23 - 18 sc

Round 24 :

Row 24 (pink) - 18 sc

Round 25-26 :

Rows 25-26 - 18 sc (2 rows)

Round 27 :

Row 27 - 18 inc-flo (36)

Round 28 :

Row 28 - *5 sc, 1 inc* 6 times (42)

Round 29 :

Row 29 - 3 sc, 1 inc, *6 sc, 1 inc* 5 times, 3 sc (48)

Round 30 :

Row 30 - *7 sc, 1 inc* 6 times (54)

Round 31 :

Row 31 - 54 sc-flo

Round 32-34 :

Rows 32-34 - 54 sc (3 rows)

Round 35 :

Row 35 - 4 sc, 1 inc, *8 sc, 1 inc* 5 times, 4 sc (60)

Round 36-38 :

Rows 36-38 - 60 sc (3 rows)

Round 39 :

Row 39 (light pink) - 60 dc inc, 1 ss

Info :

Sew hands between 23rd and 24th rows. Fasten off, cut a thread and weave in ends. Fill the body with hollowfiber.

β€” Underskirt :

Info :

Underskirt is crochet in continuous rounds / spirals. To crochet the underskirt take 2-Fine (Sport) weight cotton blend yarn (turquoise color) and 2 mm crochet hook.

Round 1 :

Row 1 - 6 sc in mr

Round 2 :

Row 2 - 6 inc (12)

Round 3 :

Row 3 - *1 sc, 1 inc* 6 times (18)

Round 4 :

Row 4 - 1 sc, 1 inc, *2 sc, 1 inc* 5 times, 1 sc (24)

Round 5 :

Row 5 - *3 sc, 1 inc* 6 times (30)

Round 6 :

Row 6 - 2 sc, 1 inc, *4 sc, 1 inc* 5 times, 2 sc (36)

Round 7 :

Row 7 - *5 sc, 1 inc* 6 times (42)

Round 8 :

Row 8 - 3 sc, 1 inc, *6 sc, 1 inc* 5 times, 3 sc (48)

Round 9 :

Row 9 - *7 sc, 1 inc* 6 times (54)

Info :

Now take the doll, turn pink skirt inside out. Find back loops of 31st row, attach the detail we are currently working on to it as pictured below.

Round 10 :

Row 10 - Work back loops only + back loops of 31st row – 54 sc

Round 11 :

Row 11 - *8 dc, 1 inc* 6 times, 1 ss, 2 ch (60)

Round 12-21 :

Rows 12-21 - *1 fpdc, 1 bpdc* 30 times, 1 ss, 2 ch (60) (10 rows)

β€” Muffin-Hat :

Info :

Muffin-hat is crochet in continuous rounds / spirals. To crochet the hat take 2-Fine (Sport) weight cotton blend yarn (white and neon-pink colors) and 2 mm crochet hook.

Round 1 :

Row 1 - 6 sc in mr

Round 2 :

Row 2 - 6 inc-blo (12)

Round 3 :

Row 3 (behind the arch on the wrong side - look at the pictures below) - *1 hdc, 1 inc* 6 times (18)

Round 4 :

Row 4 (behind the arch on the wrong side) - *2 hdc, 1 inc* 6 times (24)

Round 5 :

Row 5 (behind the arch on the wrong side) - *3 hdc, 1 inc* 6 times (30)

Round 6 :

Row 6 (behind the arch on the wrong side) - *4 hdc, 1 inc* 6 times (36)

Round 7 :

Row 7 (behind the arch on the wrong side) - *5 hdc, 1 inc* 6 times (42)

Round 8 :

Row 8 (behind the arch on the wrong side) - *6 hdc, 1 inc* 6 times (48)

Round 9 :

Row 9 (behind the arch on the wrong side) - *7 hdc, 1 inc* 6 times (54)

Info :

Turn your work, 1 ch, from the 3rd stitch from the hook work *1 inc, 1 dc-blo* repeat up to the 1st row. Work *1 hdc, 1 sc, 1 ss* in the last 3 stitches of the 2nd row.

Info :

Attach neon-pink thread, as pictured below. In the front loops work 2 ch, *1 inc, 1 dc*. Repeat action in the asterisks up to the 1st row. Work 1 hdc, 1 sc, 1 ss in the last 3 stitches of 2nd row. Fasten off, cut a thread and weave in ends.

β€” Cherry :

Info :

Cherry is crochet in continuous rounds / spirals. To crochet the cherry take 2-Fine (Sport) weight cotton blend yarn (red color) and 2 mm crochet hook.

Round 1 :

Row 1 - 6 sc in mr

Round 2 :

Row 2 - 6 inc (12)

Round 3 :

Row 3 - *1 sc, 1 inc* 6 times (18)

Round 4 :

Row 4 - *2 sc, 1 inc* 6 times (24)

Round 5-8 :

Rows 5-8 - 24 sc (4 rows)

Round 9 :

Row 9 - *2 sc, 1 dec* 6 times (18)

Round 10 :

Row 10 - *1 sc, 1 dec* 6 times (12)

Round 11 :

Row 11 - 6 dec

Info :

Tie the hole. Fasten off and cut a thread. Weave in ends. Tail: 12 ch. Cut a thread, leave a long tail for sewing. Sew the tail to the cherry. Sew the cherry to the hat, decorate hat with beads and sequins. Small details are dangerous for small kids! You can replace them with embroidery. Sew the elastic band on the wrong side of the hat to fasten the hat on the head of the doll. If you don't have an elastic band, you can sew the hat to the head.

Assembly Instructions

  • Attach hair to the head with pins to find the best layout, then sew each curl to the head securely using matching yarn and a blunt sewing needle.
  • Sew hands to the body between rows 23 and 24, spacing them evenly and securing with whipstitches through the body rounds.
  • Join underskirt to the doll by finding the back loops of the 31st row on the pink skirt and working the turquoise underskirt back loops into them, then secure with single crochet.
  • Sew the cherry to the top of the muffin-hat, then attach the hat to the head using an elastic band sewn into the hat's wrong side or by sewing the hat directly to the head for a permanent finish.
  • Decorate the neckline and straps of the dress with pink yarn: work slip stitches on the edge of the back, make 5 ch loops over the hand area, and then slip stitch on the front side to make straps; fasten off and weave in ends.
  • Pin all parts in place before permanent sewing, then use secure stitches and weave in tails to prevent loosening during play.

Important Notes

  • πŸ’‘Use stitch markers to keep track of the start of each round when working in continuous spirals to avoid accidental stitch count drift.
  • πŸ’‘Stuff firmly but gradually with hollowfiber to maintain smooth shaping; overstuffing can distort the profile and under-stuffing can make the toy floppy.
  • πŸ’‘Pin parts (hair, hands, skirt) in place before sewing to ensure symmetrical placement and to get the look shown in the photos.
  • πŸ’‘Be cautious with small beads and sequins around children; for toys intended for small kids replace beads with embroidery or permanently sewn sequins.

This reversible muffin-doll pattern is a delightful mix of toy-making and decorative craft, perfect for gifting or displaying. The clever flip design turns a cupcake into a sweet little doll in moments, and every tiny detail is full of charm. Make it in bright playful colors or soft pastels β€” either way it brings a smile and a handmade hug. 🧢✨

You ask,

we answer.

FAQs

What size will the finished piece be?

The finished amigurumi measures approximately 10-12 cm tall when using the recommended sport-weight cotton and 2.0 mm hook; final size depends on yarn and tension.

Can I use different yarn weights for this pattern?

Yes, you can substitute yarn weights but your finished size will change; adjust hook size and expectations accordingly and make a gauge test to estimate final dimensions.

Do I need prior crochet experience for this pattern?

This pattern is rated intermediate, so basic knowledge of crochet stitches (sc, hdc, dc), working in the round, and experience with increases/decreases is recommended.

How long does this project typically take to complete?

Most crocheters complete this project in 5-7 hours, though time varies with experience, color changes, and finishing details like hair and beading.