๐Ÿงถ Beautiful โœจ Detailed ๐Ÿ’ Adorable

Hedwig the Owl Amigurumi Pattern

Hedwig the Owl Amigurumi Pattern
4.5โ˜… Rating
5-7 Hours Time Needed
4.1K Made This
โœ‚๏ธ

Intermediate Level

Ideal for those with basic crochet experience, featuring slightly more advanced stitches and techniques to expand your skills.

โฑ๏ธ

Weekend Treat

Takes 5-7 hours, making it an enjoyable project to finish over a couple of days.

๐Ÿฅ

Charming Critter

Delightful animal designs with sweet details that capture the essence of your favorite woodland and farmyard friends.

About This Hedwig the Owl Amigurumi Pattern

This pattern creates a small Hedwig-style snowy owl amigurumi with a rounded head and body, embroidered beak, and removable wings. The design uses worsted weight yarn and standard amigurumi shaping techniques like increases, decreases, and front/back loop work. You will make the body in continuous rounds and attach simple wings worked in rows.

Hedwig the Owl Amigurumi Pattern crochet pattern - detailed view of completed project

Detailed round-by-round instructions guide you through shaping, eye placement and finishing touches. The wings include optional black 'V' speck detailing to capture the snowy-owl look.

Why You'll Love This Hedwig the Owl Amigurumi Pattern

I absolutely love this pattern because it captures the sweet, round shape of a snowy owl with very simple stitches and clear shaping. I enjoy the way the front-loop wing detail gives the wings character with only a few extra steps. Sewing the wings and embroidering the beak always feels like the moment the owl gains personality, and that is incredibly rewarding. I love sharing a pattern that produces a finished toy you can give as a thoughtful handmade gift or keep as a decorative companion.

Hedwig the Owl Amigurumi Pattern step 1 - construction progress Hedwig the Owl Amigurumi Pattern step 2 - assembly progress Hedwig the Owl Amigurumi Pattern step 3 - details and accessories Hedwig the Owl Amigurumi Pattern step 4 - final assembly and finishing

Switch Things Up

I love customizing this pattern by changing colors to create different owl species; swapping white for brown makes a very different look.

I sometimes use a thicker yarn and a larger hook to make a chunky, cuddly Hedwig that is perfect for a pillow or larger toy.

For a tiny keychain version I pick a finer yarn and a smaller hook and reduce stuffing for a lightweight result.

I often add embroidered eyebrows or feet to give the owl more character and personality with simple surface stitches.

Try varying eye sizes from 8mm to 12mm to change the facial proportions and expression of your owl.

I sometimes make the wings removable by sewing only partway and adding a tiny snap or button so the owl can wear different wing styles.

Instead of black pulled-through specks, try brown or gray for subtler markings and a more realistic feathered look.

I like to add a little felt scarf or tiny crocheted accessories like a letter to make a Hedwig gift-ready and themed for Harry Potter fans.

If you want a posable owl, consider inserting light wire in the wing edges before closing and sewing to allow gentle shaping.

I recommend experimenting with stuffing levels and stitch tension on a swatch so you can predict final size and firmness before committing to the full build.

Common Mistakes & How to Fix Them

โœ— Skipping a stitch marker while working in continuous rounds leads to losing the start of the round; use a scrap of yarn or a marker to mark the first stitch and move it each round. โœ— Placing safety eyes after stuffing can be difficult and may distort the shape; insert the safety eyes before stuffing fully so you can position them easily and evenly. โœ— Overstuffing the head and body makes shaping awkward and may force seams open; stuff gradually and lightly, adding small amounts until you achieve the desired roundness. โœ— Trying to center the eyes perfectly can look stiff; place the eyes slightly off-center as suggested for a natural head-tilt look and check placement while you still can reach inside. โœ— Neglecting to keep black yarn carried or secured when doing pull-through specks on the wings results in loose ends; carry the black yarn neatly or fasten it off and weave in ends as you go. โœ— Not counting decreases and increases carefully will change overall stitch counts and shape; count stitches at the end of each round, especially during shaping sections, to maintain the intended gauge.

Hedwig the Owl Amigurumi Pattern

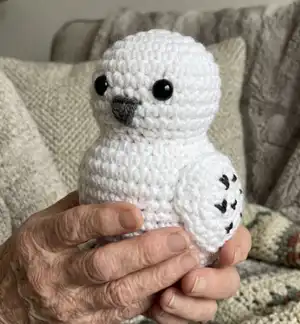
Make your own Hedwig-inspired snowy owl with this approachable amigurumi pattern. You will enjoy shaping the round body, stitching on delicate wings, and adding charming facial details. The pattern includes clear round-by-round instructions for the body and wings, plus tips on placement of eyes and beak. Perfect for gifting or keeping as a whimsical handmade friend.

Intermediate 5-7 Hours

Materials Needed for Hedwig the Owl Amigurumi Pattern

โ€” Main Fabric

  • 01
    White worsted weight yarn (#4), approximately one small skein (pattern lists 'White Worsted Weight Yarn (4)')
  • 02
    Small amount of black yarn for beak and wing specks
  • 03
    Optional brown yarn for alternate owl varieties

โ€” Tools Required

  • 01
    Crochet hook size G/6 4.25mm
  • 02
    Small amount of Black yarn
  • 03
    2 black safety eyes, 8-12 mm (I used 10 mm)
  • 04
    Scissors
  • 05
    Yarn needle (tapestry needle recommended for beak)
  • 06
    Stitch markers or scrap yarn to mark rounds
  • 07
    Polyester stuffing (poly fil)
  • 08
    Pins for assembly (optional)

Progress Tracker

0% Complete

โ€” Supplies & Stitches :

Info :

G/6 4.25mm Hook. White Worsted Weight Yarn (4). Small amount of Black Yarn. 2 black safety eyes, 8-12 mm (I used 10 mm but a little bigger or smaller would be fine too).

Infos :

Stitches Used: MR- Magic Ring. SC- Single Crochet. 2SC- Single Crochet Increase. Do 2 SC in same stitch to increase. DEC- Invisible SC decrease. FLO- Front Loop Only. SC3TOG-Single Crochet Decrease over 3 stitches.

Info :

Note: This body of the owl is worked in continuous rounds, you will not join. You would do well to use a stitch marker to keep your place. I simply use a scrap piece of yarn to keep my place. It's a good idea to read through the pattern before beginning. If you get confused on a step, read the next section and see if that helps explain.

โ€” Body :

Round 1 :

MR 6 SC in ring (6)

Round 2 :

2SC in each around (12)

Round 3 :

*SC, 2SC* Repeat from * to * around (18)

Round 4 :

*SC 2, 2SC* Repeat from * to * around (24)

Round 5 :

*SC 3, 2SC* Repeat from * to * around (30)

Round 6-10 :

SC in each around (30)

Round 11 :

*SC 2, DEC* Repeat from * to * around. SC in last 2 (23)

Round 12 :

*SC 5, DEC* Repeat from * to * around. SC in last 2 (20)

Round 13 :

*SC, 2SC* Repeat from * to * around (30)

Round 14 :

*SC 2, 2SC* Repeat from * to * around (40)

Round 15-16 :

SC in each around (40)

Round 17 :

*SC, 2SC* Repeat from * to * a total of 3 times. SC in next 12. *DEC, SC* Repeat from * to * a total of 4 times. SC in last 10 (39)

Round 18-19 :

SC in each around (39)

Round 20 :

*SC 2, DEC* Repeat from * to * a total of 2 times. SC in each remaining (37)

Round 21 :

*SC, DEC* Repeat from * to * a total of 2 times. SC in each remaining (35)

Round 22-23 :

SC in each around (35)

Info :

You should be able to tell which side is the front chest of the bird. Put the safety eyes on now while you can reach inside. The best part about the owl is that you don't have to get the eyes centered! Centering is the worst. I aim to get the eyes in Round 7 about 5 stitches apart.

Info :

You can also stitch on the beak at this point. Cut a length of black yarn and thread through yarn needle. (I actually prefer tapestry needles instead of the big plastic yarn ones. But use what you like.) The beak is simple. Start centered between the eyes in the same row and straight down over a couple rows, go around 3 or 4 times. Tie off.

Round 24 :

FLO *SC, 2SC* Repeat from * to * a total of 4 times. Through both loops the rest of the round, SC in next 8, DEC 6 times, SC in last 7 (33)

After Round 24 :

Switch from working only front loops to both loops for the remainder as instructed. (Photo reference in original pattern)

Round 25 :

In the unworked back loops of Row 24 (should be 8 back loops) then through both loops; *SC 3, DEC* Repeat from * to * around. SC in last 4 (24)

Round 26 :

*SC 2, DEC* Repeat from * to * around (18)

Info :

Stuff with poly fil before continuing to rounds 27 and 28. Make sure head and body are shaped as desired before closing.

Round 27 :

*SC, DEC* Repeat from * to * around (12)

Round 28 :

DEC around (6)

Info :

Finish off, leaving long tail to sew last hole shut. Finish stuffing if needed. Weave in ends.

โ€” Wings :

Info :

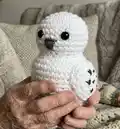
The look of these wings can be accomplished a couple of ways. Use White for the whole wing and use a needle and black yarn to stitch the V shaped black specks. OR you can do a pull through of black to give it the V shapes by inserting hook into the stitch, yarn over with Black yarn, pull through, yarn over with White yarn and pull through to finish the single crochet. Do the next stitch in all white, but carry over the black yarn. The wrong side will be sewn down to the body of the owl so you won't notice if the color changes get messy. The wings are worked in rows, each row ends with a Ch1 and turn.

Left wing (P1) :

Ch 3

Row 1 :

SC in 2nd Ch from hook, SC (2)

Row 2 :

2SC, 2SC (4)

Row 3 :

2SC, SC, SC, 2SC (6)

Row 4 :

SC in each across (Do 2 black pull through stitches on this row. Starting in White- SC, SC, In black- SC, In White- SC, In Black- SC, In White- SC, SC. Space out the black stitches) (6)

Row 5 :

2SC, SC in last 5 (7)

Row 6 :

SC 6, 2SC in last (Do 3 black pull through stitches on this row. Again spacing them out evenly.) (8)

Row 7 :

SC across (8)

Row 8 :

SC across (Do 4 black pull through stitches on this row. Again spacing them out evenly) (8)

Row 9 :

DEC, DEC, SC in last 4 (6)

Row 10 :

SC 4, DEC (Do 2 black pull through stitches on this row.) (5)

Row 11 :

DEC, DEC, SC (3)

Row 12 :

SC across (Do 1 black pull through stitch.) (3)

Row 13 :

SC3TOG (1)

Row 14 :

SC (1)

Row 15 :

SC evenly around the edge of the wing, SS to first SC. Finish off, leave long tail for sewing.

Right wing (P1) :

Ch 3

Row 1 :

SC in 2nd Ch from hook, SC (2)

Row 2 :

2SC, 2SC (4)

Row 3 :

2SC, SC, SC, 2SC (6)

Row 4 :

SC in each across (Do 2 black pull through stitches on this row. Starting in White- SC, SC, In black- SC, In White- SC, In Black- SC, In White- SC, SC. Space out the black stitches) (6)

Row 5 :

SC 5, 2SC (7)

Row 6 :

2SC, SC in last 6 (Do 3 black pull through stitches on this row. Again, spacing out the black stitches evenly.) (8)

Row 7 :

SC across (8)

Row 8 :

SC across (Do 4 black pull through stitches on this row. Spacing out the black stitches evenly) (8)

Row 9 :

SC 4, DEC, DEC (6)

Row 10 :

DEC, SC in last 4 (Do 2 black pull through stitches on this row.) (5)

Row 11 :

SC, DEC, DEC (3)

Row 12 :

SC across (Do 1 black pull through stitch on this row.) (3)

Row 13 :

SC3TOG (1)

Row 14 :

SC (1)

Row 15 :

SC evenly around the edge of the wing, SS to first SC. Finish off, leave long tail for sewing.

Info :

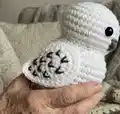
Line up the bottom part of the wing parallel with the bottom of the owl and sew each side on.

Info :

And there you go! You have your very own Hedwig or pet snowy owl! You could also use brown and make different owl varieties!

Assembly Instructions

  • Place safety eyes in Round 7 about 5 stitches apart while you can still reach inside the body; secure the washers from the inside before stuffing fully.
  • Stitch the beak centered between the eyes in the same row, stitching straight down over a couple rows with black yarn around 3 or 4 times and tie off.
  • Line up the bottom edge of each wing parallel to the bottom of the owl body and sew each wing to the sides using the long tail left from finishing the wing.
  • Stuff the body firmly but not overfilled, then sew the final opening closed using the long tail left from Round 28 and weave in the tail securely.
  • If you used pull-through black specks on the wings, sew the wrong side of the wing to the body so that color changes are hidden and tidy.

Important Notes

  • ๐Ÿ’กWork the body in continuous rounds and use a stitch marker to keep track of the start of each round.
  • ๐Ÿ’กPlace safety eyes before stuffing fully so you can reach inside and adjust placement easily.
  • ๐Ÿ’กCarry or secure black yarn neatly when doing pull-through specks on wings to avoid loose strands on the wrong side.
  • ๐Ÿ’กStuff gradually and check overall shape often; overstuffing can distort the sculpted head and body.
  • ๐Ÿ’กWeave in ends and leave long tails for sewing pieces together to make assembly easier.

This sweet Hedwig-inspired owl is a fun weekend make that becomes a charming handmade gift or a keepsake for your own shelf. The pattern blends simple amigurumi shaping with playful wing details to give personality in every stitch. Try different yarn colors to create a variety of owl friends! ๐Ÿฆ‰๐Ÿงถ

You ask,

we answer.

FAQs

What size will the finished piece be?

The finished amigurumi will be a small, palm-sized owl when using worsted weight yarn and a 4.25mm hook; exact dimensions depend on tension and stuffing.

Can I use different yarn weights for this pattern?

Yes, you can change yarn weight, but your finished owl size will change accordingly; use an appropriate hook for your chosen yarn and adjust stuffing and stitch counts if needed.

Do I need prior crochet experience for this pattern?

This pattern is rated intermediate; basic knowledge of single crochet, increases, decreases, working in rounds, and reading stitch counts is recommended.

How long does this project typically take to complete?

Most crocheters finish this owl in about 5-7 hours, depending on experience, customization, and assembly time.