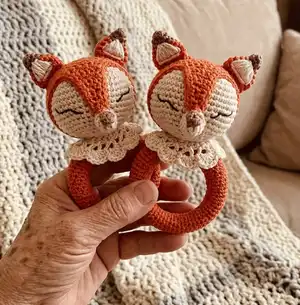
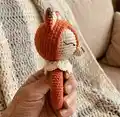
Make an adorable hand-held fox rattle with this detailed crochet pattern. You'll get step-by-step instructions, clear rounds, and photo-based assembly guidance to create a safe, baby-friendly toy. The pattern uses simple amigurumi techniques with helpful tips for working around a wooden ring. Perfect for gifting or adding to your handmade baby collection.
Progress Tracker
0% Complete
— Required Skills :
Info :
Sc, magic ring, increases, decreases, sewing parts together.
— Materials :
Infos :
2 hanks of Vita Cotton Lily 100% cotton, 1.75 oz/50g approx 137 yds/125 m. You can substitute yarn just make sure that it matches original proportions. Gauge: 26 sc x 25 rows = 4 in (10 cm). Suggested substitute yarn "Scheepjes Catona", "Alpina Anabel". Yardage approx 87 yds/80 m MC yarn (beige), CC yarn (orange). 10-15 g brown yarn (CC1 yarn). Crochet hook 2 mm and 2.5 mm. Wooden ring approx 2-3 in / 60-70 mm in diameter (I recommend beech wooden ring). Rattle approx 1 in / 24-30 mm in diameter. Stuffing. Scissors. Black embroidery floss or yarn. Tapestry needle.
— Abbreviations (US terminology) :
Infos :
beg of rnd - beginning of round. ch - chain. cont - continue. dc - double crochet. dec - decrease (sc2tog) (I recommend to make invisible decreases). inc - increase (2 sc in one st). foll - follow(ing)(s). rep - repeat. rnd - round. sc - single crochet. sl st - slip stitch. st(s) - stitch(es). ( ) * n - rep the content of the parenthesis as many times as the number after parenthesis says. MR - magic ring.
— Notes :
Info :
All pieces worked in a continuous spiral. Do not join to work in the rnd, just work sc in the next st. Place marker or use contrasting color yarn to mark beg of rnd. Use hook 2.5 mm or size matching your yarn and obtaining gauge. When work around the wooden ring, use smaller size hook, it will be easier to work.
— Working around the ring. Option 1 :
Info :
Work around the ring in a continuous spiral. The total number of sts depends on the size of your wooden ring and yarn. For my size ch10 using hook 2.5 mm, then work around the ring using hook 2 mm.
Info :
Join chain with sl st around the ring. Then sc in each st around. The first rnd is the most difficult. Then start to work in a continuous spiral, sc in each st. If it`s still uncomfortable to work, try to use smaller size hook. Pay attention to your tension, crochet around the ring tightly. If the fabric is moving loosely, rip it out and start over again with one st less.
Info :
Cont to work until the half or a bit less than half of the ring is covered. End with sl st. The beginning and the end of work should be inside of the ring. Weave in ends. Pull the end through the last rnd to tighten the fabric around the ring, and then pull it through the fabric inside the ring.
— Working around the ring. Option 2 :
Info :
If option 1 is too complicated for you, you can crochet a rectangle, working sc. For my ring size, ch20 and work for 9 rows. When the rectangle is finished, fold it over the ring and sew it, the fabric should be tight around the ring. The seam should be inside the ring. Weave in ends using tapestry needle.
— Head :
Round 1 :
6 sc in magic ring = 6 sts
Round 2 :
(inc) * 6 times = 12 sts
Round 3 :
(inc, sc in next st) * 6 times = 18 sts
Round 4 :
(inc, sc in next 2 sts) * 6 times = 24 sts
Round 5 :
(inc, sc in next 3 sts) * 6 times = 30 sts
Round 6 :
(inc, sc in next 4 sts) * 6 times = 36 sts
Round 7 :
(inc, sc in next 5 sts) * 6 times = 42 sts
Round 8 :
(inc, sc in next 6 sts) * 6 times = 48 sts
Rounds 9-15 :
48 sc (work even for 7 rnds)
Round 16 :
(dec, sc in next 6 sts) * 6 times = 42 sts
Round 17 :
(dec, sc in next 5 sts) * 6 times = 36 sts
Round 18 :
(dec, sc in next 4 sts) * 6 times = 30 sts
Round 19 :
(dec, sc in next 3 sts) * 6 times = 24 sts
Info :
Stuff the head and put rattle inside.
Round 20 :
(dec, sc in next 2 sts) * 6 times = 18 sts
Info :
Stuff the head tightly, for your convenience you can use tweezers.
Round 21 :
(dec, sc in next st) * 6 times = 12 sts
Round 22 :
(dec) * 6 times = 6 sts
Info :
Bind off rem 6 sts using a needle. Leave a long tail to sewing around a ring (approx 18-20 in / 45-50 cm). The head is done.
— Upper head piece :
Info :
With CC work the upper head piece, hook - 2.5 mm
Round 1 :
6 sc into magic ring = 6 sts
Round 2 :
(inc) * 6 times = 12 sts
Round 3 :
(inc, sc in next st) * 6 times = 18 sts
Round 4 :
(inc, sc in next 2 sts) * 6 times = 24 sts
Round 5 :
(inc, sc in next 3 sts) * 6 times = 30 sts
Round 6 :
(inc, sc in next 4 sts) * 6 times = 36 sts
Round 7 :
(inc, sc in next 5 sts) * 6 times = 42 sts
Round 8 :
(inc, sc in next 6 sts) * 6 times = 48 sts
Rounds 9-13 :
sc in every st (work even for 5 rnds) = 48 sts
Round 14 :
(dec, sc in next 6 sts) * 6 times = 42 sts
Round 15 :
sc in every st (work 1 rnd even) = 42 sts
Info :
Turn the piece and start to work flat.
Row 16 :
ch1, sc in next 6 sts, turn.
Row 17 :
ch1, sc in next 6 sts, turn.
Row 18 :
sc in next 5 sts starting from the 2nd st from the hook, turn.
Row 19 :
sc in next 4 sts starting from the 2nd st from the hook, turn.
Row 20 :
ch1, sc in next 4 sts, turn.
Row 21 :
sc in next 3 sts starting from the 2nd st from the hook, turn.
Row 22 :
sc in next 2 sts starting from the 2nd st from the hook, turn.
Rows 23-25 :
ch1, sc in next 2 sts.
Info :
Sc in every st to end of upper head piece.
Info :
Sl st in next st, fasten off leaving a long tail approx 25-27 in (65-70 cm) for sewing to the head.
— Nose :
Info :
Work with MC yarn (beige). Hook - 2.5 mm
Round 1 :
5 sc into magic ring = 5 sts
Round 2 :
(inc) * 5 times = 10 sts
Rounds 3-5 :
sc in next 10 (work even for 3 rnds) = 10 sts
Info :
Sl st in next st, fasten off leaving a tail for sewing.
Info :
With CC1 yarn or black work 6 sc into magic ring for the nose tip, fasten off and sew it to the nose or embroider the tip of the nose using brown or black yarn. Stuff the nose firmly.
— Ears (Make 2) :
Info :
With brown yarn and hook size 2.5 mm work as foll:
Round 1 :
6 sc into magic ring = 6 sts
Round 2 :
sc in every st (work even around) = 6 sts
Round 3 :
(inc, sc in next 2 sts) * 2 times = 8 sts
Info :
Cont to work with CC yarn:
Round 4 :
(inc, sc in next st) * 4 times = 12 sts
Round 5 :
(inc, sc in next 5 sts) * 2 times = 14 sts
Round 6 :
(inc, sc in next 6 sts) * 2 times = 16 sts
Round 7 :
sc in every st (work even around) = 16 sts
Info :
Sl st in next st, fasten off leaving a long tail for sewing to the head. With MC yarn embroider triangle on the ear. Rep the same for the 2nd ear.
— Collar :
Info :
Now make a collar. With MC yarn ch22. Then work flat as foll:
Row 1 :
sc in 2nd st from the hook, sc in next 20 sts, turn.
Row 2 :
ch4, dc in 1st st, [sk1, dc in next st, ch1, dc in the same st] 10 times, turn.
Row 3 :
ch2, 2 dc in next ch space, sc in next st, [5 dc in next ch space, sc in next st] 10 times, 3 dc in last post. The collar is ready. Sew it as it`s shown on the photo.
— Assembling :
Info :
Sew the nose to the head at level of row 6 from the last inc, attaching the upper head piece to the head, checking the right place for embroidering the nose. See photo-instructions for sewing the upper head piece and the nose.
Info :
Then outline the eyes and remove the upper head piece. With black embroidery floss or fingering weight yarn embroider sleepy eyes. You can bring the needle from the back side of the head. The upper head piece will hide all the knots when attaching it. Embroider the eyes as it`s shown on the photo, mirror the 2nd eye. Pay attention to the symmetrical position of the eyes regarding to the nose. For your convenience attach the upper head piece. When eyes are finished, secure the thread on the back of the head and cut it.
Info :
Now sew the upper head piece. Attach it as it`s shown on the photo and sew it to the head around the edge.
Info :
Sew the ears at level of 2-3 rows from the edge of the upper head piece with 5 sts in between. The head is done.
Info :
With MC yarn tail sew the head to the wooden ring. When you sew the head to the ring, push it slightly, the neck shouldn`t be too thin. The head should be tightly attached to the ring, I recommend to sew it around twice.
This charming Rattle Fox Amigurumi brings handmade warmth to any nursery and makes a thoughtful baby shower gift. The pattern includes clear rounds, two options for covering a wooden ring, and neat finishing techniques to create a professional-looking toy. Happy crocheting and enjoy gifting this sweet little fox that will be loved for years! 🧶🧸