๐Ÿงถ Beautiful โœจ Detailed ๐Ÿ’ Adorable

Jellyfish Keychains Amigurumi Pattern

Jellyfish Keychains Amigurumi Pattern
4.0โ˜… Rating
2-3 Hours Time Needed
1.7K Made This
โœ‚๏ธ

Intermediate Level

Ideal for those with basic crochet experience, featuring slightly more advanced stitches and techniques to expand your skills.

โฑ๏ธ

Bite-Sized Project

Finishes in 2-4 hoursโ€”perfect for an afternoon of creative relaxation.

๐ŸŽ

Tiny Treasure

Small, sweet, and gift-worthy creations that fit perfectly in the palm of your hand with detailed charm.

About This Jellyfish Keychains Amigurumi Pattern

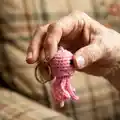
This pattern creates tiny crocheted jellyfish keychains that are fun to make and great for gifting. Each keychain uses very little yarn and works up quickly. The pattern uses simple shaping, front/back loop techniques and a mix of spiral and straight tentacles for personality.

Jellyfish Keychains Amigurumi Pattern crochet pattern - detailed view of completed project

Perfect for stash-busting DK yarn and practicing BLO/FLO techniques. Complete instructions include materials, abbreviations and assembly notes.

Why You'll Love This Jellyfish Keychains Amigurumi Pattern

I absolutely love this pattern because it turns a tiny scrap of yarn into an instantly charming little companion. I enjoy the mix of textures created by the front loop and back loop rows โ€” it gives the jellyfish character without complicated stitching. The tentacle options (spiral and straight) let me play with different looks for the same base, which keeps the process fun. I also appreciate how portable this makes a crochet project โ€” you can finish one on a short commute or during a coffee break.

Jellyfish Keychains Amigurumi Pattern step 1 - construction progress Jellyfish Keychains Amigurumi Pattern step 2 - assembly progress Jellyfish Keychains Amigurumi Pattern step 3 - details and accessories Jellyfish Keychains Amigurumi Pattern step 4 - final assembly and finishing

Switch Things Up

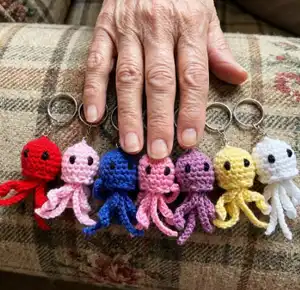
I love customizing these little jellyfish by changing yarn colorsโ€”try ombre or variegated DK yarn for a playful look.

I sometimes switch to a thicker yarn and a larger hook to make a huggable chunky version that is perfect for decor.

I often make the tentacles longer or shorter to create different silhouettes; spiral tentacles can be lengthened by adding more chain before curling.

I like to use safety eyes for sturdiness on adult items, but for children I embroider eyes with black yarn as shown in the pattern.

I sometimes add small beads or bells to the inside of the body before closing for a subtle jingle when it moves.

I recommend trying metallic or sparkly yarn for a sea-magic variant that catches the light beautifully.

I will occasionally add a tiny crocheted hat or bow to the head to turn the keychain into a character gift.

I also make matching sets in different colours to sell at marketsโ€”grouped sets make an attractive display.

I like to attach a small ribbon or charm to the keyring along with the jellyfish for a boutique finish.

I encourage you to experiment with embroidered faces and different tentacle counts to personalize each jellyfishโ€”there are so many creative directions to take this tiny pattern.

Common Mistakes & How to Fix Them

โœ— Skipping stitch markers when working continuous rounds can make you lose track of the start of a round; place a marker at the last stitch of each round to stay oriented. โœ— Overstuffing the body will cause the stitches to stretch and the stuffing to show through; stuff gradually and stop when the piece can be lightly squeezed. โœ— Sewing tentacles without gathering the base tightly can cause them to sit loose and look messy; use a small running stitch around each tentacle base and pull tight to secure before sewing. โœ— Placing the eyes too low or too far apart changes the expression; measure and mark positions three stitches apart and two rows up from the htr row for consistent placement. โœ— Cutting yarn ends too short before weaving can let ends work free; leave long enough tails to weave through the body and secure before trimming flush.

Jellyfish Keychains Amigurumi Pattern

Make adorable jellyfish keychains with this compact crochet pattern. You can create a whole set in different colors using a small amount of yarn. The design is perfect for gifts, markets, or a fun quick project to brighten your day.

Intermediate 2-3 Hours

Materials Needed for Jellyfish Keychains Amigurumi Pattern

โ€” Main Fabric

  • 01
    Hayfield Bonus (DK) Main colour - approx 7g per keychain
  • 02
    Hayfield Bonus (DK) Black 0965 - small oddment for embroidered eyes
  • 03
    Assorted DK weight yarns for colourful variations - approx 7g each

โ€” Tools Required

  • 01
    3mm crochet hook
  • 02
    Keychain hardware (split ring with short chain)
  • 03
    Hi-Loft quality toy stuffing
  • 04
    Wool/tapestry needle for sewing and weaving ends
  • 05
    Scissors
  • 06
    Stitch marker (to mark rounds)

Progress Tracker

0% Complete

โ€” Materials :

Info :

Hayfield Bonus (DK) Main โ€“ 7g. Hayfield Bonus (DK) Black 0965 โ€“ Oddment for Eyes. Keychain. Hi-Loft Quality Toy Stuffing. 3mm Crochet Hook. Wool Needle (for sewing)

โ€” Abbreviations :

Infos :

ch โ€“ chain. dc โ€“ double crochet. htr โ€“ half treble crochet. inc โ€“ 2 stitches into next stitch. dec โ€“ decrease over next two stitches in front loops only. BLO โ€“ dc into back loops only picking up the extra loop at the back of the previous htr row to create a firmer stitch. FLO โ€“ dc into front loops only. sl st โ€“ slip stitch. f/o โ€“ fasten off by slip stitch in next stitch.

โ€” Note :

Info :

Unless stated work in continuous rounds marking last stitch of each row with a stitch marker before proceeding with the next.

Info :

When stuffing parts make sure that you donโ€™t overstuff them as you donโ€™t want the stuffing to show through when complete.

Info :

Each part should be filled just enough that it can be easily squeezed when pinched firmly.

โ€” Body :

Row 1 :

ch2, dc 6 into 2nd st from hook (alternatively dc 6sts into magic ring) (6)

Row 2 :

inc x6 (12)

Row 3 :

(dc into next st, inc) x6 (18)

Row 4 :

dc (18)

Row 5 :

dc (18)

Row 6 :

dc (18)

Row 7 :

htr (18) sl st to join in FLO only

Row 8 :

FLO Row: (ch2, miss 1, sl st into next st) x9 (9 loops)

Row 9 :

BLO Row: sl st into BLO directly behind the 1st FLO sl st, (dc into next st, dec) x6 (12)

Info :

Stuff body

Row 10 :

dec x6 (6) sl st to join

Row 11 :

(ch6, starting in 2nd ch from hook, inc x5, sl st into next st from previous row, ch12, starting in 2nd ch from hook, sl st into next 11sts, sl st in next st from previous row) x3 (3 spiral+ 3 straight tentacles)

Info :

F/O leaving a 25cm end

Info :

Using a small running st sew around the base of each tentacle (next to the body), then pull tight to gather.

Info :

Sew around once more then secure with a couple of small sts.

Info :

Weave end up to starting circle at top of body and making sure not to pull out of shape, secure with a couple of small sts.

Info :

Attach keychain to top of body using 5 small back sts.

Info :

Secure end before weaving through body and cutting flush.

Info :

Using black oddment weave end up through body and sew eyes 3sts apart and 2 rows up from the htr row.

Info :

Weave ends through body and cut flush to finish.

Assembly Instructions

  • Using a small running stitch sew around the base of each tentacle (next to the body), pull tight to gather, then secure with a couple of small stitches.
  • Weave the yarn end up to the starting circle at the top of the body and secure with a couple of small stitches to maintain shape.
  • Attach the keychain to the top of the body by sewing through the top circle with five small back stitches, then secure the end and weave through the body before trimming flush.
  • Using black oddment yarn, weave the end up through the body and sew eyes 3 stitches apart and 2 rows up from the htr row, then weave ends through the body and cut flush.
  • Position and adjust tentacles before final securing; make sure they are evenly spaced (three spiral and three straight) and that bases are tightly gathered for a neat finish.

Important Notes

  • ๐Ÿ’กWork in continuous rounds unless stated otherwise and mark the last stitch of each round with a stitch marker before proceeding to the next.
  • ๐Ÿ’กDo not overstuff the body; overstuffing will cause the stuffing to show through the finished stitches.
  • ๐Ÿ’กFill each part just enough so it can be easily squeezed when pinched firmly for the best shape and structure.

This tiny jellyfish keychain pattern is perfect for quick gifts, market stock, or creative stash-busting. Make them in bright colours or soft pastels to suit any mood. Each one takes only a few grams of yarn and brings a lot of charm to your day. ๐Ÿงถ๐Ÿ™

You ask,

we answer.

FAQs

What size will the finished piece be?

The finished keychain measures approximately 5-7 cm tall depending on yarn tension and tentacle length when using DK yarn and a 3mm hook.

Can I use different yarn weights for this pattern?

Yes, you can use different yarn weights; using thicker yarn and a larger hook will produce a chunkier jellyfish while finer yarn will make a mini version. Adjust stuffing and tentacle lengths accordingly.

Do I need prior crochet experience for this pattern?

This pattern is rated intermediate due to BLO/FLO and shaping techniques, so basic crochet experience and familiarity with increases/decreases are recommended.

How long does this project typically take to complete?

Most crocheters complete a single jellyfish keychain in about 2-3 hours, though time may vary based on experience and customization choices.