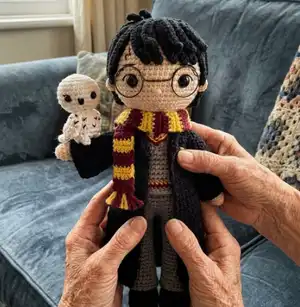
Make your own adorable Harry Potter amigurumi with this detailed crochet pattern. You will create a dressed wizard doll complete with scarf, robe, hairpiece and Hedwig using step-by-step rounds and clear photos. The pattern includes assembly and embroidery instructions so you can finish a charming collectible to gift or display.
Progress Tracker
0% Complete
— Arms :
Info :
2.5 mm. crochet hook. Begin with skin yarn.
Round 1 :
Make magic ring 6 sc (6)
Round 2 :
(Sc 1, inc) x 3 (9)
Round 3 :
Sc in each st around (9)
Round 4 :
Sc 3, puff stitch, sc 1, inv dec, sc 2 (8)
Round 5-19 :
(Grey) sc in each st around (8) - Stuff the arm with fiberfill
Info :
Fasten off and leave a long tail for sewing.
Item Name (Right arm) :
Begin with skin yarn.
Round 1 :
Make magic ring 6 sc (6)
Round 2 :
(Sc 1, inc) x 3 (9)
Round 3 :
Sc in each st around (9)
Round 4 :
Inv dec, sc 1, puff stitch, sc 5 (8)
Round 5-19 :
(Grey) sc in each st around (8) - Stuff the arm with fiberfill
Info :
Fasten off and leave a long tail for sewing.
— Inner Neck :
Info :
2.25 mm. crochet hook. Begin with skin yarn.
Round 1 :
Make magic ring 6 sc (6)
Round 2-10 :
Sc in each st around (6)
Info :
Fasten off. Stuff the inner neck with fiberfill firmly and leave a long tail for sewing. Using a yarn needle weave the yarn tail through the front loop of each remaining stitch and pull tight to close.
— Legs & Body :
Info :
2.5 mm. crochet hook. Make 2 legs, begin the left leg with black yarn and make 7 chains.
Round 1 :
Start in the 2nd chain from hook, then crochet inc, sc 4, sc 5 in same stitch, sc 4, inc (17)
Round 2 :
Sc 1, inc, sc 4, inc x 5, sc 4, inc, sc 1 (24)
Round 3 :
(BLO) sc in each st around (24)
Round 4 :
Sc in each st around (24)
Round 5 :
Sc 7, inv dec x 5, sc 7 (19)
Round 6 :
Sc 5, inv dec x 2, sc 1, inv dec x 2, sc 5 (15)
Round 7 :
Sc 3, hdc dec x 2, hdc 1, hdc dec x 2, sc 3 (11) - Stuff the leg with fiberfill.
Info :
Change color to skin yarn.
Round 8 :
(BLO) sc in each st around (11)
Round 9-10 :
Sc in each st around (11)
Round 11 :
Inc, sc 10 (12)
Round 12 :
Sc in each st around (12)
Round 13 :
Sc 1, inc, sc 10 (13)
Round 14 :
Sc in each st around (13)
Round 15 :
Sc 2, inv dec, sc 9 (12)
Round 16 :
Sc in each st around (12)
Round 17 :
Sc 2, inv dec, sc 3, inc x 3, sc 2 (14)
Round 18 :
Sc 2, inc, sc 3, inv dec x 3, sc 2 (12)
Round 19 :
Sc 2, inc, sc 9 (13)
Round 20 :
Sc in each st around (13)
Round 21 :
Sc 5, inc, sc 4, inc, sc 2 (15)
Round 22 :
Sc 5, (white) sc 10 (15)
Round 23-24 :
(White) sc in each st around (15)
Info :
Fasten off and cut the yarn. Stuff the left leg with polyester fiberfill.
Item Name (Right leg) :
Make the right leg same as the left leg rnd 1- rnd 24 and stuff the right leg with polyester fiberfill but don’t cut the yarn, we will continue to the body part after finished the shoe soles.
Round 25 :
Sc 9, ch 3 (Join both legs onto the body)
Info :
Join both legs onto the body. Start 1st sc on the 2nd stitch of the left leg, (The left leg) sc 15, sc 3 in chains, (The right leg) sc 15, sc 3 in another side of the chains (36) and mark a new beginning point with stitch marker or different yarn color.
Round 26 :
Sc in each st around (36)
Round 27 :
Sc 7, inv dec, sc 16, inv dec, sc 9 (34)
Round 28 :
Sc in each st around (34)
Info :
Change color to grey yarn.
Round 29 :
Sc in each st around (34)
Round 30 :
(BLO) sc 6, inv dec, sc 15, inv dec, sc 9 (32)
Info :
Change color to red yarn.
Round 31 :
Sc in each st around (32)
Info :
Change color to grey yarn.
Round 32 :
Sc in each st around (32)
Round 33 :
Sc 6, inv dec, sc 14, inv dec, sc 8 (30)
Round 34-35 :
Sc in each st around (30)
Round 36 :
Sc 6, inv dec, sc 13, inv dec, sc 7 (28)
Round 37 :
Sc in each st around (28)
Round 38 :
Sc 6, inv dec, sc 11, inv dec, sc 7 (26)
Round 39 :
Sc 5, inv dec, sc 11, inv dec, sc 6 (24)
Info :
Join both arms onto the body.
Round 40 :
(The body) sc 5, (The left arm) start at the 2nd stitch on the left arm and sc 7, (Skip last stitch on the left arm), (Skip 1 stitch on the body), (The body) sc 11, (The right arm) start at the 6th stitch on the right arm and sc 7, (Skip last stitch on the right arm), (Skip 1 stitch on the body), (The body) sc 6 (36)
Round 41 :
Sc 2, inv dec, (sc 4, inv dec) x 2, sc 1, (white) sc 2, (grey) sc 1, inv dec, (sc 4, inv dec) x 2, sc 2 (30)
Round 42 :
(Grey) sc 13, (white) sc 4, (grey) sc 13 (30)
Round 43 :
(Grey) (sc 3, inv dec) x 2, sc 2, (white) sc 1, inv dec, sc 3, (grey) inv dec, (sc 3, inv dec) x 2 (24)
Round 44 :
(White) (sc 2, inv dec) x 6 (18)
Round 45 :
(White) (sc 1, inv dec) x 6 (12)
Round 46 :
(Skin) (BLO) (sc 4, inv dec) x 2 (10)
Round 47-48 :
(Skin) sc in each st around (10)
Info :
Make a shirt collar before starting the head. (Use 1.6 mm crochet hook) Use yellow embroidery thread to make a surface crochet around the white part. After you finished, you may use red embroidery thread to make a surface crochet follow under the yellow thread.
Step 3 :
(Use 2.25 mm crochet hook) Locate the center point on rnd 46 of the body. Then use different thread color or stitch marker to mark the point. Hold the body upside down and use white yarn to start 1st sc on that point.
Rnd 1 :
Ch 1, (sc 2, inc) x 2, sc 1, inc, sc 2, inc, sc 1, sc 1 in same st as the 1st sc, turn (17)
Rnd 2 :
Ch 1, sc 8, inc, sc 8 (18)
Info :
Fasten off and weave in the yarn end.
Round 49 :
(FLO) inc x 10 (20)
Round 50 :
(Sc 1, inc) x 10 (30)
Round 51 :
Sc 2, inc, (sc 4, inc) x 5, sc 2 (36)
Round 52 :
(Sc 5, inc) x 6 (42)
Round 53 :
Sc 3, inc, (sc 6, inc) x 5, sc 3 (48)
Round 54 :
(Sc 7, inc) x 6 (54)
Round 55-65 :
Sc in each st around (54)
Round 66 :
(Sc 7, inv dec) x 6 (48)
Round 67 :
Sc 3, inv dec, (sc 6, inv dec) x 5, sc 3 (42)
Round 68 :
(Sc 5, inv dec) x 6 (36)
Round 69 :
Sc 2, inv dec, (sc 4, inv dec) x 5, sc 2 (30)
Info :
Stuff the head with fiberfill. (If you use safety eyes, please insert them at this point and see page 17 for the placement)
Round 70 :
(Sc 3, inv dec) x 6 (24)
Round 71 :
Sc 1, inv dec, (sc 2, inv dec) x 5, sc 1 (18)
Round 72 :
(Sc 1, inv dec) x 6 (12)
Round 73 :
Inv dec x 6 (6)
Info :
Finish stuffing the head firmly. Fasten off and leaving a long tail for sewing. Using a yarn needle weave the yarn tail through the front loop of each remaining stitch and pull tight to close.
— Trouser & Trousers Legs :
Info :
2.5 mm. crochet hook. Hold the body upside down and use dark grey yarn start in front loop of rnd 30 in the back of the body.
Round 1-2 :
Sc in each st around (34)
Round 3 :
Sc 9, inc, sc 16, inc, sc 7 (36)
Round 4 :
Sc in each st around (36)
Round 5 :
Sc 10, inc, sc 16, inc, sc 8 (38)
Round 6 :
Sc in each st around (38)
Round 7 :
Sc 11, inc, sc 18, inc, sc 7 (40)
Info :
Use a stitch marker to locate the 2nd st and the 22nd st between the legs and you should get 19 stitches of each trouser leg.
Left trouser leg - Round 8 :
Sc 9, inc, sc 9 (20)
Round 9-11 :
Sc in each st around (20)
Right trouser leg :
Using a new dark grey yarn start at the 3rd stitch on rnd 7 of the trousers and make the right trouser leg same as the left one rnd 8 - rnd 11.
Round 12 :
Sc 4, inv dec, sc 14 (19)
Round 13 :
Inv dec, sc 7, inv dec, sc 2, inc x 4, sc 2 (21)
Round 14 :
Sc 11, inv dec x 4, sc 2 (17)
Round 15-17 :
Sc in each st around (17)
Round 18 :
Sc 3, inc, sc 13 (18)
Round 19-20 :
Sc in each st around (18)
Round 21 :
Sc 4, inc, sc 13 (19)
Round 22-24 :
Sc in each st around (19)
Round 25 :
Dc 13, hdc 1, sc 4, hdc 1, dc 9 (19) - Fasten off and weave in the yarn end.
Info :
Use dark grey yarn to sew close the gap between the left trouser and the right trouser. Use yellow embroidery thread to make a surface crochet between rnds 31 and 32. After that, use grey yarn to make a surface crochet between rnds 29 and 30.
— Ears :
Info :
2.25 mm. crochet hook. Make 2 ears and use skin yarn to make 2 chains.
Round 1 :
Start in the 2nd chain from hook, then crochet [sc 1, hdc 2, sc 1] in same stitch (4)
Info :
Fasten off and leave a long tail for sewing.
— Gryffindor Robe :
Info :
2.5 mm. crochet hook. Use black yarn to make 35 chains.
Round 1 :
Start 1st hdc in the 3rd chain from hook and crochet hdc in each remaining chain, turn (33)
Round 2 :
Ch 5, then starting on the 33rd stitch of rnd 1, (hdc inc, hdc 15) x 2, hdc inc, turn (36)
Round 3 :
Ch 2, hdc inc, hdc 31, (yellow) hdc 1, (red) hdc 1, (black) hdc 1, hdc inc, turn (38)
Round 4 :
Ch 1, inc, sc 1, (yellow) sc 1, (red) sc 1, (black) sc 2, ch 6, skip 8 sts, sc 10, ch 6, skip 8 sts, sc 5, inc, turn (24)
Rounds 5-22 :
Continue shaping and rows as indicated in the pattern photos and notes (see Pic 6.1 - 6.6). Fasten off and weave in the yarn end. Add sleeves and sew 5 mm black bead between rnds 2 and 3 on the right side of the robe (Pic 6.11 - 6.12).
— Scarf :
Info :
2.25 mm. crochet hook. Use red yarn to make 6 chains.
Round 1 :
Start in the 3rd chain from hook and crochet hdc in each remaining chain, turn (4)
Round 2 :
Ch 2, hdc in each st around, turn (4)
Round 3-4 :
Change color to yellow yarn. Ch 2, hdc in each st around, turn (4)
Round 5-6 :
Change color to red yarn. Ch 2, hdc in each st around, turn (4)
Info :
Repeat rounds 3 to 6 until you have 50 rounds (25 stripes). Make sure that the start and the end on the same color stripes. Fasten off and weave in the yarn end. Add tassels to both ends as shown in Pic 7.1 - 7.6.
— Hairpiece :
Info :
2.25 mm. crochet hook. Begin with black yarn.
Round 1 :
Make magic ring 7 sc (7)
Round 2 :
(BLO) sc 2 in each st around (14)
Round 3 :
(Sc 1, inc) x 7 (21)
Round 4 :
Sc 1, inc, (sc 2, inc) x 6, sc 1 (28)
Info :
Don't fasten off, we will start to crochet the hair strands. Follow the 1st round and 2nd round of hair tables to create the hair strands and attach them according to the hair diagrams and photos (Pics 8.1 - 8.9 and diagrams on pages 15-16).
— How to Assemble & Embroidery :
Info :
Follow the step-by-step photos for face embroidery, eye placement and hairpiece gluing. Place eyes, sew white eye areas, embroider eye lines, nose, eyebrows and attach ears on specified rounds. See the pattern photos for exact positioning (Pics 9.1 - 9.33).
This Harry Potter amigurumi pattern is packed with charming details — from the striped scarf to the tiny embroidered collar and hairpiece. It makes a wonderful handmade gift or a collectible for fans and crafters. Finish it with care and enjoy the magic you create stitch by stitch. 🧶✨