๐Ÿงถ Beautiful โœจ Detailed ๐Ÿ’ Adorable

Pumpkin for Halloween Amigurumi Pattern

Pumpkin for Halloween Amigurumi Pattern
4.9โ˜… Rating
2-4 Hours Time Needed
3.9K Made This
โœ‚๏ธ

Intermediate Level

Ideal for those with basic crochet experience, featuring slightly more advanced stitches and techniques to expand your skills.

โฑ๏ธ

Bite-Sized Project

Finishes in 2-4 hoursโ€”perfect for an afternoon of creative relaxation.

๐Ÿงธ

Cute Companion

An adorable friend to cherish, handcrafted with love to bring comfort and joy for years to come.

About This Pumpkin for Halloween Amigurumi Pattern

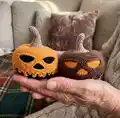
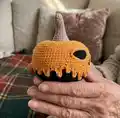
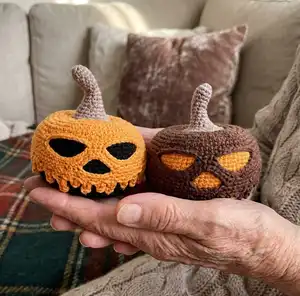
This pattern guides you through crocheting a small amigurumi pumpkin with a carved face, decorative drips and a stalk. You will work in rounds, change colors and add textured details for a finished, dimensional look. The pattern includes clear step sequences and photo references to help you achieve identical results. It is a fun seasonal project to decorate your home or give as a handmade gift.

Pumpkin for Halloween Amigurumi Pattern crochet pattern - detailed view of completed project

The instructions cover the pumpkin body, the top and drip overlay, and the stalk with sewing guidance. Photos show each key stage so you can follow along easily and reproduce the look shown.

Why You'll Love This Pumpkin for Halloween Amigurumi Pattern

I absolutely love this pattern because it captures playful Halloween character in a small, quick amigurumi. I enjoy how a few simple techniquesโ€”color change, working in FLO/BLO, and crocheting small chainsโ€”create expressive facial features and texture. I also love the versatility: change colors or adjust yarn weight to make different sizes and moods. Sharing this pattern makes me happy because it brings handmade charm to seasonal decor and gifts.

Pumpkin for Halloween Amigurumi Pattern step 1 - construction progress Pumpkin for Halloween Amigurumi Pattern step 2 - assembly progress Pumpkin for Halloween Amigurumi Pattern step 3 - details and accessories Pumpkin for Halloween Amigurumi Pattern step 4 - final assembly and finishing

Switch Things Up

I love how easy it is to customize this pumpkin by switching yarn colors to make spooky or sweet versions.

I often use softer pastel shades to create a gentle autumn decor set for a nursery or living room.

To make a larger pumpkin I use thicker yarn and a larger hook; conversely, a smaller hook and thinner yarn makes a tiny keychain pumpkin.

I sometimes embroider extra facial expressions for different moods, placing the eyes and nose slightly differently for character.

I enjoy adding beads or tiny sequins to the drips for a sparkly effect when making party decorations.

Try crocheting several drips of different lengths and spacing to create unique silhouettes around the pumpkin.

I also like to make coordinating stems by twisting two colors together or stuffing the stalk firmer for a sturdier look.

For a set, I vary the amount of stuffing to create squat and tall pumpkins for dynamic displays.

I recommend testing the placement of eyes and drips with pins before sewing so you can adjust symmetry easily.

Finally, feel free to add small accessories like a crocheted leaf or tiny hat to give each pumpkin its own personality.

Common Mistakes & How to Fix Them

โœ— Skipping the color change placement can hide the carved face details; change to orange exactly after round 12 so the face lines up correctly. โœ— Forgetting to stuff gradually causes uneven shaping and lumps; stuff from the center to the sides in small amounts for a smooth round shape. โœ— Cutting the brown thread before making the drips will break the continuous edging; do not cut the thread and crochet drips directly as instructed to secure them. โœ— Not working in BLO or FLO as directed will alter the surface detail and fit; pay attention to BLO/FLO instructions and orient the hook tip as described for correct texture.

Pumpkin for Halloween Amigurumi Pattern

Make a charming crocheted Halloween pumpkin with this easy-to-follow amigurumi pattern. You will enjoy step-by-step instructions and clear photos that guide you through each stage. The design includes a carved face, dripping detail and a cute stalk so your pumpkin looks ready for spooky season. Perfect for gifts, decorations, or a cozy handmade touch for your home.

Intermediate 2-4 Hours

Materials Needed for Pumpkin for Halloween Amigurumi Pattern

โ€” Main Fabric

  • 01
    Orange yarn - small amount for the pumpkin body (main color)
  • 02
    Brown yarn - small amount for the pumpkin top and drip overlay
  • 03
    Light brown yarn - small amount for the pumpkin stalk
  • 04
    Fiberfill stuffing - small bag to fill the pumpkin
  • 05
    Black yarn or thread for internal facial backing (optional)

โ€” Tools Required

  • 01
    Crochet hook size 1.75 mm
  • 02
    Yarn needle for sewing and weaving ends
  • 03
    Pins to secure eyes, nose and drips before sewing
  • 04
    Scissors
  • 05
    Polyester fiberfill stuffing

Progress Tracker

0% Complete

โ€” Pumpkin :

Round 1 :

8 sc in MR

Round 2 :

8 inc (16)

Round 3 :

(1 sc, inc) * 8 (24)

Round 4 :

1 sc, inc, (2 sc, inc) * 7, 1 sc (32)

Round 5 :

(3 sc, inc) * 8 (40)

Round 6 :

2 sc, inc, (4 sc, inc) * 7, 2 sc (48)

Round 7 :

(5 sc, inc) * 8 (56)

Round 8 :

3 sc, inc, (6 sc, inc) * 7, 3 sc (64)

Round 9 :

(7 sc, inc) * 8 (72)

Round 10-12 :

72 sc (3 rounds)

Info :

Change color to orange.

Round 13 :

BLO: 72 sc

Round 14-27 :

72 sc (14 rounds)

Round 28 :

(7 sc, dec) * 8 (64)

Round 29 :

3 sc, dec, (6 sc, dec) * 7, 3 sc (56)

Round 30 :

(5 sc, dec) * 8 (48)

Round 31 :

2 sc, dec, (4 sc, dec) * 7, 2 sc (40)

Round 32 :

(3 sc, dec) * 8 (32)

Info :

Stuff the toy, spread the fiberfill inside from the center to the sides. Then add fiberfill if you need.

Round 33 :

1 sc, dec, (2 sc, dec) * 7, 1 sc (24)

Round 34 :

(1 sc, dec) * 8 (16)

Round 35 :

8 dec (8)

Info :

Fasten off, leaving a long thread for the pumpkin lift.

Info :

Insert the thread into the needle. Insert the needle into the base of the pumpkin and exit from the opposite side, tighten the thread. Repeat twice. Fasten off, hide the yarn tail.

Info :

Go back to the 12th round, continue to sc on FLO using the brown thread (the tip of the hook is pointing down).

Round 1 :

72 sc

Round 2 :

26 sc, make chain 12, skip 8 sc, 4 sc, make chain 12, skip 8 sc, 26 sc (80)

Round 3 :

26 sc, 12 sc on the chain, 4 sc, 12 sc on the chain, 26 sc (80)

Round 4 :

80 sc

Round 5 :

37 sc, make chain 7, skip 8 sc, 35 sc (79)

Round 6 :

37 sc, 7 sc on the chain, 35 sc (79)

โ€” Drip and Decoration :

Info :

Do not cut the thread. Next, we will crochet the drip on the pumpkin.

Drip :

Make chain 5, start to crochet on the second chain from the hook: 4 hdc, sl st to the next one, 2 sc.

Drip :

Make chain 6, start to crochet on the second chain from the hook: 5 hdc, sl st to the next one, 2 sc.

Info :

Continue crocheting in a circle, alternating chains of different lengths from 3 to 7 ch. Fasten off, leaving a long thread for sewing.

Info :

Use pins to secure the eyes, the nose and the drips on the pumpkin and sew.

โ€” Pumpkin stalk :

Round 1 :

6 sc in MR

Round 2 :

(1 sc, inc) * 3 (9)

Round 3-6 :

9 sc (4 rounds)

Round 7 :

4 sl st, 5 sc (9)

Round 8 :

9 sc

Round 9 :

4 sl st, 5 sc (9)

Round 10 :

9 sc

Round 11 :

(2 sc, inc) * 3 (12)

Round 12 :

12 sc

Round 13 :

(1 sc, inc) * 6 (18)

Round 14 :

18 sc

Round 15 :

(2 sc, inc) * 6 (24)

Round 16 :

24 sc

Info :

Fill in the stalk with fiberfill. Fasten off, leaving a long thread for sewing. Sew the stalk to the pumpkin.

Assembly Instructions

  • Stuff the pumpkin gradually from the center to the sides to create an even round shape and avoid lumps before closing the top.
  • Insert the long thread into a needle, pass the needle through the base and exit on the opposite side, then tighten and repeat twice to create the pumpkin lift before fastening off and hiding the tail.
  • Use pins to position the eyes, nose and the drip pieces on the pumpkin surface to check placement, then sew them securely in place with matching yarn.
  • Sew the stuffed stalk to the top center of the pumpkin using the long thread left on the stalk and secure firmly with several passes.
  • Weave in all ends neatly on the inside with a yarn needle and trim excess yarn to finish a clean look.

Important Notes

  • ๐Ÿ’กWork BLO and FLO rounds exactly as instructed to achieve the correct facial overlay and texture.
  • ๐Ÿ’กDo not cut the brown thread before crocheting the drips so you can attach them seamlessly around the edge.
  • ๐Ÿ’กLeave long threads when fastening off at key points for sewing pieces together and creating the pumpkin lift.
  • ๐Ÿ’กUse pins to temporarily secure features and check symmetry before permanently sewing them in place.

This cute pumpkin amigurumi pattern is a delightful little project for Halloween decorations and handmade gifts. It combines simple shaping, a color change, and decorative dripping details for a spooky-cute result. Make a whole set in different colors to fill a mantel or table display. ๐ŸŽƒ๐Ÿงถ

You ask,

we answer.

FAQs

What size will the finished piece be?

The finished pumpkin measures approximately 3.94 inches (10 cm) in height when made with the recommended 1.75 mm hook and the suggested yarn amounts.

Can I use different yarn weights for this pattern?

Yes, you can use different yarn weights but the final size will change; adjust your hook accordingly and expect a chunkier or smaller pumpkin depending on your choice.

Do I need prior crochet experience for this pattern?

This pattern is rated intermediate, so basic knowledge of single crochet, increases, decreases, BLO and FLO techniques is recommended for best results.

How long does this project typically take to complete?

Most crocheters finish this pumpkin in about 2-4 hours, depending on experience and how much time you spend on sewing and finishing details.

How do I attach the drip and facial pieces accurately?

Pin the drip, eyes and nose in place first to check symmetry, then sew each piece securely with matching yarn, hiding ends inside the pumpkin.