🧶 Beautiful ✨ Detailed 💝 Adorable

Pocket Wall Hanging Pattern

Pocket Wall Hanging Pattern
4.2★ Rating
5-7 Hours Time Needed
3.6K Made This
✂️

Intermediate Level

Ideal for those with basic crochet experience, featuring slightly more advanced stitches and techniques to expand your skills.

⏱️

Weekend Treat

Takes 5-7 hours, making it an enjoyable project to finish over a couple of days.

🏡

Cozy Accent

A warm touch for your space that transforms ordinary corners into inviting nooks filled with handmade charm.

About This Pocket Wall Hanging Pattern

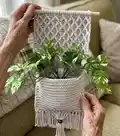
This pattern creates a textured pocket wall hanging featuring a diamond stitch panel and a sewn pocket for small items or a faux plant. It includes step-by-step rows for the diamond stitch, pocket shaping in BLO, and clear instructions for making and attaching tassels. Youll finish the piece by threading it onto a wooden dowel and adding a small bead for a polished boho look.

Pocket Wall Hanging Pattern crochet pattern - detailed view of completed project

Works up in worsted weight yarn and uses front post treble crochet techniques to create the diamond texture. The pattern also shows you how to fold and sew the pocket and attach tassels for a finished hanging.

Why You'll Love This Pocket Wall Hanging Pattern

I absolutely love this pattern because the diamond stitch creates an elegant texture that looks more complicated than it is. I enjoy how the pocket adds both form and function—its perfect for small decor or a faux plant. I love that the tassels and single bead give a handmade, boho charm that fits many interiors. I also appreciate that the pattern includes clear stitch tutorials for FPtr and FPtr2tog, which helped me learn a new technique while making something beautiful.

Pocket Wall Hanging Pattern step 1 - construction progress Pocket Wall Hanging Pattern step 2 - assembly progress Pocket Wall Hanging Pattern step 3 - details and accessories Pocket Wall Hanging Pattern step 4 - final assembly and finishing

Switch Things Up

I love playing with color when I make this wall hanging; try a gradient of greys or alternating accent colors in the diamond section to change the mood.

If you want a chunkier look I often switch to a bulkier yarn and a larger hook to create an oversized, cozy version of the hanging.

I sometimes make smaller versions using lighter yarn to create a set of pocket hangings that look great in a gallery wall arrangement.

You can replace the wooden dowel with a branch, metal rod, or painted dowel to match your decor—I like a natural branch for rustic appeal.

I like to add beads or wooden accents to the tassels for a personalized touch; larger beads need two long strands to thread through them securely.

For a plant-safe pocket, line the inner pocket with a waterproof fabric or place a small pot inside a jar to protect the yarn from moisture.

If you prefer cleaner edges, I sometimes add a crocheted trim or single crochet border around the pocket after sewing it closed to hide seams.

I also vary tassel length and placement—shorter, denser tassels give a neater look while long, layered tassels feel more bohemian.

Want pockets for more storage? I sometimes extend the pocket height or add interior stitching to create divided pockets for keys and mail.

Finally, I recommend trying contrasting yarn textures (a cotton body with a wool tassel) for subtle visual interest; experimenting is half the fun!

Common Mistakes & How to Fix Them

✗ Skipping the turning chain instructions causes incorrect row height and stitch placement; follow the ch 1 for sc/FPtr rows and ch 2 for dc rows exactly so your rows line up correctly. ✗ Not counting stitches after each increase or decrease leads to lopsided panels; count your stitches at the end of every row and correct mistakes immediately to keep the diamond pattern even. ✗ Failing to skip the required stitch after FPtr or FPtr2tog will distort the diamond shape; pay attention to the Video Note and skip a stitch after completing FPtr or FPtr2tog before working sc 3. ✗ Sewing the pocket unevenly will twist or bulge the finished pocket; fold the pocket carefully to overlap the diamond section and sew the two layers together along the edges with a yarn needle for a neat finish. ✗ Using inconsistent tension with front post stitches can make the diamonds uneven; try practicing FPtr and FPtr2tog on a swatch to keep tension consistent when working the main panel.

Pocket Wall Hanging Pattern

Make a stylish pocket wall hanging that doubles as decor and a small planter pocket. Youll work a textured diamond stitch panel, add a sewn pocket, and finish with playful tassels for a boho look. Perfect for gifting or sprucing up a blank wall, this pattern guides you step-by-step so you can create a polished piece with a wooden dowel and bead detail.

Intermediate 5-7 Hours

Materials Needed for Pocket Wall Hanging Pattern

— Main Fabric

  • 01
    225 yds of light grey yarn (size 4) (Craftsmart Value in Mushroom)

— Tools Required

  • 01
    5 mm crochet hook
  • 02
    Yarn needle
  • 03
    Wooden dowel
  • 04
    A small brass or wooden bead
  • 05
    Scissors

Progress Tracker

0% Complete

— Main Panel (Diamond Stitch) :

Round 1 :

ch 30. Starting in the 2nd ch from the hook, sc into the back bump of each ch (29)

Info :

Turning chain instructions: At the start of each row, ch 1 for sc rows and FPtr rows, ch 2 for dc rows. Do not count the turning chains as stitches. diamond stitch begins: Video Note: After completing a FPtr or FPtr2tog, make sure you skip a st before working sc 3.

Round 2 :

dc into each st (29)

Round 3 :

Work a FPtr into the 2nd st from the right of row 1. [Skip a st and then sc into the next 3 sts of row 2. FPtr2tog by working into the same st as the last FPtr st worked, skip the next 3 sts of row 1, and then work into the 4th st] 6 times. When you have 5 sts left in the row, skip a st and then sc into the next 3 sts of row 2. FPtr into the same st as the last FPtr worked from row 1, but stop before completing the stitch (with 2 loops left on the hook). Work a sl st by inserting your hook into the last stitch of the row, pulling up a loop and then pulling that loop through both loops on the hook (29)

Round 4 :

dc into each st (29)

Round 5 :

sc 2. FPtr2tog by working around the first FPtr from row 3 and then around the following FPtr2tog (around the entire upside down "V"). [Skip a st and then sc into the next 3 sts of row 4. FPtr2tog by working around the last FPtr2tog from row 3 that you just worked around and then around the following FPtr2tog from row 3] 5 times. When there are 7 stitches left in the row, skip a st and then sc into the next 3 sts of row 4. FPtr2tog by working around the last FPtr2tog from row 3 that you just worked around and then around the final FPtr from row 3. Skip a st and then sc into the last 2 sts (29)

Round 6 :

dc into each st (29)

Round 7 :

FPtr around the first FPtr2tog from row 5. [Skip a st and then sc into the next 3 sts of row 6. FPtr2tog by working around the last FPtr2tog you just worked around and then around the following FPtr2tog from row 5] 6 times. When you have 5 sts left in the row, skip a st and then sc into the next 3 sts of row 6. FPtr around the last FPtr2tog that you just worked around from row 5, but stop before completing the stitch (with 2 loops left on the hook). Work a sl st by inserting your hook into the last stitch, pulling up a loop and then pulling that loop through both loops on the hook (29)

Round 8-39 :

repeat the same sequence [rows 4-7] 8 times (29)

Infos :

*pattern continues on next page...

FPtr :

1: YO twice and inserting from the front, weave hook behind and around the post of the stitch 2: YO and pull up a loop 3: YO and pull through the first 2 loops on the hook 4: YO and pull through the next 2 loops on the hook 5: YO and pull through the last 2 loops on the hook

FPtr2tog (Makes an upsidedown "V") :

1: Work a FPtr steps 1-4 around the post of the first required st, leaving 2 loops left on the hook 2: YO twice and weave hook around the post of the next required stitch 3: YO and pull up a loop 4: YO and pull through first 2 loops on the hook 5: YO and pull through next 2 loops on the hook 6: YO and pull through all 3 loops left on the hook

— Pocket :

Round 40-42 :

sc into the BLO of each st (29)

Round 43 :

[sc 9, inc, sc 9, inc, sc 9] into the BLO of each st (31)

Round 44 :

sc into the BLO of each st (31)

Round 45 :

[sc 10, inc, sc 9, inc, sc 10] into the BLO of each st (33)

Round 46 :

sc into the BLO of each st (33)

Round 47 :

[sc 10, inc, sc 11, inc, sc 10] into the BLO of each st (35)

Round 48 :

sc into the BLO of each st (35)

Round 49 :

[sc 17, inc, sc 17] into the BLO of each st (36)

Round 50 :

sc into the BLO of each st (36)

Round 51 :

[sc 17, inc, sc 18] into the BLO of each st (37)

Round 52-67 :

sc into the BLO of each st (37)

Infos :

fasten off and weave in ends. fold the pocket section up to overlap the diamond pattern. using your yarn needle, create the pocket by sewing the two layers together along the edges. fasten off and weave in ends.

Infos :

NOTES: This pocket wall hanging is not meant for very large or heavy items. If the items inside your pocket are a bit too heavy, use tacks to pin either edge of the wall hanging to the wall, placing the tacks just below the inside of the pocket to hide them. This will make the wall hanging a bit more flush with the wall and add stability.

— Tassels :

Info :

cut 30 strands of 5.5 inch yarn, and 7 strands of 8.5 inch yarn. use 2 strands of the 5.5 inch yarn for each tassel. There will be 15 tassels placed on every other stitch, starting in one corner. to make a tassel, fold the 2 strands in half. Insert your hook up through the back of the stitch and pull up a loop of the strands. Pull the ends through the loop and tighten. make a tassel using one strand of the 8.5 inch yarn on top of each of the 7 center tassels you already created. take one strand from each long tassel (or both if your bead is larger), and thread through the bead. Make a knot underneath the bead if you need to. trim the remaining long strands not used in the bead to make them level with the shorter strands.

Info :

attach the dowel to the top edge by threading the yarn around the dowel and through each stitch with a yarn needle. weave in any loose ends.

Info :

TIP: To keep the yarn used for hanging your finished work on the wall from pinching the corners of your work, secure the yarn to each end of the wooden dowel.

Assembly Instructions

  • Attach the wooden dowel to the top edge by threading the yarn around the dowel and through each stitch with a yarn needle, then secure and weave in ends.
  • Fold the pocket section up to overlap the diamond pattern and, using your yarn needle, sew the two layers together along the side edges to form the pocket.
  • Make 15 tassels using two 5.5 inch strands each and place them on every other stitch starting in one corner; add one long strand to the 7 center tassels and thread bead through the long strands, knotting underneath if needed.
  • Trim tassel strands to even length and, if using a bead, trim remaining long strands not used in the bead so they are level with the shorter strands.
  • If the pocket contains heavier items, pin the wall hanging near the pocket edges with tacks just below the pocket interior to help the hanging sit flush against the wall.

Important Notes

  • 💡Use the turning chain instructions exactly: ch 1 for sc and FPtr rows and ch 2 for dc rows; do not count turning chains as stitches.
  • 💡After completing a FPtr or FPtr2tog, skip a stitch before working sc 3 to preserve the diamond pattern and alignment.
  • 💡Fasten off and weave in ends after completing the pocket rows to keep the inside of the pocket neat and secure.
  • 💡This pocket wall hanging is not meant for very large or heavy items; use tacks to pin either edge if needed for extra stability.
  • 💡When attaching the dowel, secure the hanging yarn to each end of the dowel to prevent pinching and to keep corners flat.

This Pocket Wall Hanging brings boho charm to any wall with a textured diamond stitch and a handy sewn pocket. Its finished with tassels and a wooden dowel for a polished, handmade look. Perfect for small plants, mail, or decorative accents—create a cozy corner in minutes! 🧶🏡

You ask,

we answer.

FAQs

What size will the finished piece be?

The finished wall hanging measures approximately 8" x 17" with tassels when made with the recommended yarn and 5 mm hook.

Can I use different yarn weights for this pattern?

Yes, you can change yarn weight but it will affect the final size and texture; adjust your hook accordingly and consider making a gauge swatch first.

Do I need prior crochet experience for this pattern?

This pattern is rated intermediate because it uses front post treble crochet (FPtr) and FPtr2tog techniques; basic crochet skills plus willingness to learn these stitches are recommended.

How long does this project typically take to complete?

Most crocheters complete this project in 5-7 hours, though time may vary depending on experience and customization choices.