🧢 Beautiful ✨ Detailed πŸ’ Adorable

Miniature Pippi Amigurumi Pattern

Miniature Pippi Amigurumi Pattern
3.9β˜… Rating
5-7 Hours Time Needed
1.9K Made This
βœ‚οΈ

Intermediate Level

Ideal for those with basic crochet experience, featuring slightly more advanced stitches and techniques to expand your skills.

⏱️

Weekend Treat

Takes 5-7 hours, making it an enjoyable project to finish over a couple of days.

🧸

Cute Companion

An adorable friend to cherish, handcrafted with love to bring comfort and joy for years to come.

About This Miniature Pippi Amigurumi Pattern

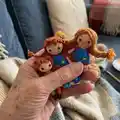
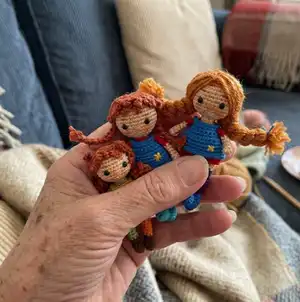
This pattern creates a tiny Pippi-inspired amigurumi doll approximately 7 cm tall when worked with lace yarn no.50. Youll crochet the legs, body, head, shoes, dress and hair with step-by-step rounds and clear color-change notes. The pattern includes a mohair rope hair option and tips for finishing and glueing hair securely.

Miniature Pippi Amigurumi Pattern crochet pattern - detailed view of completed project

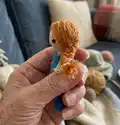
Detailed rounds are written out exactly so you wont miss a single stitch or shaping step. Photos and notes explain joining legs, placing eyes and assembling finished parts.

Why You'll Love This Miniature Pippi Amigurumi Pattern

I absolutely love this pattern because it captures so much character in a very small size β€” the striped legs and braids give the doll instant personality. I enjoy the challenge of working tiny stitches and color changes; it feels like miniature sculpting. The hair techniques (either crocheted strands or mohair rope) let me experiment with texture and volume every time. This pattern also lets me make quick, giftable dolls that still feel handcrafted and special.

Miniature Pippi Amigurumi Pattern step 1 - construction progress Miniature Pippi Amigurumi Pattern step 2 - assembly progress Miniature Pippi Amigurumi Pattern step 3 - details and accessories Miniature Pippi Amigurumi Pattern step 4 - final assembly and finishing

Switch Things Up

I love how easy it is to customize colors β€” I often swap the striped leg colors to create new personalities and seasonal looks.

I sometimes use a thicker yarn and a larger hook to make a chunky, cuddly version instead of a tiny one; it changes the whole feel and is fun to experiment with.

I like alternating hair techniques: try crocheted hair strips for tidy braids or mohair rope for wild, fluffy hair that can be trimmed and styled.

You can change eye size or use embroidered eyes for an entirely different expression β€” smaller eyes make a cuter face, larger give a more toy-like look.

For accessories, I often add a tiny embroidered pocket on the apron, or tiny buttons made from contrasting yarn to give a handcrafted detail.

I sometimes make sets with matching outfits by changing the dress color and adding a tiny hat or scarf β€” great for gifting multiple dolls with a theme.

If you want a sturdier toy, I add a little wire in the limbs for posability; otherwise leave them soft for safety and plush appeal.

I recommend trying different hair lengths and braid styles β€” two short braids, one long ponytail, or loose curls all give different characters.

Try embroidering freckles or a small mouth to give expression; experiment on scrap pieces first until you find the look you like.

You can also turn this into a keychain by leaving a long yarn tail at the top when finishing and attaching a small metal ring β€” a quick gift idea I use a lot.

Common Mistakes & How to Fix Them

βœ— Not joining the legs evenly before crocheting the body; make sure the loops are opposite each other and the legs are the same height before joining as described in the body section. βœ— Starting safety eyes too early or too close together which distorts the face; place eyes between the 38th and 39th rounds and keep a distance of 6sc as instructed. βœ— Forgetting to start stuffing when the pattern indicates; begin filling fiber at the indicated round (for example at the body round where it says start filling fiber) to maintain smooth shaping. βœ— Ignoring the direction of the loop when finishing the body top; take the beginning of the loop back and center it to keep the opening neat and easy to close. βœ— Overtightening yarn when changing colors causes puckering; switch colors smoothly and keep consistent tension during color stripes and dress joining.

Miniature Pippi Amigurumi Pattern

Make a tiny, delightful Pippi-style doll that measures about 7 cm tall β€” perfect for collectors, keychains, and tiny gifts. This pattern walks you through every part: legs, body, head, hair (including mohair options), dress and apron, with clear round-by-round instructions. Youll enjoy the bright color changes and fun hair construction that give this miniature personality. Suitable for crocheters who enjoy detail work and small-scale amigurumi.

Intermediate 5-7 Hours

Materials Needed for Miniature Pippi Amigurumi Pattern

β€” Main Fabric

  • 01
    Lace yarn no.50 (20 g skeins) in various colors: skin tone (20 g), red (20 g), green (20 g), yellow (20 g), purple (20 g), orange (20 g), blue (20 g)
  • 02
    Mohair or hair yarn for full hair option, small amount (approx. 10-20 g)
  • 03
    Fiberfill / polyester stuffing (small amount)
  • 04
    Optional contrast yarns for stripes and dress details (several 20 g skeins)

β€” Tools Required

  • 01
    Crochet hook 0.55mm (22 no)
  • 02
    Crochet hook 3.0 mm (for details if required)
  • 03
    3 mm safety eyes (2 pieces)
  • 04
    Scissors
  • 05
    Yarn needle for sewing and weaving ends
  • 06
    Stitch markers
  • 07
    Liquid glue for hair and mohair attachment
  • 08
    Pins for assembly (optional)

Progress Tracker

0% Complete

β€” General :

Info :

The size of ready doll is 7 cm. This pattern contains step by step instructions about crocheting a doll itself.

Info :

MATERIALS AND TOOLS: a lace yarns no :50/ 20 gr of the different colors (altınbaşak, leylak vb.) and fiberfill. Hook 0.55 / 22 no and 3 mm safeyt eyes, hair yarn, liquid glue.

β€” Arms :

Round 1 :

magic ring 5sc

Round 2 :

5sc inc (10)

Round 3 :

10sc

Round 4 :

sc, sc in 3dc bobble, 8sc

Round 5 :

2sc dec, 6sc (8)

Round 6-8 :

8sc (3 rounds)

Info :

Skin colour;

Round 9-12 :

8sc (7 rounds) and finished. Cloused 4 sc.

β€” Legs :

Round 1 :

magic ring 5sc

Round 2 :

5sc inc (10sc)

Round 3-12 :

10sc (10 rounds)

Info :

Skin colours;

Round 13-15 :

10 sc (3 rounds) (filling fiber).

β€” Body :

Info :

**6 ch join the other leg. Let the loops be opposite each other. Let the legs be even. If you want it to be more introverted, combine it accordingly. After joining, crochet 10 sc and set your starting point. 10+6+10+6 in total (32sc)

Info :

Change colour; red/green

Round 1-7 :

32sc (6 round)

Info :

****4. Round BLO **** If you're going to do the red suit, that's BLO, the body's going to die, plus four rows of HDC crocheted.

Round 8 :

14 sc, dec,14 sc, dec (30sc)

Round 9 :

3sc dec*6 (24 sc) (satrt filling fiber)

Round 10-11 :

24 sc (2 rounds)

Round 12 :

2sc dec (18)

Round 13-14 :

18sc (2 round)

Info :

Skin colours;

Round 15 :

Sc dec (12)

Round 16 :

12 sc (1 round)

Info :

**take the beginning of the loop back and center it.

β€” Dress :

Info :

Attach the string to the BLO row on the body section. Make 2 ch and make 32 HDC. Complete the round and combine with cc. Repeat 4 times and finish.

β€” Head :

Info :

Skin colours;

Round 31 :

Sc inc*6 (18)

Round 32 :

2sc inc*6 (24)

Round 33 :

Sc inc*12 (36)

Round 34 :

5sc inc*6 (42)

Round 35 :

6sc inc*6 (48)

Round 36-43 :

48 sc (8 rounds)

Info :

**The 38th and 39th rounds are fitted with a locked eye. Keep a distance of 6sc.

Round 44 :

6sc dec

Round 45 :

5sc dec

Round 46 :

4sc dec (start filling fiber)

Round 47 :

3Sc dec

Round 48 :

2sc dec

Round 49 :

sc dec

Round 50 :

closed.

β€” Shoes :

Round 1 :

magic ring 8sc

Round 2 :

8sc inc (16sc)

Round 3 :

blo ;16sc

Round 4 :

16 sc

Round 5 :

5sc, 3sc dec, 5sc (13)

Round 6 :

5sc, sc dec, 5sc (12)

Round 7 :

FLO ; 12sc, cc

Info :

*Sew the shoes to the legs.

β€” Hair :

Round 1 :

magic ring 6sc

Round 2 :

6sc inc*6 (12)

Round 3 :

1sc inc*6 (18)

Round 4 :

2sc inc*6 (24)

Info :

After that, we will work on RS 24th

Round 1 :

Make 15 chains, scroll with 14 HDC or cc's

Round 2 :

10 ch, 9 HDC

Round 3-5 :

7 ch, 6 HDC (3 times) (Make 6 hairs in the same loop twice.)

Round 6 :

5 ch, 4 HDC (1 times)

Round 7-9 :

7 ch, 6 HDC (2 times) (Make four hairs in the same loop twice.)

Round 10 :

10 ch, 9 HDC

Round 11 :

15 ch, 14 HDC

Round 12-15 :

35 ch, 34 HDC (4 times)

Round 16-21 :

25 ch, 24 HDC (6 times)

Round 22-25 :

35 ch, 34 HDC (4 times)

Info :

Not: turn the hair over and stick it on the head. Let the bangs come forward. Glue the remaining pieces of hair. braid long hair

β€” Hair With Mohair Rope :

Info :

cut the hair rope with the density you want. I'm usually cutting 12 of them, 10 or 12 centimeters long, triple them into the head and then light glue to secure them. Then braid your hair. Glue the hair to the head as in the photo. Or perpendicular to the hair. Cut it in half and knit.

β€” Apron :

Round 1 :

19 Chains make and turn 18 sc make

Round 2 :

2sc inc*6 (24sc) turn and 1 ch

Round 3 :

4sc, 5 ch and make sc in rs4, 10 sc, 5 ch and make sc in rs4, 4 sc

Round 4 :

1 round 26 sc

Round 5 :

4 sc, 2inc, 14sc, 2inc, 4sc (30 sc )

Round 6 :

4sc inc*6 (36)

Round 7-12 :

6 round 36 sc and finished.

Info :

**make SC 1 round around Apron. **patch over the apron with needle and thread. It should be like a pocket. Make it square.

Assembly Instructions

  • Insert and secure safety eyes on the head between rounds 38-39, keeping a distance of 6 single crochets between them before closing the head.
  • Attach the legs by joining 6 chains between them as described in the Body section, align loops opposite each other and crochet the joining round (10+6+10+6 = 32 sc) before continuing the body shaping.
  • Sew the shoes to the legs after finishing the shoes (see Shoes section) using matching yarn and small whipstitches so they sit neatly on the foot.
  • Glue or sew the hair: for mohair rope option triple the rope pieces and glue them into the head base, then braid or trim as desired; for crocheted hair strips, stitch the strips to the BLO row and shape bangs forward.
  • Patch the apron onto the dress with needle and thread to form a small pocket and sew the arms to the body sides at the appropriate rounds for a natural pose.

Important Notes

  • πŸ’‘Let the loops be opposite each other when joining legs so the legs are even and the body joins without twisting.
  • πŸ’‘When placing eyes make sure to keep a distance of 6 single crochet stitches between them (place on rounds 38 and 39).
  • πŸ’‘Start filling fiber when the pattern indicates (for example at the body and head rounds noted) to keep smooth shaping and avoid lumps.
  • πŸ’‘Take the beginning of the loop back and center it when closing the top to make the final seam neat and easy to finish.

This tiny Pippi doll is a joyful little project that packs personality into a palm-sized friend. Its bright stripes, playful braids and miniature dress make it a perfect handmade gift or collectible. Enjoy the detailed rounds and hair options to create a unique tiny companion. 🧢✨

You ask,

we answer.

FAQs

What size will the finished piece be?

The finished miniature Pippi measures approximately 7 cm tall when made with lace yarn no.50 and the recommended hook sizes.

Can I use different yarn weights for this pattern?

Yes, but changing yarn weight will alter the final size; use an appropriate hook for your chosen yarn and expect a larger or smaller finished doll.

Do I need prior crochet experience for this pattern?

This pattern is rated intermediate; it assumes familiarity with single crochet, increases, decreases, working into BLO/FLO, and basic amigurumi assembly techniques.

How long does this project typically take to complete?

Most crocheters complete this project in 5-7 hours, depending on experience, color changes and how much time you spend on hair and finishing details.