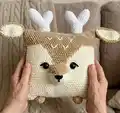
Make a charming Pillow Reindeer to bring handmade warmth to your home. This cozy cushion features soft velvet yarn, adorable antlers, ears, embroidered details and full assembly instructions to guide you. You will love how the textured velvet stitch and colorwork create a sweet reindeer face that brightens any room. Perfect as a gift or a seasonal accent for nursery, bedroom or living room.
Progress Tracker
0% Complete
— Pillow :
Info :
Crochet with beige yarn.
Rnd 2 :
connect in a circle with the first stitch: 1 sc (it is the first stitch of a new round) and crochet further 89 sc {90}
Info :
Next, alternate colors:
Rnd 20 :
in beige: 18 sc, in brown: 8 sc, in beige: 64 sc {90}
Rnd 21 :
in beige: 18 sc, in brown: 8 sc, in beige: 64 sc {90}
Rnd 22 :
in beige: 17 sc, in brown: 10 sc, in beige: 63 sc {90}
Rnd 23 :
in beige: 16 sc, in brown: 12 sc, in beige: 60 sc, in brown: 1 sc, in beige: 1 sc {90}
Rnd 24 :
in beige: 15 sc, in brown: 14 sc, in beige: 16 sc, in brown: 1 sc, in beige: 42 sc, in brown: 2 sc {90}
Rnd 25 :
in beige: 14 sc, in brown: 16 sc, in beige: 14 sc, in brown: 2 sc, in beige: 42 sc, in brown: 2 sc {90}
Rnd 26 :
in brown: 1 sc, in beige: 12 sc, in brown: 19 sc, in beige: 11 sc, in brown: 3 sc, in beige: 42 sc, in brown: 2 sc {90}
Rnd 27 :
in brown: 2 sc, in beige: 10 sc, in brown: 21 sc, in beige: 9 sc, in brown: 4 sc, in beige: 42 sc, in brown: 2 sc {90}
Rnd 28 – 37 :
(10 Rounds) in brown: 46 sc, in beige: 42 sc, in brown: 2 sc {90}
Info :
Leave a long yarn tail for sewing and sew up the top of the pillow. Fasten off, hide the yarn end inside.
Info :
If you secure eyes before stuffing the pillow, insert them between rounds 17 and 18, counting from the bottom (the distance between the eyes is 12-13 sc). In the description, sewing on eyes will be lower.
Info :
Stuff the pillow, especially the corners. Sew up the bottom of the pillow, fasten off, hide it inside.
— Ears (make 2) :
Info :
Crochet with beige yarn.
Row 2 :
from the second chain on the hook: 11 sc, 3 sc in the last chain, on the other side of the chain: 12 sc, ch1, turn
Row 3 :
from the second stitch on the hook: 13 sc, 3 sc in 1 stitch, 12 sc, ch1, turn
Row 4 :
from the second stitch on the hook: 14 sc, 3 sc in 1 stitch, 13 sc
Info :
Fasten off, cut the yarn.
Info :
Crochet the second piece with brown yarn for the edge and then join both pieces to create a two-color ear.
Info :
Crochet with brown yarn (outer ear piece):
Row 2 :
from the second stitch on the hook: 11 sc, 3 sc in the last chain, on the other side of the chain: 12 sc, ch1, turn
Row 3 :
from the second stitch on the hook: 13 sc, 3 sc in 1 stitch, 12 sc, ch1, turn
Row 4 :
from the second stitch on the hook: 14 sc, 3 sc in 1 stitch, 13 sc, ch1
Info :
Do not cut the yarn. Fold both pieces together and crochet through both pieces with brown yarn. Hide the ends inside.
Row 4 (joined) :
15 sc, 3 sc in 1 stitch, 14 sc
Info :
Leave a long yarn end for sewing. Fold the bottom of the ear in half and sew up the edges. Sew the ears to the upper corners of the pillow. Fix the thread and hide inside.
— Nose :
Info :
Crochet with brown and beige yarn, alternating colors.
Rnd 1 :
in brown: 6 sc in an amigurumi ring {6}
Rnd 2 :
in beige: 3 inc, in brown: 3 inc {12}
Rnd 3 :
in beige: (1 sc, inc) – repeat 3 times, in brown: 6 sc {15}
Rnd 4 :
in beige: (2 sc, inc) – repeat 3 times, in brown: (1 sc, inc) – repeat 3 times {21}
Rnd 5 :
in beige: (3 sc, inc) – repeat 3 times, in brown: (2 sc, inc) – repeat 3 times {27}
Rnd 6 :
in beige: (4 sc, inc) – repeat 3 times, in brown: (3 sc, inc) – repeat 3 times {33}
Rnd 7 :
in beige: (5 sc, inc) – repeat 3 times, in brown: (4 sc, inc) – repeat 3 times {39}
Info :
Stuff the nose, sew it between rounds 10 and 18 of the pillow, leave a small hole to facilitate embroidering and fixing the thread.
Info :
Sew on the eyes between rounds 17 and 18 (distance between eyes 12-13 sc). Take black yarn and embroider the nose and eyelids. With beige yarn embroider checkmarks on the forehead. Sew up any holes and hide threads inside.
— Legs (make 2) :
Info :
Crochet with brown yarn.
Rnd 1 :
6 sc in an amigurumi ring {6}
Rnd 2 :
(inc) – repeat 6 times {12}
Rnd 3 :
(1 sc, inc) – repeat 6 times {18}
Info :
Leave a long yarn end for sewing.
— Arms (make 2) :
Info :
Crochet with brown yarn.
Rnd 1 :
6 sc in an amigurumi ring {6}
Rnd 2 :
(inc) – repeat 6 times {12}
Info :
Leave a long yarn end for sewing.
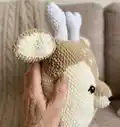
— Antlers (make 2) :
Info :
Crochet with white yarn.
Piece 1 - Rnd 1 :
6 sc in an amigurumi ring {6}
Piece 1 - Rnd 2 :
(inc) – repeat 6 times {12}
Piece 1 - Rnd 3 :
(1 sc, inc) – repeat 6 times {18}
Piece 1 - Rnd 4 – 7 :
(4 rounds) 18 sc
Info :
Do not fasten off on the piece 1, leave the loop open and leave a long tail for sewing.
Piece 2 - Rnd 1 :
6 sc in an amigurumi ring {6}
Piece 2 - Rnd 2 :
(inc) – repeat 6 times {12}
Piece 2 - Rnd 3 :
(1 sc, inc) – repeat 6 times {18}
Piece 2 - Rnd 4 – 5 :
(2 rounds) 18 sc
Info :
Do not cut the yarn, continue crocheting, connecting both pieces:
Joined Rnd 1 :
Along piece 1: 4 sc (crochet the first stitch with 2 loops of both pieces), dec, 2 sc, dec, 2 sc, dec, 2 sc, dec. Along piece 2: 4 sc, dec, 2 sc, dec, 3 sc, dec, 1 sc, dec {28}
Joined Rnd 2 :
(2 sc, dec) – repeat 7 times {21}
Joined Rnd 3 :
11 sc, dec, 6 sc, dec {19}
Info :
Leave a long yarn end for sewing. Stuff the antlers and sew them to the top of the pillow.
Info :
Sew on the arms between rounds 7 and 10, stuff them tightly and sew on the legs. Fix the threads and hide them inside the pillow.
— Assembly & Finishing :
Info :
Insert or sew eyes between rounds 17 and 18 (distance 12-13 sc). Sew the nose between rounds 10 and 18 and embroider eyelids and nose with black yarn. Embroider beige checkmarks on the forehead. Sew ears to upper corners and antlers to the top. Hide all yarn ends inside and shape the pillow.
This cozy Pillow Reindeer will make a sweet handmade accent for your home, blending soft velvet texture with charming facial details. It is the perfect gift for friends, family, or a seasonal touch for your living room or nursery. Enjoy the satisfying mix of simple rounds and cute amigurumi parts that make this project truly special. 🧶🎁