🧢 Beautiful ✨ Detailed πŸ’ Adorable

Nymphs Bag Pattern

Nymphs Bag Pattern
3.9β˜… Rating
12-15 Hours Time Needed
3.7K Made This
βœ‚οΈ

Intermediate Level

Ideal for those with basic crochet experience, featuring slightly more advanced stitches and techniques to expand your skills.

⏱️

Multi-Day Project

A rewarding 12+ hour journeyβ€”perfect for dedicated crafters who love detailed work.

✨

Stylish Touch

An elegant detail to elevate any look, combining traditional techniques with contemporary design sensibilities.

About This Nymphs Bag Pattern

This pattern creates a structured crochet handbag called the Nymphs bag using polyester macrame cord and single crochet thermal stitch technique. It features shaping for a tapered top, a separate side part, and instructions for lining and hardware. The pattern uses clear step-by-step photos and row-by-row instructions to help you achieve a professional finish.

Nymphs Bag Pattern crochet pattern - detailed view of completed project

Designed for intermediate crocheters, the pattern includes stitch placement tips, finishing instructions, and recommended materials for a durable, fashionable result. Youll also find measurements and gauge to help you match the sample size.

Why You'll Love This Nymphs Bag Pattern

I absolutely love this pattern because it combines clean geometry with tactile, thermal stitch texture to create a modern, wearable bag. I enjoyed the shaping process that turns a rectangle into a tapered, elegant flap and top. The use of polyester cord makes the bag sturdy and ideal for everyday use, and I appreciate how the instructions break each row down so mistakes are easy to fix. Sewing the lining and adding hardware gives a satisfying finishing touch that makes each bag feel like a boutique piece.

Nymphs Bag Pattern step 1 - construction progress Nymphs Bag Pattern step 2 - assembly progress Nymphs Bag Pattern step 3 - details and accessories Nymphs Bag Pattern step 4 - final assembly and finishing

Switch Things Up

I love how easy it is to customize this bag by changing the cord color; try a neutral and a bold accent for a modern contrast.

You can make the bag larger or smaller simply by increasing or decreasing the starting chain and adjusting the number of rows to fit your desired dimensions.

I often swap the metal chain for a crocheted strap using the 2 mm cord to match the bag for a softer, tonal finish.

Try substituting cotton cord or a different macrame cord to change the drape and firmness of the bag; always make a gauge swatch first.

I sometimes add a decorative pocket to the lining or an inner zipper pocket for extra functionality and security.

For a boho look, add fringe or tassels to the sides or bottom; for a cleaner look, keep the lines smooth and attach minimalist hardware.

If you prefer a magnetic snap instead of a snake lock, sew in a metal magnetic closure centered under the flap and reinforce the area with extra stitches.

I recommend experimenting with different stitch patterns for the front panel; substituting a textured stitch can give a unique effect but adjust row counts accordingly.

Make a reversible version by choosing two contrasting cord colors and sewing the lining so the contrasting side shows when you fold the flap.

Finally, personalize your bag with embroidered initials or tiny attached charms to make each piece one-of-a-kind.

Common Mistakes & How to Fix Them

βœ— Skipping the chain foundation count can lead to a bag that is too narrow or too wide; count 31 CH at the start and verify your gauge before continuing. βœ— Crocheting into both loops instead of the specified back loop/front loop can ruin the thermal stitch texture; always work in the BACK loop and the FRONT loop of the pre-previous row exactly as directed. βœ— Forgetting to insert the hook into the same lower loop at increases and decreases distorts the edge shaping; place the hook in the indicated lower loop for the first and last stitches as described. βœ— Not cutting and securing ends properly can cause unraveling at the shaped top; cut, pull out the end, strengthen, hide on the wrong side and process with fire as instructed for a secure finish.

Nymphs Bag Pattern

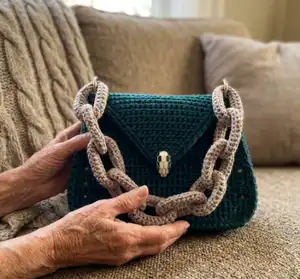
Make a stylish, handcrafted Nymphs bag using polyester cord and simple crochet stitches. This intermediate pattern guides you step-by-step through creating a durable, structured bag with a thermal stitch texture and shaped top. Youll learn shaping, decreases, and how to finish edges so your bag looks polished. Perfect for gifting or adding a chic handmade piece to your accessories collection.

Intermediate 12-15 Hours

Materials Needed for Nymphs Bag Pattern

β€” Main Fabric

  • 01
    Polyester cord 3 mm - approx. 400 yards (350 m) - example: Shikimiki Matte Macrame polyester cord, ocean color (main color)
  • 02
    Polyester cord 2 mm - approx. 60 yards (50 m) - example: Shikimiki PP Macrame Mini polyester cord, latte color (accent/chain)
  • 03
    Fabric for the lining - 20x20 inches (50x50 cm)

β€” Tools Required

  • 01
    Crochet hook size 4 mm (for 3 mm cord main work)
  • 02
    Crochet hook size 3 mm (for 2 mm cord details, if needed)
  • 03
    Snap hook rings 30-38 mm (2 pieces)
  • 04
    Chain, 39-43 inches (1-1.2 m)
  • 05
    Small snake lock, 1 1/2 inches (4 cm)
  • 06
    Double cap rivets 5 mm, 20 pieces (optional)
  • 07
    4 stitch markers
  • 08
    Plastic needle with large eyelet
  • 09
    Sewing needle and thread of the base color
  • 10
    Lighter (for processing ends)
  • 11
    Scissors

Progress Tracker

0% Complete

β€” Materials & Gauge :

Infos :

Materials: polyester cord 3 mm (approx. 400 yards/350 m) and polyester cord 2 mm (approx. 60 yards/50 m), hooks 3 mm and 4 mm, hardware and lining as specified. Gauge: 15 stitches and 24 row = 4x4 inches (10x10cm). Finished bag from the specified materials: length - 11 inches (27 cm), height - 8 inches (20 cm), width - 4 inches (10 cm), length of the crochet chain - 22 inches (55 cm).

β€” Front side :

Info :

Take the 3 mm cord and the 4 mm hook.

Round 1 :

Crochet 31 CH.

Round 2 :

1 row. 30 SC from the 2nd loop from the hook on the back loop of the chain only, CH.

Info :

Insert the hook in the last SC, pull out the end. Crochet in the end in the next row. Next crochet a turning rows.

Round 3 :

2 row. Inc, 28 SC, Inc, on the back loop and the loop of the chain only, CH (=32).

Round 4 :

3 row. Inc, 30 SC, Inc, on the back loop and the front loop of the pre-previous row only, CH (=34).

Info :

When making the first increase and SC, as well as the last increase and SC, insert the hook on the same lower loop of the increase from the previous row.

Info :

Next, crochet SC of the each subsequent row on the back loop and the front loop of the pre-previous row only (thermal stitch).

Round 5 :

4 row. 34 SC, CH. When crocheting the first 2 SC and the last 2 SC, insert the hook on the same lower loop of the increase from the previous row.

Round 6 :

5 row. 34 SC, CH.

Round 7-11 :

6-10 rows. 34 SC, CH.

Round 12 :

11 row. Dec, 30 SC, Dec, CH (=32).

Round 13 :

12 row. 32 SC, CH. In this row and the subsequent rows after decreases, when crocheting the first and last SC, insert the hook on the two lower loops of the decrease from the previous row.

Round 14-17 :

13-16 rows. 32 SC, CH.

Round 18 :

17 row. Dec, 28 SC, Dec, CH (=30).

Round 19 :

18 row. 30 SC, CH.

Round 20 :

19 row. 30 SC, CH.

Round 21 :

20 row. 30 SC, CH.

Round 22 :

21 row. 30 SC, CH.

Round 23 :

22 row. 30 SC, CH.

Round 24 :

23 row. Dec, 26 SC, Dec, CH (=28).

Round 25 :

24 row. 28 SC, CH.

Round 26 :

25 row. 28 SC, CH.

Round 27 :

26 row. 28 SC, CH.

Round 28 :

27 row. 28 SC, CH.

Round 29 :

28 row. 28 SC, CH.

Round 30 :

29 row. Dec, 24 SC, Dec, CH (=26).

Round 31 :

30 row. 26 SC, CH.

Round 32 :

31 row. 26 SC, CH.

Round 33 :

32 row. 26 SC, CH.

Round 34 :

33 row. 26 SC, CH.

Round 35 :

34 row. 26 SC, CH.

Round 36 :

35 row. 26 SC. Crochet the last row on two loops and the front loop of the pre-previous row only.

Info :

Cut the thread, pull out the end. Strengthen and hide the end on the wrong side. Process with fire.

β€” Back side :

Round 1-34 :

1-34 rows. Crochet similarly to rows 1-34 of the front side.

Round 35-47 :

35-47 rows. 26 SC, CH.

Round 48 :

48 row. Dec, 22 SC, Dec, CH (=24).

Round 49 :

49 row. 24 SC, CH.

Round 50 :

50 row. Dec, 20 SC, Dec, CH (=22).

Round 51 :

51 row. 22 SC, CH.

Round 52 :

52 row. Dec, 18 SC, Dec, CH (=20).

Round 53 :

53 row. 20 SC, CH.

Round 54 :

54 row. Dec, 16 SC, Dec, CH (=18).

Round 55 :

55 row. 18 SC, CH.

Round 56 :

56 row. Dec, 14 SC, Dec, CH (=16).

Round 57 :

57 row. 16 SC, CH.

Round 58 :

58 row. Dec, 12 SC, Dec, CH (=14).

Round 59 :

59 row. 14 SC, CH.

Round 60 :

60 row. Dec, 10 SC, Dec, CH (=12).

Round 61 :

61 row. 12 SC, CH.

Round 62 :

62 row. Dec, 8 SC, Dec, CH (=10).

Round 63 :

63 row. 10 SC, CH.

Round 64 :

64 row. Dec, 6 SC, Dec, CH (=8).

Round 65 :

65 row. 8 SC, CH.

Round 66 :

66 row. Dec, 4 SC, Dec, CH (=6).

Round 67 :

67 row. 6 SC, CH.

Round 68 :

68 row. Dec, 2 SC, Dec, CH (=4).

Round 69 :

69 row. 4 SC, CH. Crochet the last row on two loops and the front loop of the pre-previous row only.

Info :

Cut the thread, pull out the end. Strengthen and hide the end on the wrong side. Process with fire.

β€” Side part :

Round 1 :

Crochet 6 CH.

Round 2 :

1 row. 5 SC from the 2nd loop from the hook on the back loop of the chain only, CH.

Assembly Instructions

  • Sew the side parts to the main front and back panels matching row counts and aligning corners, using a whipstitch for a neat, strong seam.
  • Attach the lining to the wrong side of the bag by pinning it in place and sewing with matching thread, ensuring the lining fits smoothly inside the bag.
  • Install snap hook rings to the sides using double cap rivets or by stitching through the top edge reinforcement, ensuring hardware is evenly spaced.
  • Attach the chain or crocheted strap to the snap hook rings, and secure any decorative chain or small snake lock in the center for the closure.
  • Hide and secure all yarn ends on the wrong side; cut the ends, pull them out, strengthen and process with fire according to the instructions for a tidy finish.
  • If adding rivets or metal hardware, pre-punch holes and use appropriate tools to set rivets; check placement against photos before final setting.

Important Notes

  • πŸ’‘Use stitch markers to keep track of the start of rows and especially during increases and decreases to maintain even shaping.
  • πŸ’‘Work the thermal stitch carefully: SC into the BACK loop and the FRONT loop of the pre-previous row only to achieve the textured effect.
  • πŸ’‘Cut and secure ends properly: pull out the end, strengthen and hide on the wrong side, then process with fire for polyester cord ends.

This Nymphs Bag pattern blends sturdy macrame cord with classic crochet shaping to create a chic, everyday handbag. Follow the row-by-row instructions and finishing tips to achieve a professional look with hardware and lining. Make one as a thoughtful gift or a beautiful treat for yourself. πŸ‘œβœ¨

You ask,

we answer.

FAQs

What size will the finished piece be?

The finished bag from the specified materials measures approximately 11 inches (27 cm) in length, 8 inches (20 cm) in height, and 4 inches (10 cm) in width.

Can I use different cord thickness or yarn for this pattern?

Yes, you can use different cord thicknesses, but the final size and structure will change; adjust your hook size accordingly and make a gauge swatch to match proportions.

Do I need prior crochet experience for this pattern?

This pattern is rated intermediate and assumes you are comfortable with single crochet, increases, decreases, and working into specific loops (back loop/front loop).

How long does this project typically take to complete?

This is a multi-day project that may take about 12-15 hours depending on your speed, experience, and how many finishing touches you add like lining and hardware.