🧢 Beautiful ✨ Detailed πŸ’ Adorable

Desert Crochet Cactus Amigurumi Pattern

Desert Crochet Cactus Amigurumi Pattern
4.7β˜… Rating
2-4 Hours Time Needed
4.1K Made This
βœ‚οΈ

Intermediate Level

Ideal for those with basic crochet experience, featuring slightly more advanced stitches and techniques to expand your skills.

⏱️

Bite-Sized Project

Finishes in 2-4 hoursβ€”perfect for an afternoon of creative relaxation.

🎁

Tiny Treasure

Small, sweet, and gift-worthy creations that fit perfectly in the palm of your hand with detailed charm.

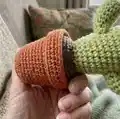
About This Desert Crochet Cactus Amigurumi Pattern

This pattern teaches you how to crochet a tiny terracotta-potted cactus complete with a soil base, cactus body, optional arms and little flowers. The design uses DK weight yarn and basic crochet stitches with a few shaping techniques to create charming details. Photographs accompany the steps so you can see how pieces are assembled for the best finish.

Desert Crochet Cactus Amigurumi Pattern crochet pattern - detailed view of completed project

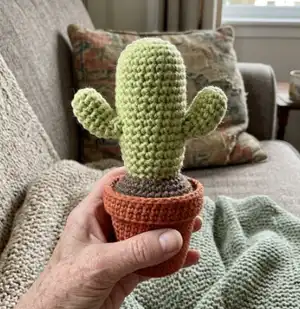
Great for gifting, desk decor or crafting practice, the cactus is compact and quick to make. You can customize colors, add pipe-cleaner arm shaping and include little flowers for a more playful look.

Why You'll Love This Desert Crochet Cactus Amigurumi Pattern

I absolutely love this pattern because it turns simple stitches into a cute, stylized cactus that brings personality to any space. I enjoy the balance between straightforward rounds and small shaping decisions that let you personalise each piece. The project is fast to make so I can gift several in an afternoon and experiment with different colors. It always brightens my desk and starts conversations when friends ask where I found such a sweet mini plant.

Desert Crochet Cactus Amigurumi Pattern step 1 - construction progress Desert Crochet Cactus Amigurumi Pattern step 2 - assembly progress Desert Crochet Cactus Amigurumi Pattern step 3 - details and accessories Desert Crochet Cactus Amigurumi Pattern step 4 - final assembly and finishing

Switch Things Up

I love how easy it is to change the look of this cactus by swapping colors; try a pale sage for a modern look or bright green for a playful style.

If you want a larger cactus, use a bulkier yarn and a larger hook β€” this will create a chunkier, more tactile piece.

To make a mini keychain version, use thinner yarn and a smaller hook, and attach a key ring instead of sewing the base to a pot.

Add pipe cleaners inside the arms for posability; I often bend them to create expressive shapes or a welcoming wave.

Try different flower colors and sizes for seasonal versions β€” pink for spring, white for a delicate winter bloom, or mixed brights for summer.

I sometimes embroider tiny spines with contrasting thread for a more realistic look; short straight stitches around the ribs work well.

Arrange several different cactus shapes together to make a mini collection; mixing tall, round and branching forms looks lovely on a windowsill.

Use metallic or variegated yarn for an artistic, decorative cactus that plays with light and texture.

For a weighted base that sits sturdier in the pot, add a small amount of dried beans or rice under the stuffing inside the soil piece (sealed in a small bag) before attaching to the pot.

You can also add felt leaves, little crocheted insects, or tags to personalize each cactus as a gift.

Common Mistakes & How to Fix Them

βœ— Not counting your stitches at the end of each round can lead to inconsistent shaping; count after every round and adjust immediately if you miss a stitch. βœ— Overstuffing the cactus or soil base makes pieces look lumpy and can distort the pot fit; stuff gradually and evenly, checking shape frequently. βœ— Skipping the invisible decrease technique will create visible gaps when closing pieces; work the invisible decrease in the front loops only as instructed for a neat finish. βœ— Forgetting to leave a sewing tail means you cannot securely attach pieces later; always fasten off leaving a long tail for sewing each piece in place. βœ— Attaching arms without pinning first can result in uneven placement and imbalance; pin arms in position and check symmetry before sewing.

Desert Crochet Cactus Amigurumi Pattern

Create a charming miniature crochet cactus to brighten any shelf or desk with this easy-to-follow pattern. You will make a soil base, a cuddly cactus body and optional arms and flowers using simple stitches. The pattern is photographed step-by-step so you can follow along with confidence and customize colors to suit your decor.

Intermediate 2-4 Hours

Materials Needed for Desert Crochet Cactus Amigurumi Pattern

β€” Main Fabric

  • 01
    Yarn A: 20g brown DK weight yarn (soil)
  • 02
    Yarn B: 20g green DK weight yarn (cactus body and arms)
  • 03
    Yarn C: small quantity of pink or white DK weight yarn (flowers) - optional
  • 04
    Small amounts of contrast DK yarn for additional flower colors (optional)

β€” Tools Required

  • 01
    Crochet hook size US 4 (3.5mm)
  • 02
    Stitch marker
  • 03
    Sewing needle
  • 04
    Yarn needle for weaving ends
  • 05
    Acrylic toy stuffing
  • 06
    Small terracotta plant pot – 6cm x 6.8cm x 4cm
  • 07
    Pipe cleaner (optional) for bendable arms
  • 08
    Scissors

Progress Tracker

0% Complete

β€” Soil :

Info :

The first step is to make the soil which will sit below the cactus in the miniature plant pot. Using yarn A:

Round 1 :

MR 6

Round 2 :

*Inc (12)

Round 3 :

*1 SC, Inc (18)

Round 4 :

1 SC, *Inc, 2 SC until last stitch, 1 SC (24)

Round 5 :

*3 SC, Inc (30)

Round 6 :

2 SC, *Inc, 4 SC until last 2 stitches, 2 SC (36)

Info :

Note: If your pot is larger continue increasing in this way until the circumference of the soil fits just inside the pot as pictured below.

Info :

At round 7:

Round 7-15 :

SC around (36)

Info :

Note: If your pot is larger continue until soil fits just inside the pot as pictured below.

Info :

Begin stuffing soil, continue stuffing as you go.

Round 16 :

2 SC, *Dec, 4 SC until last 2 stitches, 2 SC (30)

Round 17 :

*3 SC, Dec (24)

Round 18 :

1 SC *Dec, 2 SC until last stitch, 1 SC (18)

Round 19 :

*1 SC, Dec (12)

Round 20 :

*Dec (6)

Info :

FO.

β€” Body :

Info :

Using Yarn B:

Round 1 :

MR 6 (6)

Round 2 :

*Inc (12)

Round 3 :

*1 SC, Inc (18)

Round 4 :

1 SC, *Inc, 2 SC until last stitch, 1 SC (24)

Round 5-19 :

SC around (24)

Round 20 :

1 SC *Dec, 2 SC until last stitch, 1 SC (18)

Info :

FO – leave tail for sewing.

Info :

Stuff firmly.

β€” Arms (Make 2) :

Info :

Using Yarn B:

Round 1 :

MR 6 (6)

Round 2 :

*Inc (12)

Rounds 3-8 :

SC around (12)

Round 9 :

(for this last row stop working in rounds) turn and do not CH, SC 8.

Info :

FO – leave tail for sewing

Info :

Lightly stuff.

Info :

If you want the arms to have more of a bend, fold a short piece of pipe cleaner so it is the length of the arm. Place inside with the stuffing.

β€” Assembly :

Info :

Sew the body of the cactus to the soil at approximately round three of the soil pattern.

Info :

To sew the arms to the cactus. Place the arms with pins to the body approximately 6 rounds up from the bottom of the body of the cactus and on opposite sides.

Info :

Place the arms facing upwards, so row 9 is facing downwards.

Info :

Sew the arm of the cactus to the body of the cactus. If you have used pipe cleaner, once sewn in place bend the pipe cleaner to create an upwards curve.

Info :

Sew to the soil.

β€” Cactus (Flat panel method) :

Info :

Using yarn B:

Info :

CH 24

Row 1 :

In 2nd Loop from the hoop, SC, repeat for remaining 22 stitches, CH1 turn

Row 2 :

In 2nd loop from the hook, SC in the back looks only for all 23 stitches, CH 1 turn

Info :

Repeat row 2 until piece measures 11cm.

Info :

Weave through one side of the cactus, drawstring close as pictured

Info :

Sew up the side of the cactus by crocheting through the stem of the first row and the back loop of the last row.

Info :

Stuff firmly.

Info :

Weave the other side of the cactus as above and drawstring to close.

Info :

Sew to the soil.

β€” Flowers (Optional) :

Info :

Using Yarn C:

Round 1 :

MR 6

Info :

Change to Yarn D:

Round 2 :

SS to the first stitch, in the same stitch: 2 CH, 2 TR, 1 DC. For the remaining 5 stitches: SS to the next stitch, 2 CH 2 TR, 1 DC. SS to the first stitch.

Info :

FO.

Assembly Instructions

  • Sew the body of the cactus to the soil at approximately round three of the soil pattern, using the long tail left from the body FO to anchor it securely.
  • Position and pin the arms on opposite sides of the body about 6 rounds up from the bottom, with row 9 facing downwards, then sew each arm firmly in place.
  • If you added pipe cleaner to the arms, bend the pipe cleaner after sewing to create the desired upward curve and secure any exposed ends inside the stuffing.
  • Weave the flat cactus panel edges together by crocheting through the stem of the first row and the back loop of the last row, stuff firmly as you close.
  • Sew any optional flowers to the top of the cactus and secure all tails by weaving them into the body so the finished piece fits neatly into the terracotta pot.

Important Notes

  • πŸ’‘This pattern uses American crochet terminology; be sure to use the correct stitch names if you normally work in another system.
  • πŸ’‘If you are not familiar with the Magic Ring technique you can replace it with 2 chains and use the second chain from the hook as your magic ring (e.g. MR 5 = CH 2, in 2nd CH from hook 5 SC).
  • πŸ’‘The pattern uses an invisible decrease created by decreasing in the front loops only; practice this on a scrap to get a neat finish.
  • πŸ’‘Stuff gradually and evenly while shaping each piece to avoid lumps and maintain a smooth silhouette.

Thank you for choosing this tiny cactus patternβ€”i hope it brings a touch of handmade joy to your home! 🧢 Make a whole row of mini potted cacti to brighten a shelf or give as cheerful gifts. 🌡 Enjoy the process and have fun customizing colors and tiny flowers for a personal touch. ✨

You ask,

we answer.

FAQs

What size will the finished piece be?

The finished amigurumi measures approximately 8-12 cm tall depending on how much you stuff it and the exact dimensions of your terracotta pot.

Can I use different yarn weights for this pattern?

Yes, you can use different yarn weights, but this will affect the final size; choose an appropriate hook for your yarn and expect a change in scale.

Do I need prior crochet experience for this pattern?

This pattern is rated intermediate, so basic knowledge of crochet stitches (SC, Inc, Dec) and familiarity with working in rounds and magic ring are recommended.

How long does this project typically take to complete?

Most crocheters complete this project in 2-4 hours depending on experience and how many optional details (arms, flowers) you add.