🧢 Beautiful ✨ Detailed πŸ’ Adorable

Pearodactyl Amigurumi Pattern

Pearodactyl Amigurumi Pattern
3.9β˜… Rating
5-7 Hours Time Needed
2.1K Made This
βœ‚οΈ

Intermediate Level

Ideal for those with basic crochet experience, featuring slightly more advanced stitches and techniques to expand your skills.

⏱️

Weekend Treat

Takes 5-7 hours, making it an enjoyable project to finish over a couple of days.

🧸

Cute Companion

An adorable friend to cherish, handcrafted with love to bring comfort and joy for years to come.

About This Pearodactyl Amigurumi Pattern

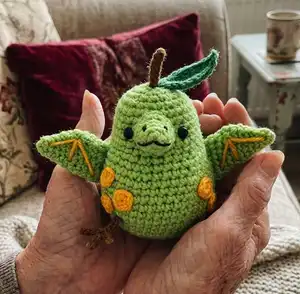
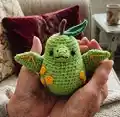
This pattern makes a playful pear-shaped bird called the Pearodactyl, worked in DK weight yarn with small pieces to assemble. It features a shaped body, two little wings, a crest, beak, leaf and stem, plus cheerful spots. Detailed rounds and photos help you place safety eyes and sew parts neatly.

Pearodactyl Amigurumi Pattern crochet pattern - detailed view of completed project

Suitable for crocheters comfortable with basic increases, decreases and invisible finishes. The finished toy measures approximately 11cm tall using the suggested yarn and hook.

Why You'll Love This Pearodactyl Amigurumi Pattern

I absolutely love this pattern because it blends a simple amigurumi shape with delightful character β€” a fruit-inspired friend that's both cute and unique. I enjoy how small details like the leaf, crest and spots add personality without needing complicated techniques. The pattern is satisfying to assemble; each piece feels like it's bringing the pear to life. I also love that it's made with DK yarn so it works up quickly but still has a neat, defined finish.

Pearodactyl Amigurumi Pattern step 1 - construction progress Pearodactyl Amigurumi Pattern step 2 - assembly progress Pearodactyl Amigurumi Pattern step 3 - details and accessories Pearodactyl Amigurumi Pattern step 4 - final assembly and finishing

Switch Things Up

I love to change colours to create different personalities for the Pearodactyl; try pale pastels for a soft nursery friend or bright neons for a playful look.

I often make a mini version by using sport weight yarn and a smaller hook to create keychain-sized Pearodactyls.

I recommend swapping the sunshine spots for tiny beads or safety buttons for a different texture and a bit of shine.

I sometimes embroider eyelashes or eyebrows for expressive faces β€” small changes in eye placement and mouth shape alter the expression dramatically.

For a cuddly, squishier version, use a bulkier DK or aran weight yarn and a larger hook to increase the overall size and softness.

I like to make outfits or tiny accessories like a scarf or hat β€” quick additions that personalize the toy and make lovely gifts.

Try using a variegated yarn for the body to get subtle colour shifts without extra sewing or colour changes.

Consider adding a small loop to the top of the stem for hanging on a bag or as an ornament if you want a decorative option.

I sometimes add wire to the legs for posability, or stuff the legs more firmly so the toy can stand on display.

If you want to simplify assembly, sew the spots on before attaching the wings so positioning is easier while the body is still open.

Common Mistakes & How to Fix Them

βœ— Skipping the safety eye placement step can ruin facial symmetry; insert safety eyes between rounds 24 - 25 five visible stitches apart and check placement before securing. βœ— Not stuffing as you go can create lumps and misshapen decreases; start adding stuffing early and stuff gradually while you work rounds 22-31. βœ— Using the wrong hook size will change the finished size and tension; use the recommended 2.5 mm hook for tight stitches and an 11 cm finished toy. βœ— Not leaving long tails to sew pieces together makes assembly difficult; cut yarn leaving long tails on small pieces so you can stitch them to the body easily. βœ— Forgetting to fold and stitch wings correctly will give an awkward shape; fold and stitch together as instructed, then embellish with yellow stitches on the front only.

Pearodactyl Amigurumi Pattern

Make a whimsical Pearodactyl amigurumi with this charming crochet pattern. You will love the playful pear-shaped body, tiny wings, and cute spotted details. Clear rounds and assembly notes guide you as you create this 11 cm tall collectible. Perfect for gifting or keeping as a bright handmade friend.

Intermediate 5-7 Hours

Materials Needed for Pearodactyl Amigurumi Pattern

β€” Main Fabric

  • 01
    Stylecraft Special DK - Kelly Green
  • 02
    Stylecraft Special DK - Grass Green
  • 03
    Stylecraft Special DK - Sunshine
  • 04
    Stylecraft Special DK - Gingerbread
  • 05
    Finished product measures approximately 11cm tall when using suggested yarn and hook

β€” Tools Required

  • 01
    Crochet hook size 2.5mm
  • 02
    Two 6mm safety eyes
  • 03
    Stitch markers
  • 04
    Yarn needle
  • 05
    Scissors
  • 06
    Fibrefill (polyester stuffing)
  • 07
    Black embroidery thread for nostrils and mouth

Progress Tracker

0% Complete

β€” Materials :

Info :

Stylecraft Special DK in Kelly Green, Grass Green, Sunshine and Gingerbread. 2.5 mm crochet hook. Two 6mm safety eyes. Stitch markers. Yarn needle. Fibrefill. Black embroidery thread.

Info :

If made using the suggested yarn and hook size, the finished product is 11cm tall.

β€” Abbreviations :

Infos :

Stitches are in US terms. MR = magic ring. ch = chain. st = stitch. sts = stitches. sc = single crochet. hdc = half double crochet. dc = double crochet. inc = increase. dec = decrease. FLO = front loop only. BLO = back loop only. slst = slip stitch. rep = repeat.

β€” Techniques :

Info :

How to close amigurumi invisibly: 1. Insert needle in the FLO of each stitch around 2. Pull tight to close 3. Insert needle through centre exiting a few rounds down 4. Weave in the end and admire your work!

Info :

How to decrease invisibly: 1. Insert hook into FLO of first stitch 2. Insert hook into FLO of next stitch 3. Yarn over and pull through two loops 4. Yarn over and pull through two loops again. Invisible decrease complete!

Info :

How to fold and stitch together: 1. Fold piece in half, insert hook through next stitch and corresponding stitch on the other side 2. Yarn over and pull through both stitches 3. Complete sc as normal and repeat for all stitches 4. Finished piece folded and stitched together!

β€” Body :

Round 1 :

6sc in MR (6)

Round 2 :

inc each st around (12)

Round 3 :

*1sc, inc* rep 6 times (18)

Round 4 :

*2sc, inc* rep 6 times (24)

Round 5 :

*3sc, inc* rep 6 times (30)

Round 6 :

*4sc, inc* rep 6 times (36)

Round 7 :

*5sc, inc* rep 6 times (42)

Round 8 :

*6sc, inc* rep 6 times (48)

Round 9 - 16 :

sc each st around (48) (8 rnds)

Round 17 :

*6sc, dec* rep 6 times (42)

Round 18 :

sc each st around (42)

Round 19 :

*5sc, dec* rep 6 times (36)

Round 20 :

sc each st around (36)

Round 21 :

*4sc, dec* rep 6 times (30)

Round 22 - 27 :

sc each st around (30) (6 rnds)

Info :

Insert safety eyes between rnds 24 - 25 five visible sts apart.

Info :

Start adding stuffing and continue to stuff as we decrease.

Round 28 :

*3sc, dec* rep 6 times (24)

Round 29 :

*2sc, dec* rep 6 times (18)

Round 30 :

*1sc, dec* rep 6 times (12)

Round 31 :

dec 6 times (6)

Info :

Fasten off and leave a long tail. Complete invisible close. Weave in ends. (photo 1)

β€” Wings (make two) :

Round 1 :

6sc in MR (6)

Round 2 :

sc each st around (6)

Round 3 :

*sc, inc* rep 3 times (9)

Round 4 :

sc each st around (9)

Round 5 :

*2sc, inc* rep 3 times (12)

Round 6 :

sc each st around (12)

Round 7 :

*3sc, inc* rep 3 times (15)

Round 8 :

sc each st around (15)

Round 9 :

dec, 5sc, inc, 5sc, dec (14)

Round 10 :

dec, 4sc, 2inc, 4sc, dec (14)

Info :

Fold and stitch together. Cut yarn leaving a long tail.

Info :

Using sunshine make three long sts on each wing making sure they are only visible on the front (photo 2).

β€” Crest :

Round 1 :

6sc in MR (6)

Round 2 :

*sc, inc* rep 3 times (9)

Round 3 :

sc each st around (9)

Round 4 :

*2sc, inc* rep 3 times (12)

Round 5 :

sc each st around (12)

Round 6 :

5sc, 2inc, 5sc (14)

Round 7 :

sc each st around (14)

Info :

Cut yarn leaving a long tail.

β€” Beak :

Round 1 :

6sc in MR (6)

Round 2 :

*sc, inc* rep 3 times (9)

Round 3 :

sc each st around (9)

Round 4 :

3sc, 3inc, 3sc (12)

Round 5 :

5sc, 2inc, 5sc (14)

Info :

Cut yarn leaving a long tail.

Info :

Using black embroidery floss, stitch two nostrils and a mouth to the beak. Crest and beak shown in (photo 3).

β€” Legs (make two) :

Item Name (P1) :

Using Gingerbread: Ch8, *slst in 2nd ch from hook, 2slst, ch4* rep 2 times. Slst in 2nd ch from hook, 2slst, now working back up the original ch, 4slst. Cut yarn leaving a long tail (photo 4)

β€” Stem :

Item Name (P1) :

Using Gingerbread: Ch7, slst in 2nd ch from hook, 5slst (6)

β€” Leaf :

Round 1 :

Using Kelly Green: ch10, sc in 2nd ch from hook, 2hdc, dc, dcinc, dc, 2hdc, work the following sts in the final st (sc, ch2, slst in 2nd ch from hook, sc)

Info :

Now working down the other side of the ch, 2hdc, dc, dcinc, dc, 2hdc, sc, slst to join (20). Cut yarn leaving a long tail.

Info :

Stem and leaf shown in (photo 5).

β€” Spots (make five) :

Round 1 :

Using Sunshine: 6sc in MR, slst to join

Info :

Cut yarn leaving a long tail (photo 6)

β€” Assembly :

Info :

We will use the long tails to attach everything to the body.

Info :

Lightly stuff the beak then sew between the eyes over rnds 23 - 27 (photo 7).

Info :

Lightly stuff the crest then sew to the back of the head directly opposite the beak over rnds 26 - 30 (photo 7).

Info :

Attach the stem and leaf to the centre/top of head (photo 8).

Info :

Join the wings either side of the body over rnds 15 - 21 (photo 9).

Info :

Attach the legs between rnds 11 - 12 approx 10 sts apart (photo 9).

Info :

Finally, sew the spots to the sides near each wing, three on one side, two on the other (photos 10 and 11).

Assembly Instructions

  • Lightly stuff the beak then sew it between the eyes over rounds 23 - 27 using the long tail from the beak (photo 7).
  • Lightly stuff the crest and sew it to the back of the head directly opposite the beak over rounds 26 - 30 using the long tail (photo 7).
  • Attach the stem and leaf to the centre/top of the head, positioning the leaf so it sits nicely behind the crest (photo 8).
  • Join the wings to either side of the body over rounds 15 - 21, folding each wing and stitching along the fold, then embroider three yellow stitches on the front of each wing (photo 9).
  • Attach the legs between rounds 11 - 12 approximately 10 stitches apart for balance and stability (photo 9).
  • Sew the spots to the sides near each wing: three on one side and two on the other, spacing evenly (photos 10 and 11).

Important Notes

  • πŸ’‘Insert safety eyes between rounds 24 - 25, five visible stitches apart to keep the face symmetrical.
  • πŸ’‘Start stuffing early and continue stuffing as you decrease to maintain even shaping and prevent lumps.
  • πŸ’‘Leave long tails when cutting yarn on small pieces so you can use them to sew each piece securely to the body.
  • πŸ’‘Use black embroidery thread for nostrils and mouth details and secure knots neatly on the inside of the beak piece.
  • πŸ’‘Pin parts in place before sewing to check placement and symmetry before making permanent stitches.

Bring a little handmade joy to your home with this playful Pearodactyl β€” a pear-shaped bird full of character and charm. Make it as a sweet gift or a cheerful shelf sitter that will brighten any room. Enjoy the slow, rewarding process of stitching together all the tiny details and watching your pear come to life. 🧢🍐

You ask,

we answer.

FAQs

What size will the finished piece be?

The finished amigurumi measures approximately 11 cm tall when using the recommended Stylecraft DK yarn and a 2.5 mm hook.

Can I use different yarn weights for this pattern?

Yes, you can use different yarn weights but this will change the final size; choose an appropriate hook for the yarn and expect a smaller or larger toy depending on weight.

Do I need prior crochet experience for this pattern?

This pattern is rated intermediate, so familiarity with sc, increases, decreases and invisible finish techniques is recommended for best results.

How long does this project typically take to complete?

Most crocheters complete this project in 5-7 hours, though time may vary based on experience level and how quickly you assemble small parts.

Where should I place the safety eyes?

Insert the safety eyes between rounds 24 and 25, spaced about five visible stitches apart to achieve the correct facial placement.