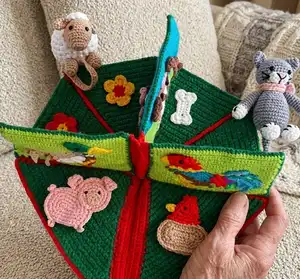
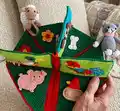
Create a charming interactive quiet book filled with farm animal pages and small 3D toys. This pattern walks you through each page chart, individual toy pieces, and the assembly so you can make a durable, washable activity book for toddlers. With clear color keys, step-by-step charts, and sewing instructions, you will enjoy bringing each animal to life. Perfect as a special handmade gift to encourage tactile play and learning.
Progress Tracker
0% Complete
— Materials :
Info :
Yarn: Alize Bahar (100% Cotton Merserize, 3.53 oz = 274 yds/100 g = 260 m). Colors used include 55, 612, 368, 611, 179, 60, 143, 21, 216, 352, 118 and 56 (white, acid, camel, crayon blue, chestnut, black, powder, grey, yellow, tangerine, green and red). Hook size – I use 2.00 mm. Fiberfill. 2 pairs of safety eyes (5 mm). White Velcro. Felt A4 (2 sheets). Tapestry needle, scissors, pins, stitch markers. Suggested substitutes for Alize Bahar: Catania Schachenmayr original, Catona Scheepjes, Must-Have Yarn and Colors.
— Abbreviations :
Infos :
st = Stitch. ch = Chain stitch. sl st = Slip stitch. sc = Single crochet. hdc = Half double crochet. dc = Double crochet. tr = Treble crochet. rnd = Round. inc = Increase. dec = Invisible decrease. BLO = Back loop only. FLO = Front loop only. sc2tog = Single crochet 2 stitches together. FO = Fasten off.
— Tips :
Infos :
Each page is worked separately and at the end the pages are joined together to form the quiet book. I recommend using the intarsia crochet method to use two or more different colors in each row; it allows neat colorwork and is less complicated than it looks. The most important thing: 1 square on the chart is 1 sc. When you work the right side of your page all tails should be on the wrong side of your work and you should read the chart from right to left. When you work the wrong side of your page all tails should be on the wrong side of your work, in front of you and you should read the chart from left to right.
Infos :
To make a neat color change: as you make the last stitch in the old color, pause before the last step of that stitch; for the final 'yarn over and draw through all loops on the hook', substitute the new yarn so you draw the new yarn through your loops. How to work invisible decrease: insert the hook into front loop of first stitch, insert the hook into front loop of next stitch, yarn over and pull through first two loops on hook, now you have two loops left on hook – yarn over and draw through both loops.
— Page 1 - Mouse :
Info :
Color key: Powder (143). Grey (21). Acid (612). Crayon blue (611).
Info :
Start in acid (color 612) and ch 41.
Row 1 :
sc in the 2nd ch from the hook, sc in next 39 ch [40]
Row 2 :
turn, 1 lifting ch, sc in all 40 st [40]
Row 3 :
turn, 1 lifting ch, 19 sc (acid), 1 sc (powder), 20 sc (acid) [40] (It's the right side of your work)
Row 4 :
turn, 1 lifting ch and continue according to the chart from left to right, fasten off after Row 40.
Eye – black (color 60) :
Start 6 sc in a magic ring, sl st, fasten off, leaving a tail for sewing.
Nose – powder (color 143) :
Start 6 sc in a magic ring, sl st, fasten off, leaving a tail for sewing.
Front paw – powder (color 143) :
Rnd 1: ch 4. Rnd 2: 3 sc in the 2nd ch from the hook, sc in next ch, 3 sc in the last ch, turn and continue working on the other side of the chain, sc in next st, sl st [8] Fasten off, leaving a tail for sewing.
Hind paw – powder (color 143) :
Rnd 1: ch 5. Rnd 2: 3 sc in the 2nd ch from the hook, sc in next 2 ch, 3 sc in the last ch, turn and continue working on the other side of the chain, sc in next 2 st, sl st [10] Fasten off, leaving a tail for sewing.
First ear – grey (color 21) :
Rnd 1: start 6 sc in a magic ring [6]. Rnd 2: inc 2 times, (2 hdc in next st) repeat 2 times, inc 2 times, sl st [12] Fasten off, leaving a tail for sewing.
Second ear – powder (color 143) :
Rnd 1: start 6 sc in a magic ring [6]. Rnd 2 [Grey]: inc 2 times, (2 hdc in next st) repeat 2 times, inc 2 times, sl st [12] Fasten off, leaving a tail for sewing.
Cheese – yellow (color 216) :
Row 1: ch 4. Row 2: sc in the 2nd ch from the hook, sc in next 2 ch [3]. Row 3: turn, 1 lifting ch, inc, sc in next 2 st [4]. Row 4: turn, 1 lifting ch, inc, sc in next 3 st [5]. Row 5: turn, 1 lifting ch, inc, sc in next 4 st [6]. Row 6: turn, 1 lifting ch, inc, sc in next 5 st [7]. Row 7: turn, 1 lifting ch, inc, sc in next 6 st [8]. Row 8: turn, 1 lifting ch, inc, sc in next 7 st [9]. Row 9: turn, 1 lifting ch, inc, sc in next 8 st [10]. Row 10: turn, 1 lifting ch, inc, sc in next 9 st [11]. Row 11: turn, 1 lifting ch, sc in all 11 st [11]. Row 12: turn, 1 lifting ch, sc2tog, sc in next 7 st, sc2tog [9]. Row 13: turn, 1 lifting ch, sc2tog, sc in next 5 st, sc2tog [7]. Rnd 14: turn, 1 lifting ch, sc across the whole shape, sl st, fasten off, leaving a tail for sewing. [TIP: You must work 2 sc in 1 st in the corners]
Info :
Sewing the parts on the page: 1. Eye, Nose, Ears (the colored ear only at the base) – photo 1; 2. Paws, Cheese – photo 2; 3. Use tangerine (color 352) to make surface slip stitches and French knots on the cheese - from photo 3 to photo 10; 4. Use powder (color 143) and surface slip stitches to express the texture of the tail and make it pop up – photo 11; 5. Use grey and surface slip stitches for the paw – photo 12.
Tips :
How to Make Surface Slip Stitches: 1. Insert your hook through your work. 2. Pull up a loop. 3. Insert your hook into the next 'hole'. 4. Yarn over, pull through your work and then pull through the loop on your hook, completing your slip stitch.
— Page 2 - Dog :
Info :
Color key: Acid (612). Camel (368). Crayon blue (611). Chestnut (179). White (55).
Info :
Start in acid (color 612) and ch 41.
Row 1 :
sc in the 2nd ch from the hook, sc in next 39 ch [40]
Row 2 - 5 :
turn, 1 lifting ch, sc in all 40 st [40]
Row 6 :
turn, 1 lifting ch, 17 sc (acid), 3 sc (white), 3 sc (camel), 7 sc (white), 10 sc (acid) [40] (It's the wrong side of your work)
Row 7 :
turn, 1 lifting ch and continue according to the chart from right to left, fasten off after Row 40.
Muzzle – white (color 55) :
Rnd 1: ch 5. Rnd 2: 3 sc in the 2nd ch from the hook, sc in next 2 ch, 3 sc in the last ch, turn and continue working on the other side of the chain, sc in next 2 st [10]. Rnd 3: (inc 3 times, sc in next 2 st) repeat 2 times, sl st [16]. Fasten off, leaving a tail for sewing.
Front paws – white (color 55) – 2 pieces :
Rnd 1: ch 4. Rnd 2: 3 sc in the 2nd ch from the hook, sc in next ch, 3 sc in the last ch, turn and continue working on the other side of the chain, sc in next st, sl st [8]. Fasten off, leaving a tail for sewing.
Hind paw – white (color 55) :
Rnd 1: ch 5. Rnd 2: 3 sc in the 2nd ch from the hook, sc in next 2 ch, 4 hdc in the last ch, turn and continue working on the other side of the chain, sc in next 2 st, sl st [11]. Fasten off, leaving a tail for sewing.
Eyes – black (color 60) – 2 pieces :
Start 6 sc in a magic ring, sl st, fasten off, leaving a tail for sewing.
Nose – chestnut (color 179) :
Start 3 sc in a magic ring, fasten off, leaving a tail for sewing.
Ears – chestnut (color 179) – 2 pieces :
Rnd 1: ch 10. Rnd 2: 3 sc in the 2nd ch from the hook, sc in next 3 ch, hdc in next 3 ch, dc in next ch, 5 dc in last ch, turn and continue working on the other side of the chain, dc in next st, hdc in next 3 st, sc in next 3 st [22]. Rnd 3: inc, sc in next st, inc, sc in next 6 st, hdc in next 2 st, 3 hdc in next st, hdc in next st, 3 hdc in next st, hdc in next 2 st, sc in next 6 st, sl st, fasten off, leaving a tail for sewing.
Tail – chestnut (color 179) :
Row 1: ch 8. Row 2: sl st in the 2nd ch from the hook, inc 3 times, sc in next 3 ch, fasten off, leaving a tail for sewing.
Info :
Sewing the parts on the page: 1. Muzzle, Nose, Eyes – photo 1; 2. Ears (only at the base) – photo 2; 3. Paws, Tail (only at the base) – photo 3.
— Page 3 - Horse :
Info :
Color key: Acid (612). Camel (368). Green (118). Crayon blue (611). Chestnut (179).
Info :
Start in green (color 118) and ch 41.
Row 1 :
sc in the 2nd ch from the hook, sc in next 39 ch [40]
Row 2 :
turn, 1 lifting ch, sc in all 40 st [40]
Row 3 :
turn, 1 lifting ch, 39 sc (green), 1 sc (acid) [40] (It's the right side of your work)
Row 4 :
turn, 1 lifting ch and continue according to the chart from left to right, fasten off after Row 40.
Head – camel (color 368) :
Row 1: start 4 sc in a magic ring [4]. Row 2: turn, 1 lifting ch, sc in all 4 st [4]. Row 3 [chestnut]: turn, 1 lifting ch, sc in all 4 st [4]. Row 4: turn, 1 lifting ch, inc, sc in next 2 st, inc [6]. Row 5: turn, 1 lifting ch, sc in all 6 st [6]. Row 6: turn, 1 lifting ch, inc, sc in next 5 st [7]. Row 7: turn, 1 lifting ch, inc, sc in next 6 st [8]. Row 8: turn, 1 lifting ch, inc, sc in next 7 st [9]. Row 9: turn, 1 lifting ch, inc, sc in next 8 st [10]. Row 10: turn, 1 lifting ch, sc2tog, sc in next 6 st, sc2tog [8]. Row 11: turn, 1 lifting ch, sc2tog, sc in next 4 st, sc2tog, ch 4, sl st in the 2nd ch from the hook, sc in next 2 ch, sl st in the base, fasten off, leaving a tail for sewing.
Mane – camel (color 368) :
Row 1: ch 31. Row 2: sc in the 2nd ch from the hook, sc in next 17 ch, (2 sc in next ch) repeat 12 times, fasten off, leaving a tail for sewing.
Eye – black (color 60) :
Start 2 sc in a magic ring, fasten off, leaving a tail for sewing.
Hooves – black (color 60) – 4 pieces :
Start 3 sc in a magic ring, fasten off, leaving a tail for sewing.
Ear – chestnut (color 179) :
Row 1: ch 4. Row 2: sl st in the 2nd ch from the hook, sc in next ch, hdc in next ch, fasten off, leaving a tail for sewing.
Info :
Sewing the parts on the page: 1. Head – photo 1; 2. Mane – photo 2; 3. Eye, Ear - photo 3; 4. Hooves – photo 4; 5. Use camel and surface slip stitches for the tail (2 rows) – photo 5.
— Page 4 - Cow :
Info :
Color key: Powder (143). Acid (612). Camel (368). Green (118). Crayon blue (611). Chestnut (179).
Info :
Start in green (color 118) and ch 41.
Row 1 :
sc in the 2nd ch from the hook, sc in next 39 ch [40]
Row 2 - 3 :
turn, 1 lifting ch, sc in all 40 st [40]
Row 4 :
turn, 1 lifting ch, 15 sc (green), 2 sc (acid), 11 sc (green), 4 sc (acid), 8 sc (green) [40] (It's the wrong side of your work)
Row 5 :
turn, 1 lifting ch and continue according to the chart from right to left, fasten off after Row 40.
Head – camel (color 368) :
Rnd 1: start 6 sc in a magic ring [6]. Rnd 2: inc 6 times [12]. Rnd 3: (sc, inc) repeat 6 times [18]. Rnd 4: [camel] (sc in next 2 st, inc) repeat 2 times, [chestnut] sc in next 2 st, inc, [camel] (sc in next 2 st, inc) repeat 3 times [24]. Rnd 5: [camel] sc in next 3 st, inc, sc in next 3 st, [chestnut] inc, sc in next 3 st, inc, [camel] sc in next 2 st, [chestnut] sc, inc, sc in next 2 st, [camel] sc, inc, sc in next 3 st, inc [30]. Rnd 6: [camel] sc in next 3 st, sl st, fasten off, leaving a tail for sewing.
Hooves – black (color 60) – 4 pieces :
Start 3 sc in a magic ring, fasten off, leaving a tail for sewing.
Eyes – black (color 60) – 2 pieces :
Start 2 sc in a magic ring, fasten off, leaving a tail for sewing.
Horns – chestnut (color 179) – 2 pieces :
Row 1: ch 5. Row 2: sl st in the 2nd ch from the hook, (2 sc in next ch) repeat 2 times, 2 hdc in next ch, fasten off, leaving a tail for sewing.
Ears – camel (color 368) – 2 pieces :
Row 1: ch 4. Row 2: sc in the 2nd ch from the hook, hdc in next 2 ch, fasten off, leaving a tail for sewing.
Muzzle – powder (color 143) :
Rnd 1: ch 5. Rnd 2: 3 sc in the 2nd ch from the hook, sc in next 2 ch, 3 sc in the last ch, turn and continue working on the other side of the chain, sc in next 2 st [10]. Rnd 3: (inc 3 times, sc in next 2 st) repeat 2 times, sl st [16]. Fasten off, leaving a tail for sewing.
Info :
Sewing the parts on the page: 1. Head – photo 1; 2. Muzzle, Eyes – photo 2; 3. Horns (only at the base) – photo 3; 4. Ears (only at the base) – photo 4; 5. Hooves – photo 5; 6. Use camel and surface slip stitches for the tail – photo 6.
— Page 5 - Duck :
Info :
Color key: White (55). Acid (612). Tangerine (352). Camel (368). Green (118). Chestnut (179). Black (60).
Info :
Start in acid (color 612) and ch 41.
Row 1 :
sc in the 2nd ch from the hook, sc in next 39 ch [40]
Row 2 - 4 :
turn, 1 lifting ch, sc in all 40 st [40]
Row 5 :
turn, 1 lifting ch, 20 sc (acid), 6 sc (tangerine), 14 sc (acid) [40] (It's the right side of your work)
Row 6 :
turn, 1 lifting ch and continue according to the chart from left to right, fasten off after Row 40.
Head – green (color 118) :
Rnd 1: start 6 sc in a magic ring [6]. Rnd 2: inc 6 times [12]. Rnd 3: (sc, inc) repeat 6 times [18]. Rnd 4: (sc, inc, sc) repeat 6 times [24]. Row 5: sc in next 2 st, sl st, fasten off, leaving a tail for sewing.
Beak – yellow (color 216) :
Rnd 1: ch 8. Rnd 2: sl st in the 2nd ch from the hook, sc in next 2 ch, hdc in next 2 ch, dc, 2 dc in the last ch, ch 3, sl st in the same ch, 3 sc in the same ch, sc in next 4 st, sl st, fasten off, leaving a tail for sewing.
Eye – black (color 60) :
Start 2 sc in a magic ring, fasten off, leaving a tail for sewing.
Feathers – camel (color 368) – 4 pieces :
Row 1: ch 8. Row 2: sc in the 2nd ch from the hook, hdc, dc, tr, dc, hdc, sc, fasten off, leaving a tail for sewing.
Info :
Sewing the parts on the page: 1. Head – photo 1; 2. Beak, Eye – photo 2; 3. Feathers and details – photo references in the PDF.
— Finishing & Assembly :
Info :
Each page is finished after sewing all parts, surface slip stitches, and French knots. Pages are joined together at the end to form the quiet book. Add Velcro and felt pieces as needed for closures and interactive elements. The finished book measures approximately 15 cm (5.9 in) square. The interactive book is safe and washable.
This charming farm animals quiet book brings tactile play and storytelling together in one handcrafted piece. Perfect for gifting to toddlers or displaying in a nursery, each page is bursting with color, texture, and tiny details to discover. Make it your own with color choices, felt accents, and little sewn toys for endless play. 🧶🐑✨